User Guide
- 0. How to use this guide
- 1. Quick start
- 2. Features
- 3. FAQ
- 4. Glossary
Plannit is an all-in-one application that streamlines the execution of module deliverables by empowering NUS students with the ability to manage tasks, links and module-mates (i.e., students in the same module) to increase their productivity.
Plannit will be the go-to platform for them to access all modules links and information without needing to tediously navigate through multiple websites. Students can also use it to track their tasks for each module with this application so that they do not have to worry about unintentionally forgetting their tasks.
In addition, Plannit allows tracking of student contacts by module. Students do not have to worry about forgetting which friend takes which module.
Plannit is optimized for use via a Command Line Interface (CLI) while still having the benefits of a Graphical User Interface (GUI). If you can type fast, Plannit can help you track your module information and tasks faster than traditional GUI apps!
0. How to use this guide
This guide is targeted at new users who are looking at learning more about our app.
- If this is your very first time using the application, welcome! You may head over to the quick start section to begin your journey with us!
- If you already have a specific feature in mind, you can check out the command summary section.
- Throughout this guide, you will encounter the icons
 ,
,
 ,
,  ,
,  . Their meanings are as follows:
| Icon | Meaning |
|---|---|
| A relevant tip which you may find helpful. | |
| Information that you must take note of when using a specific feature. | |
| A feature related to the section you are currently looking at. | |
| A disclaimer related to the section you are currently looking at. |
1. Quick start
-
Ensure you have Java
11or above installed in your computer. -
Download the latest
plannit.jarhere. -
Copy the file to the folder you want to use as the home folder for Plannit. In other words, the folder which
plannit.jaris in will be the folder in which Plannit will store its data. -
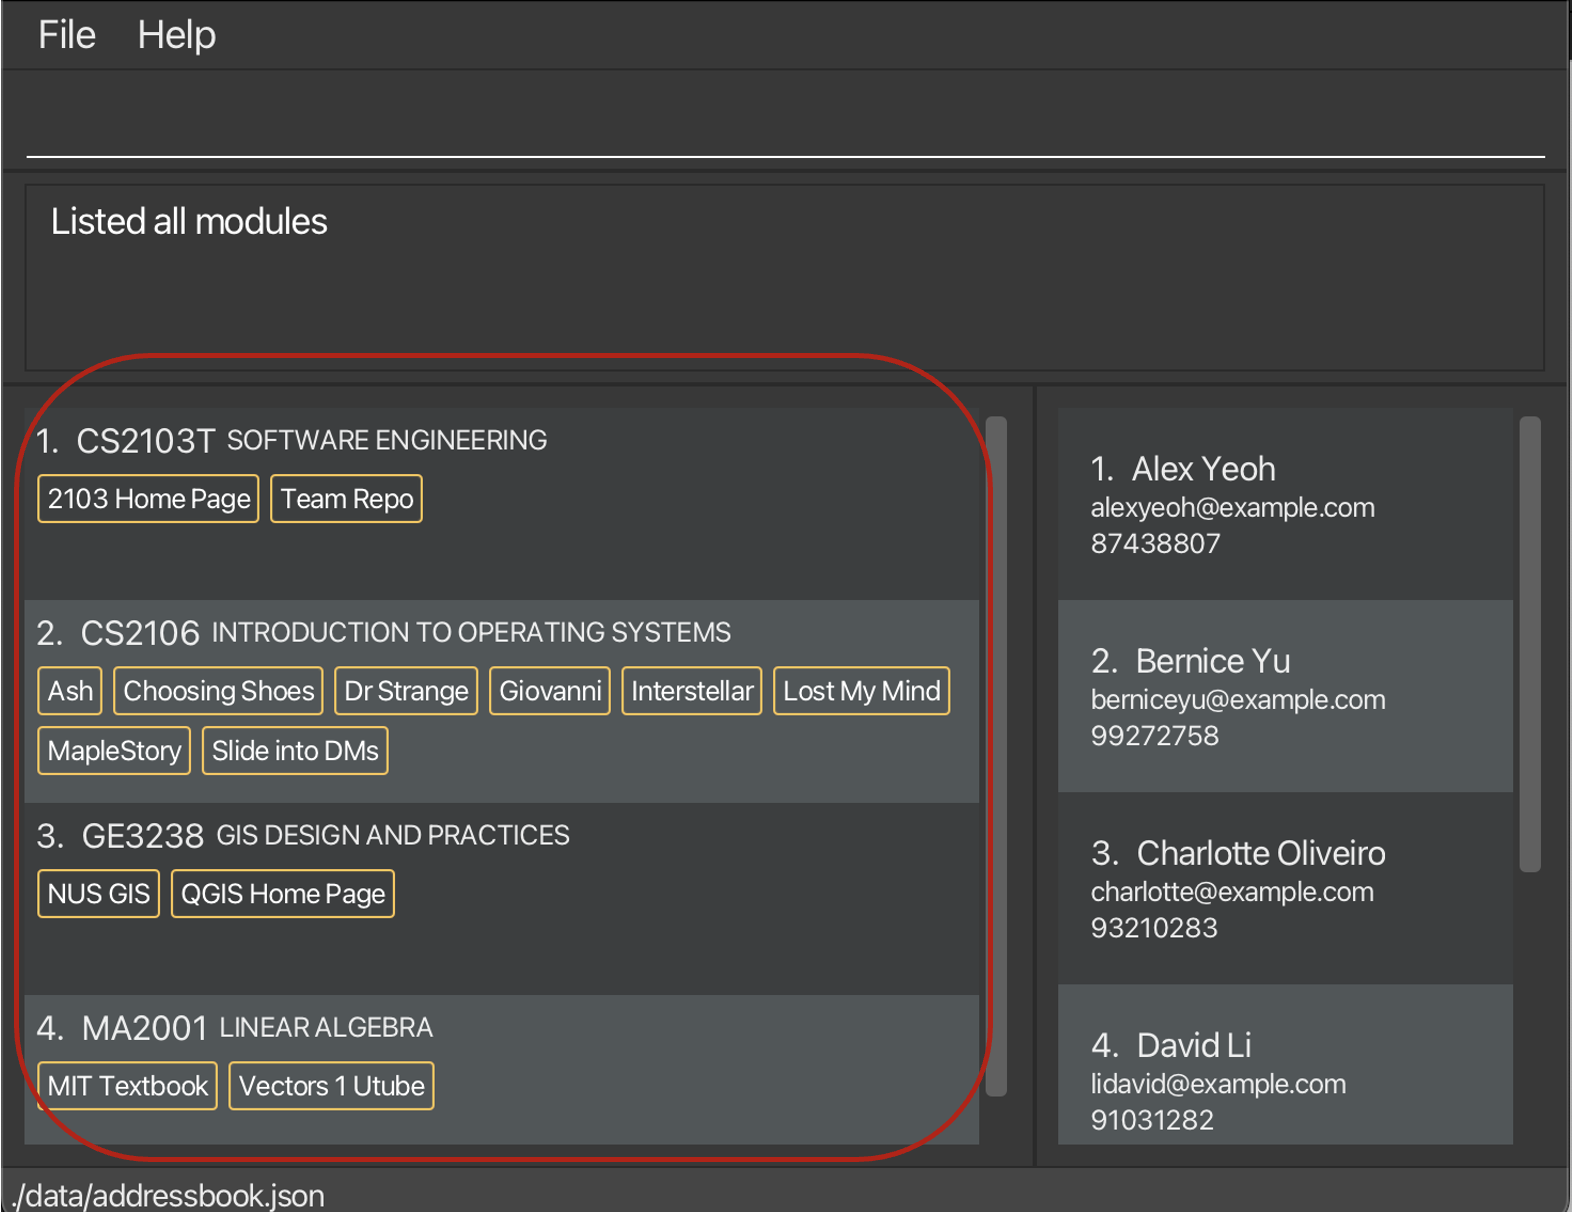
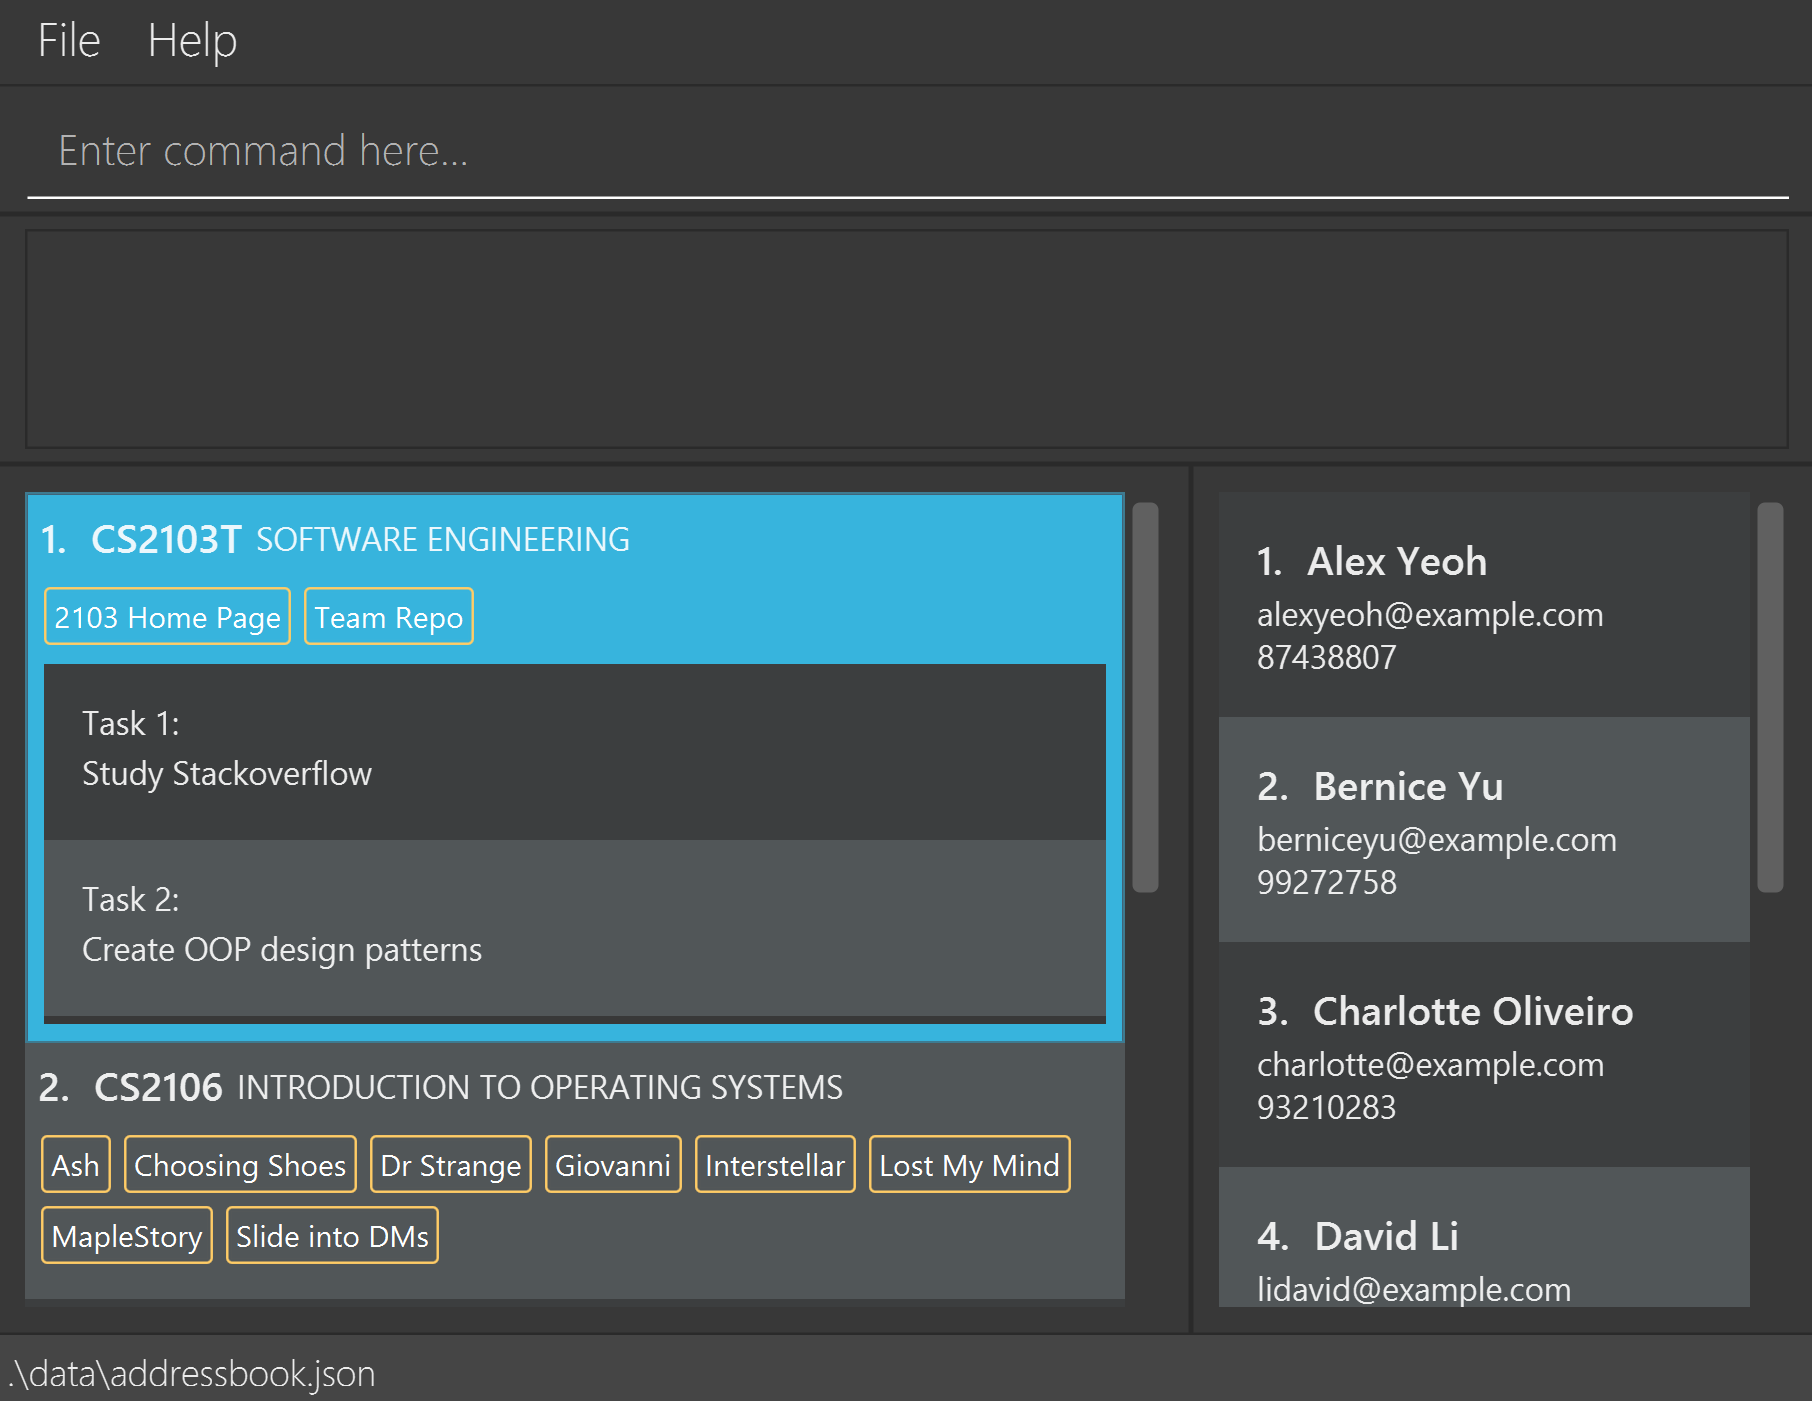
Double-click the file to start the app. The window below should appear in a few seconds.
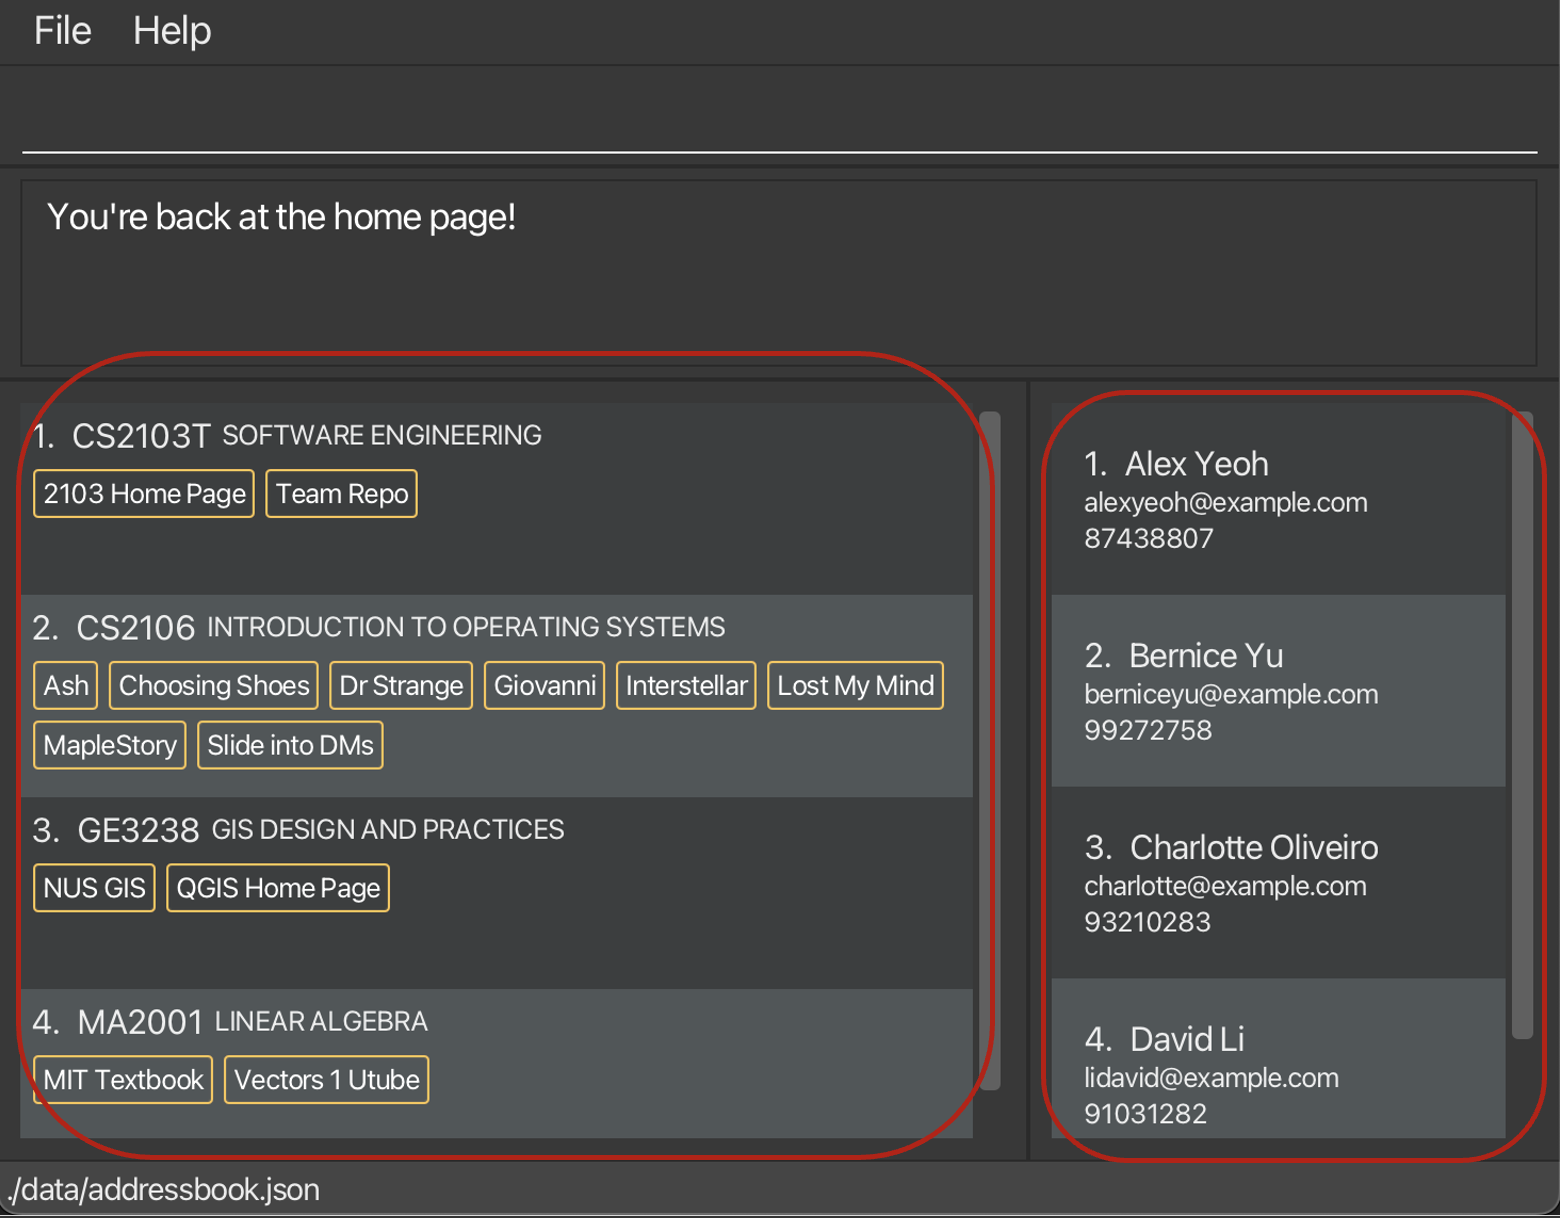
Screenshot of Plannit Description of labels 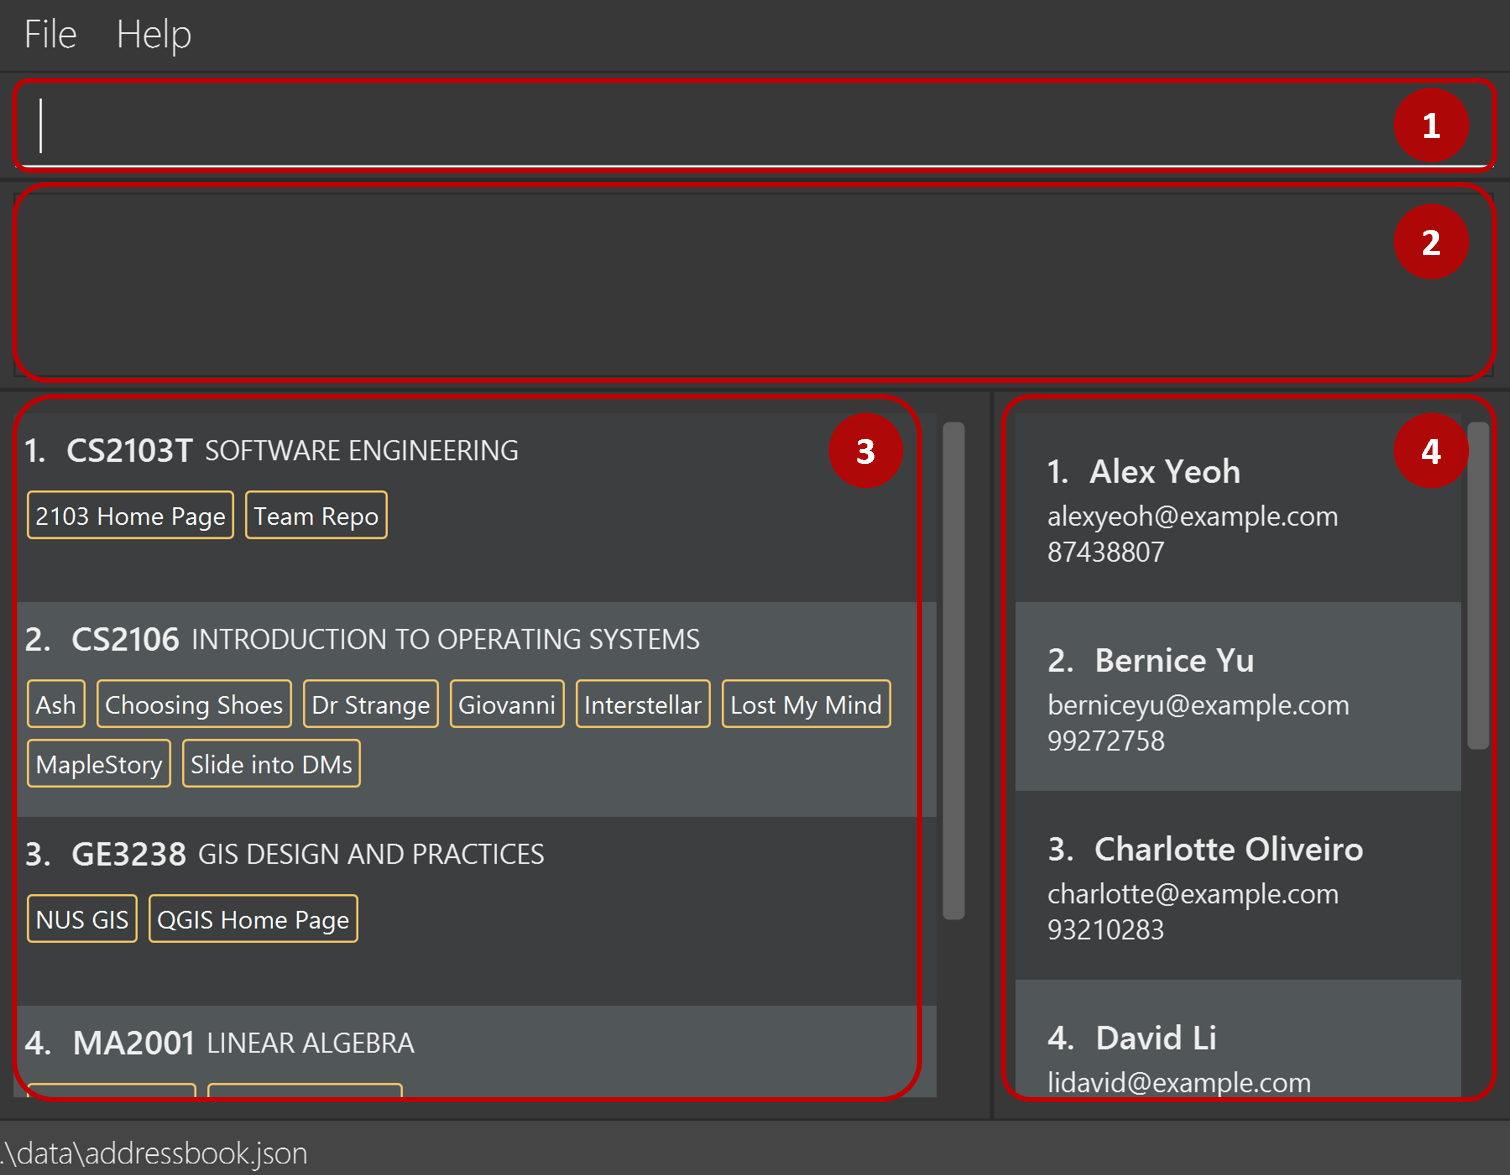
- Command box
- Result display
- Module list
- Person list
-
Type the command in the command box and press Enter to execute it. e.g.
add-module m/CS2103T. For more commands, you may refer to the Command summary. Alternatively, head over to Features to find the details of each command. -
After a command has been executed, a message will be displayed in the result display to indicate whether the command’s execution has been successful.
1.1. Command summary
| Action | Format | Short Description |
|---|---|---|
| Add module | add-module m/MODULE_CODE [t/MODULE_TITLE] |
Add module with a module code and optional module title |
| Delete module | delete-module m/MODULE_CODE |
Delete module by module code |
| Edit module | edit-module INDEX ([m/MODULE_CODE] [t/MODULE_TITLE]) |
Edit module belonging to the specified index currently displayed on the screen |
| *Find module | find-module KEYWORD |
Find module that starts with specified keyword in home page |
| *List module | list-module |
List all modules in home page after finding |
| Add task | add-task m/MODULE_CODE td/TASK_DESCRIPTION |
Add task with specified module code and task description |
| Delete task | delete-task m/MODULE_CODE tn/TASK_NUMBER |
Delete task corresponding to specified task number of specified module code |
| Swap task | swap-task m/MODULE_CODE ts/FIRST_TASK_NUMBER SECOND_TASK_NUMBER |
Swap the order of tasks in the task list of a specified module |
| Add link | add-link m/MODULE_CODE l/LINK_URL la/LINK_ALIAS |
Add link URL with an alias to a module by its specified module code |
| Delete link | delete-link m/MODULE_CODE la/LINK_ALIAS |
Delete link URL from a module by its specified module code and alias |
| Open link | open-link m/MODULE_CODE la/LINK_ALIAS |
Open link URL from a module by its specified module code and alias |
| Add person | add-person n/NAME e/EMAIL p/PHONE_NUMBER |
Add contact with specified name, email, and phone number |
| Add person to module | add-person-to-module m/MODULE_CODE n/NAME |
Add person with specified name to the module with the specified module code |
| Delete person | delete-person n/NAME |
Delete contact belonging to the specified name |
| Delete person from module | delete-person-from-module m/MODULE_CODE n/NAME |
Delete person with specified name from a module with specified module code |
| Edit person | edit-person INDEX ([n/NAME] [e/EMAIL] [p/PHONE_NUMBER]) |
Edit contact belonging to the specified index currently displayed on the screen |
| *Find person | find-person KEYWORD |
Find contacts that starts with specified keyword |
| *List person | list-person |
List all contacts |
| Goto | goto MODULE_CODE |
Navigate to specified module page |
| Home | home |
Navigate to the home page |
| Clear | clear |
Purges all data |
| Help | help |
View help |
| Exit | exit |
Exit the program |
Features marked with * can only be utilised when you are at the home page.
2. Features
![]() Notes about the command format:
Notes about the command format:
-
Prefixes are used to separate your input for different fields.
e.g. inadd-person n/Amy e/amy@gmail.com p/91234567,n/,e/, andp/are the prefixes used to differentiate and identify your input for the three different fields. -
Words in
UPPER_CASEare the parameters to be supplied by you.
e.g. inadd m/MODULE,MODULEis a parameter which can be used asadd m/MODULE. -
Items in square brackets are optional.
e.g.n/NAME [e/EMAIL]can be used asn/John Doe e/john@u.nus.eduor asn/John Doe. -
*after a set of square brackets means that it can be used multiple times.
e.g.[la/LINK_ALIAS]*can be used asla/google la/facebook la/luminusor just asla/google. -
A round bracket surrounding multiple square brackets indicate a need for at least one of the items in square brackets to be present.
e.g.([n/NAME] [e/EMAIL] [p/PHONE_NUMBER])requires at least one of eithern/NAME,e/EMAIL, orp/PHONE_NUMBERto be present. -
Parameters can be in any order.
e.g. if the command specifiesn/NAME p/PHONE_NUMBER,p/PHONE_NUMBER n/NAMEis also acceptable. -
If a parameter is expected only once in the command but you specified it multiple times, only the last occurrence of the parameter will be taken.
e.g. if you specifyp/81234123 p/99999999, onlyp/99999999will be taken. -
Any parameter in commands that do not take in parameters (such as
home,list-module,list-person,clear,help, andexit) will be ignored.
e.g. if the command specifieshome 123, it will be interpreted ashome.
2.1. Modules
In Plannit, you can organise tasks and links by academic module. You can also add study buddies to a module so that you can keep track of who could potentially be your study buddy.
2.1.1. Add module
You can add a module into Plannit. To prepare for the modules in the upcoming semester, you can add your list of modules, one by one, into Plannit.
This command will require one prefix, and another optional prefix:
| Field | Prefix | Constraints |
|---|---|---|
| Module Code | m/ |
|
| Module Title (Optional) | t/ |
Can be any string of characters |
Format: add-module m/MODULE_CODE [t/MODULE_TITLE]
- Module code will be automatically treated as uppercase. For example,
cs1231swill be treated asCS1231S. - If provided module title is empty, then a module without a title will be added to Plannit.
- You cannot add a duplicate module code.
Module codes in Plannit are case-insensitive, as opposed to person names which are case-sensitive.
Examples:
add-module m/CS2104
OR
add-module m/CS2104 t/
In either of the above examples, we are adding a module CS2104 without a title.
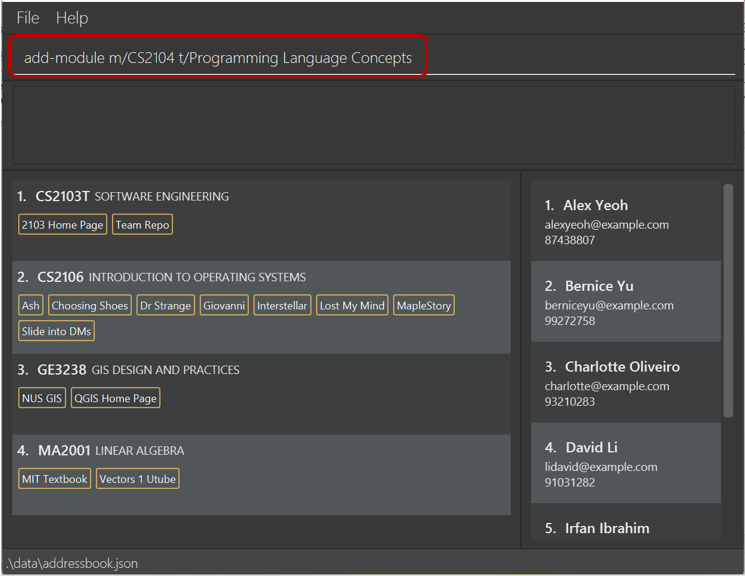
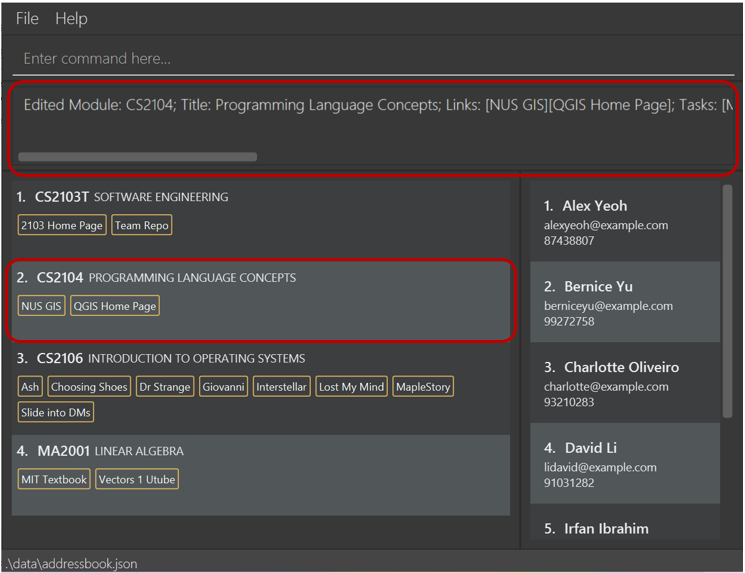
add-module m/CS2104 t/Programming Language Concepts
In the above example, we are adding a module CS2104 which has the title Programming Language Concepts.
Here’s a screenshot of Plannit before and after executing the command:
| Before executing the command | After executing the command |
|
Enter the command into the command box and hit |
A message will appear indicating that |
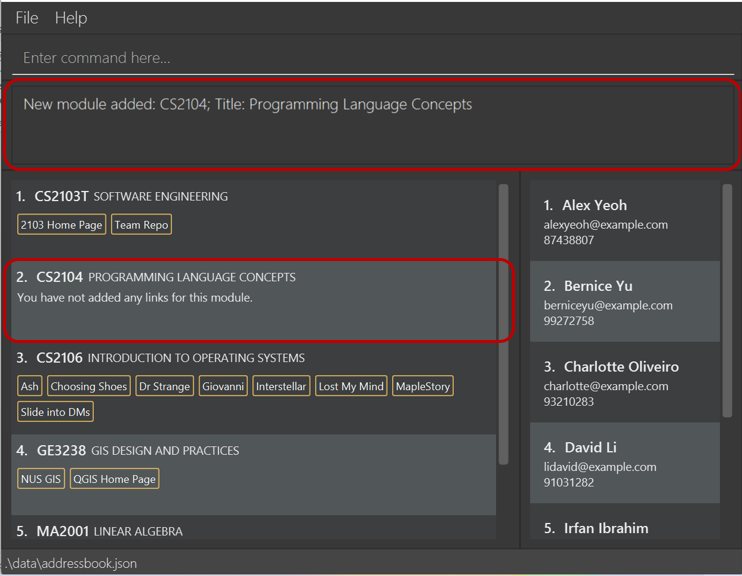
Adding a module will bring you back to the home page.
2.1.2. Delete module
You can delete the module with the indicated module code from Plannit. This could be useful at the end of the semester when you would want to do some cleanup and prepare for the modules for next semester.
This command will require one prefix:
| Field | Prefix | Constraints |
|---|---|---|
| Module Code | m/ |
|
Format: delete-module m/MODULE_CODE
- Module code must correspond to a currently displayed module on screen (case-insensitive).
Example:
delete-module m/CS2104
In the above example, we are deleting module CS2104 from Plannit.
Here’s a screenshot of Plannit before and after executing the command:
| Before executing the command | After executing the command |
|
Enter the command into the command box and hit |
A message will appear indicating that |

Deleting a module will bring you back to the home page.
2.1.3. Edit module
You can edit a module on Plannit using the edit-module command. In this way, you can modify module
titles and descriptions without having to delete and recreate the entire module, together with its
associated links, tasks and contacts.
This command will require an index and at least one of the following prefixes:
| Field | Prefix | Constraints |
|---|---|---|
| Module Code | m/ |
|
| Module Title | t/ |
Can be any string of characters |
Format: edit-module INDEX ([m/MODULE_CODE] [t/MODULE_TITLE])
-
INDEXis the currently displayed index number of the module you are editing for on the screen. - You cannot edit a module such that the new module code coincides with the module code of another module on Plannit (case-insensitive).
- If
MODULE_TITLEis empty, then the module title will be deleted from Plannit.
Examples:
edit-module 3 m/CS2104
In the above example, we are changing the module code of the third module on Plannit to CS2104.
edit-module 3 m/CS2104 t/
In the above example, we are changing the module code of the third module on Plannit to CS2104,
and at the same time, removing the module title.
edit-module 3 t/Programming Language Concepts
In the above example, we are changing the module title of the third module on Plannit to
Programming Language Concepts.
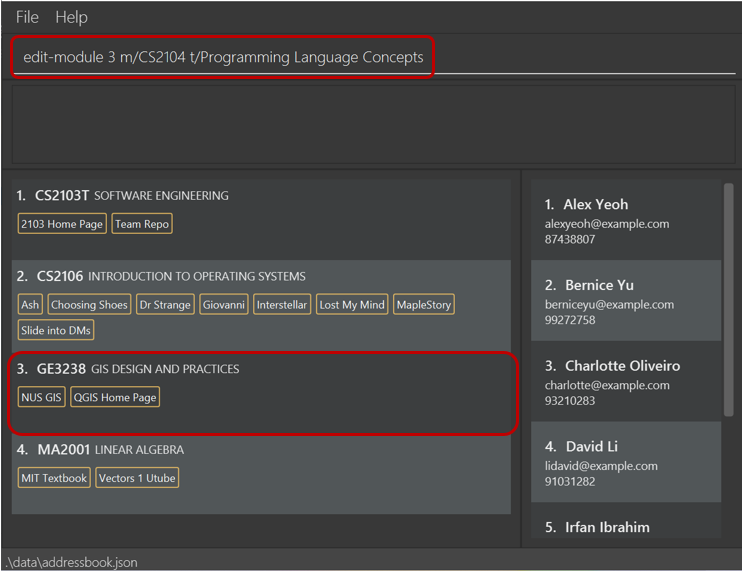
edit-module 3 m/CS2104 t/Programming Language Concepts
In the above example, we are changing the module code of the third module on Plannit to CS2104,
and at the same time, changing the module title to Programming Language Concepts.
Here’s a screenshot of Plannit before and after executing the command:
| Before executing the command | After executing the command |
|
Enter the command into the command box and hit |
A message will appear indicating that a module has been edited. Observe that the third module in the module list has its module code changed to |
Editing a module will bring you back to the home page.
2.1.4. Find module
Suppose you want to filter the list of modules to find modules whose module codes starts with specific characters,
you can search for them on the home page using the find-module command.
Format: find-module KEYWORD
- The KEYWORD is case-insensitive.
Examples:
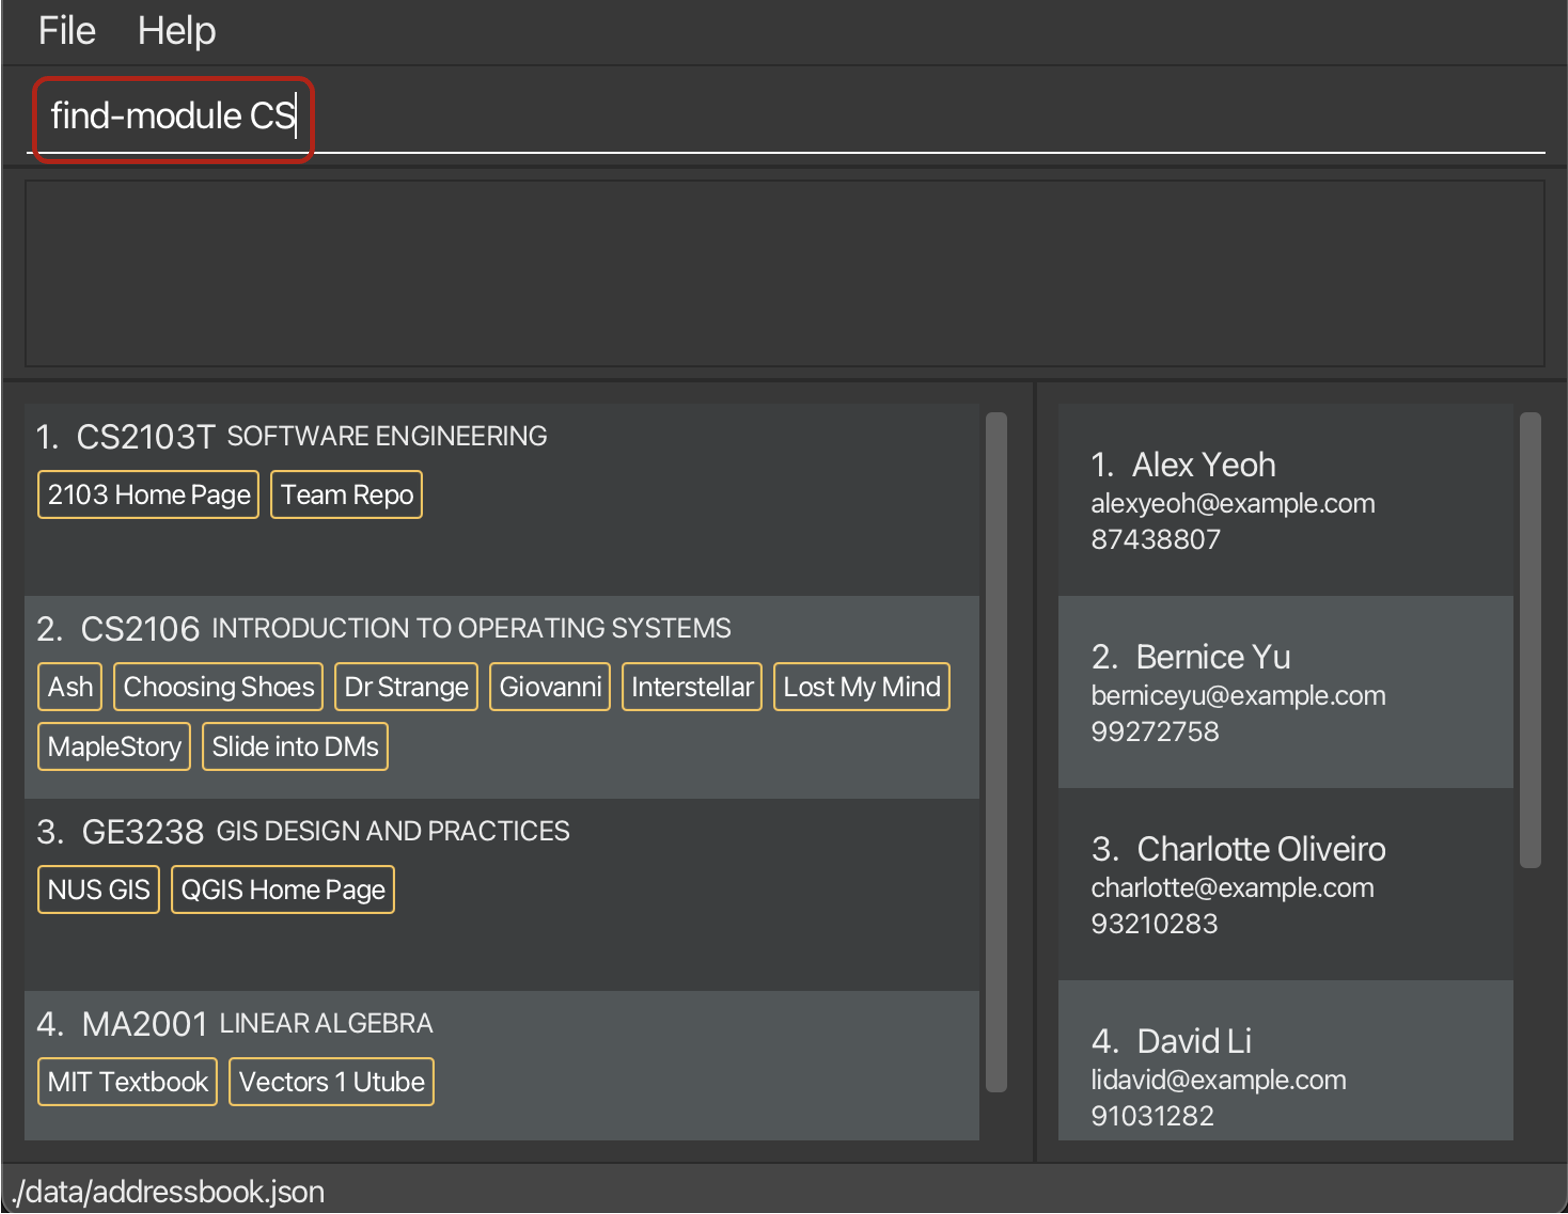
find-module cs
OR
find-module CS
In either of the above examples, we find every module whose module code starts with CS in Plannit. Here’s a screenshot of Plannit before and after executing the command:
| Before executing the command | After executing the command |
|---|---|
|
Enter the command into the command box and hit |
The module list is now updated with modules whose module code starts with |
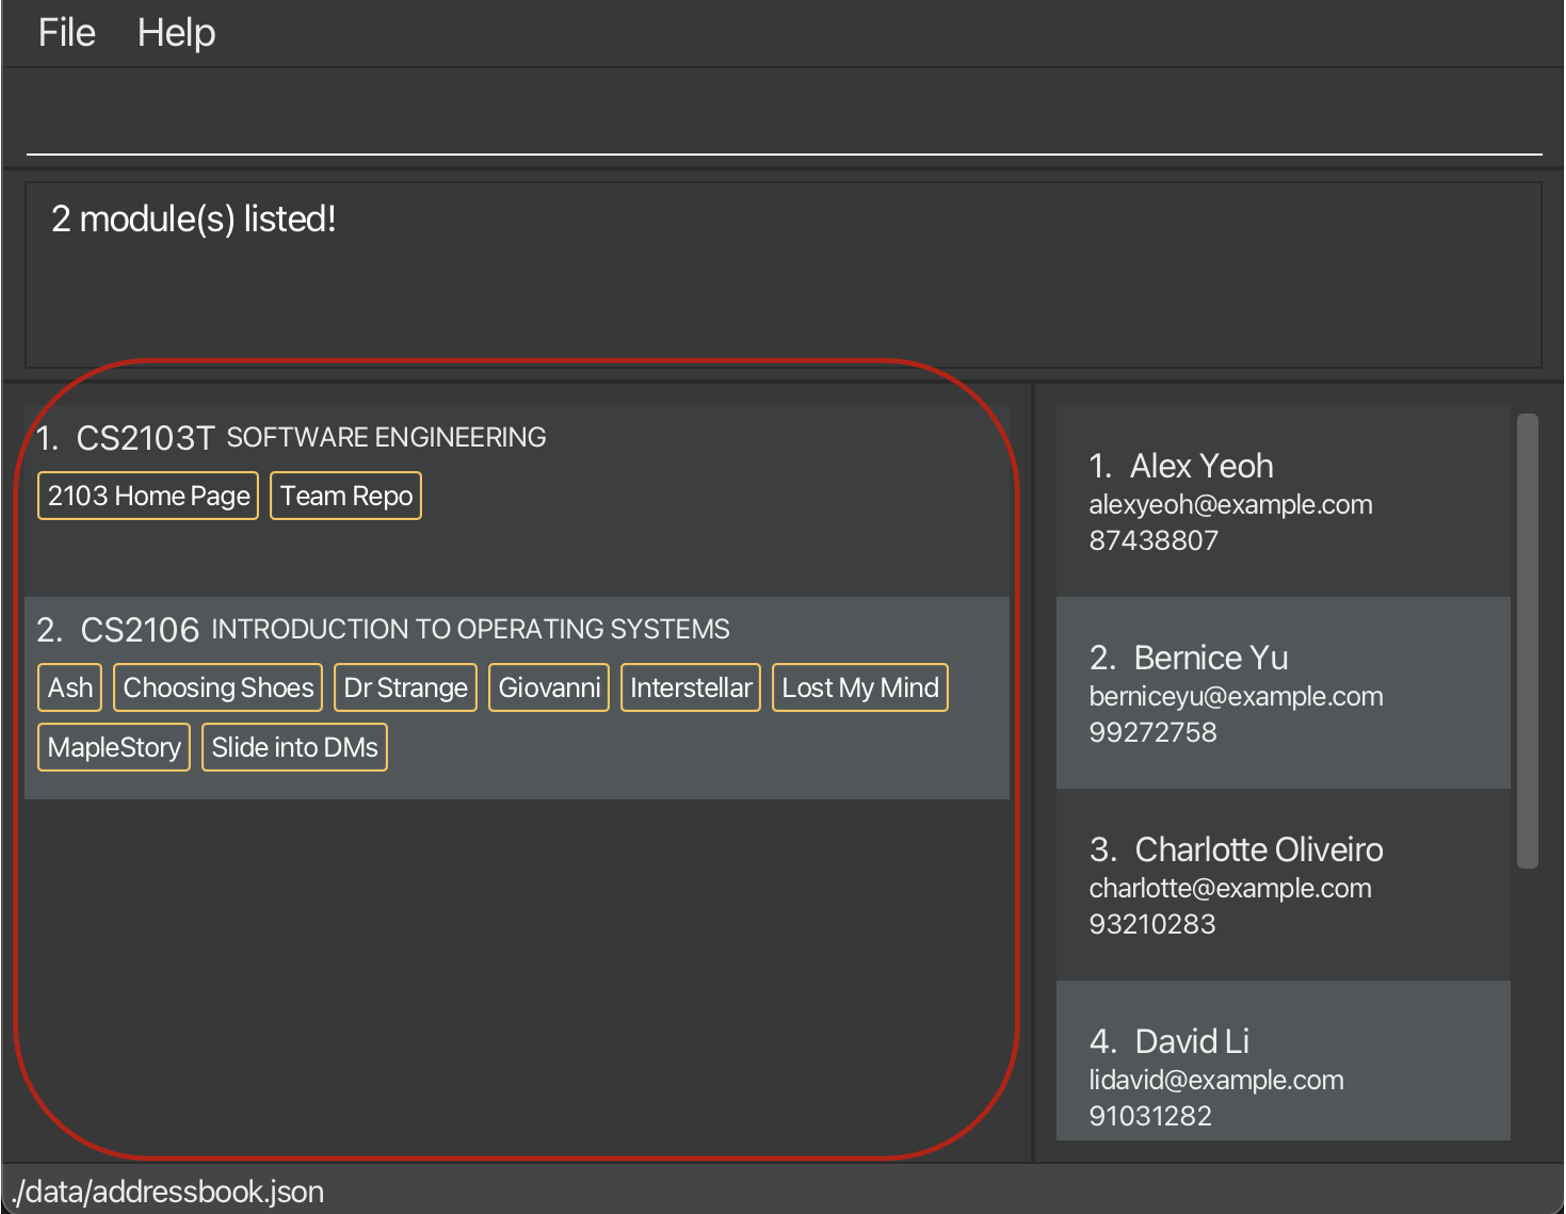
You will remain on the home page after executing the
find-module command. This is different
from the behavior of goto command, where the person list will be
updated with the persons associated with the module.
2.1.5. List module
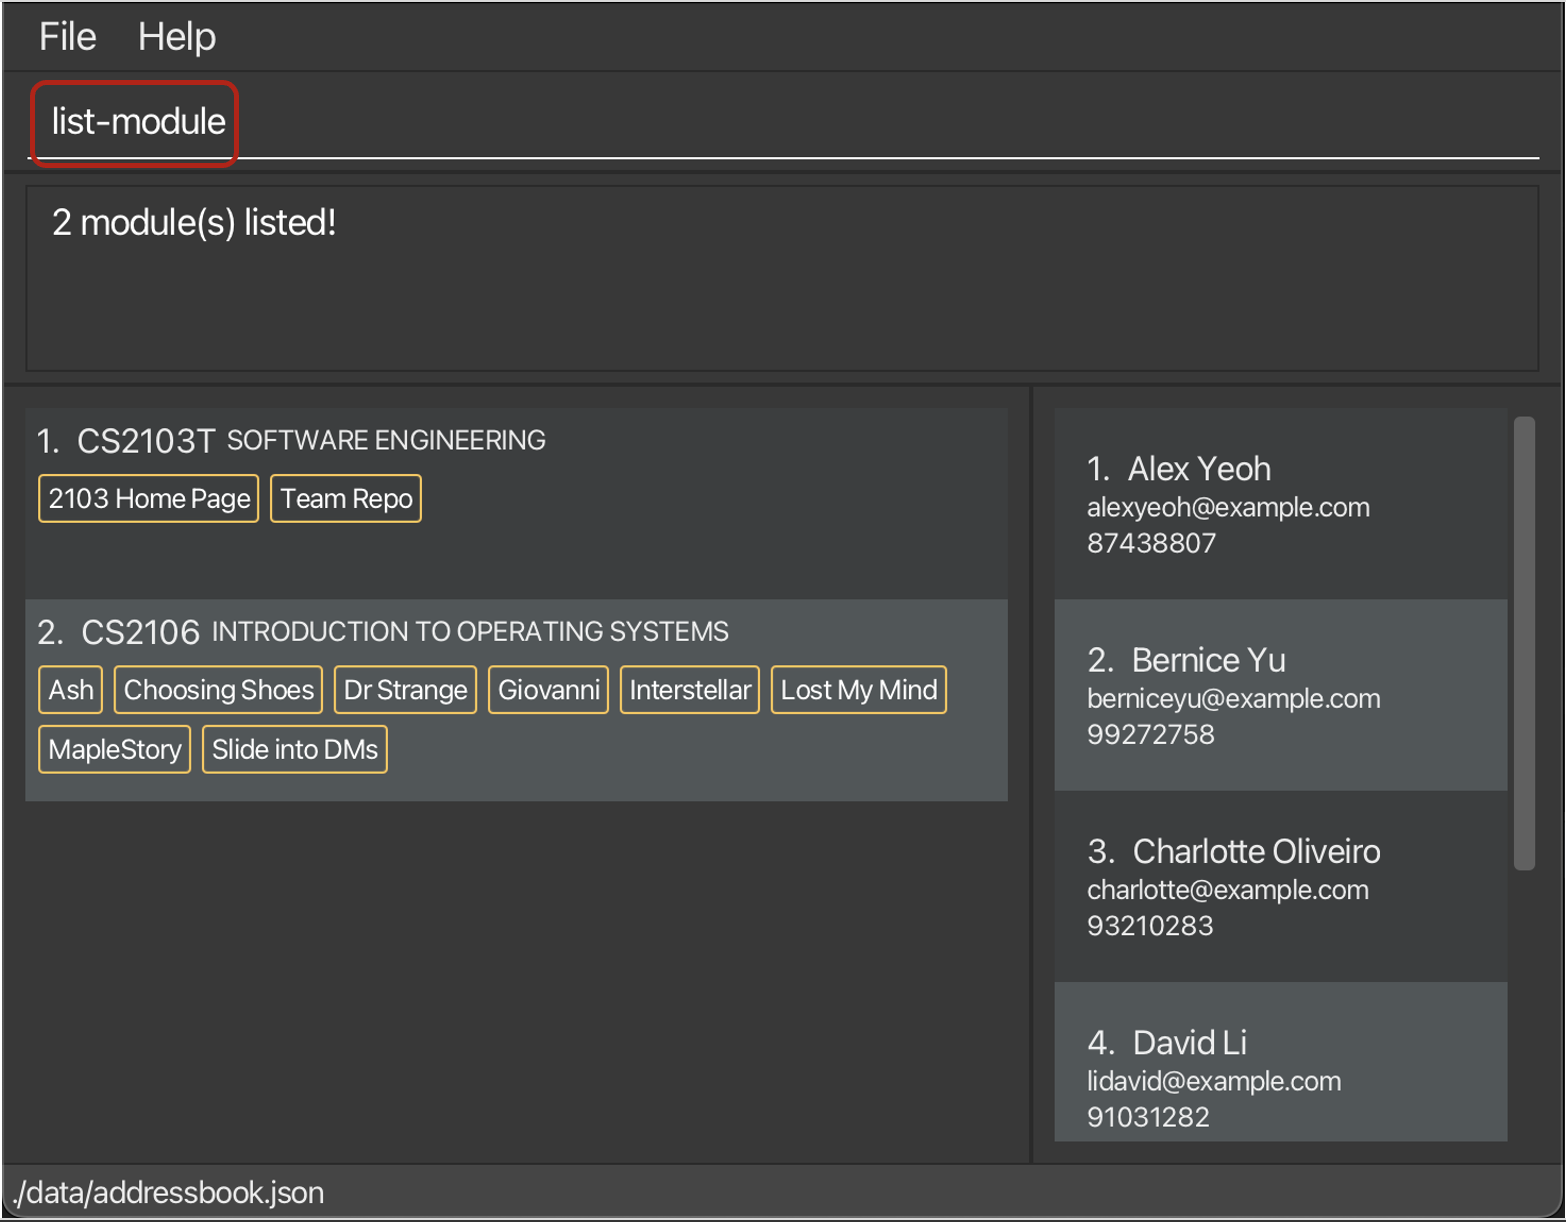
Suppose you want to see every module stored in Plannit, you can do so on the home page using the list-module command.
Format: list-module
Here’s a screenshot of Plannit before and after executing the command:
| Before executing the command | After executing the command |
|---|---|
|
Enter the command into the command box and hit |
The module list has now been updated with every module! |
2.2. Tasks
Plannit allows you to track tasks that have been assigned by your modules.
2.2.1. Add task
Suppose a particular module has assigned you an assignment to be completed. You
can keep track of it by adding it to Plannit using the add-task command.
This command will require two prefixes:
| Field | Prefix | Constraints |
|---|---|---|
| Module Code | m/ |
|
| Task Description of New Task | td/ |
Can be any string of characters |
Format: add-task m/MODULE_CODE td/TASK_DESCRIPTION
- Each task must belong to a specific module.
- Module code must correspond to a currently displayed module on screen (case-insensitive).
Example:
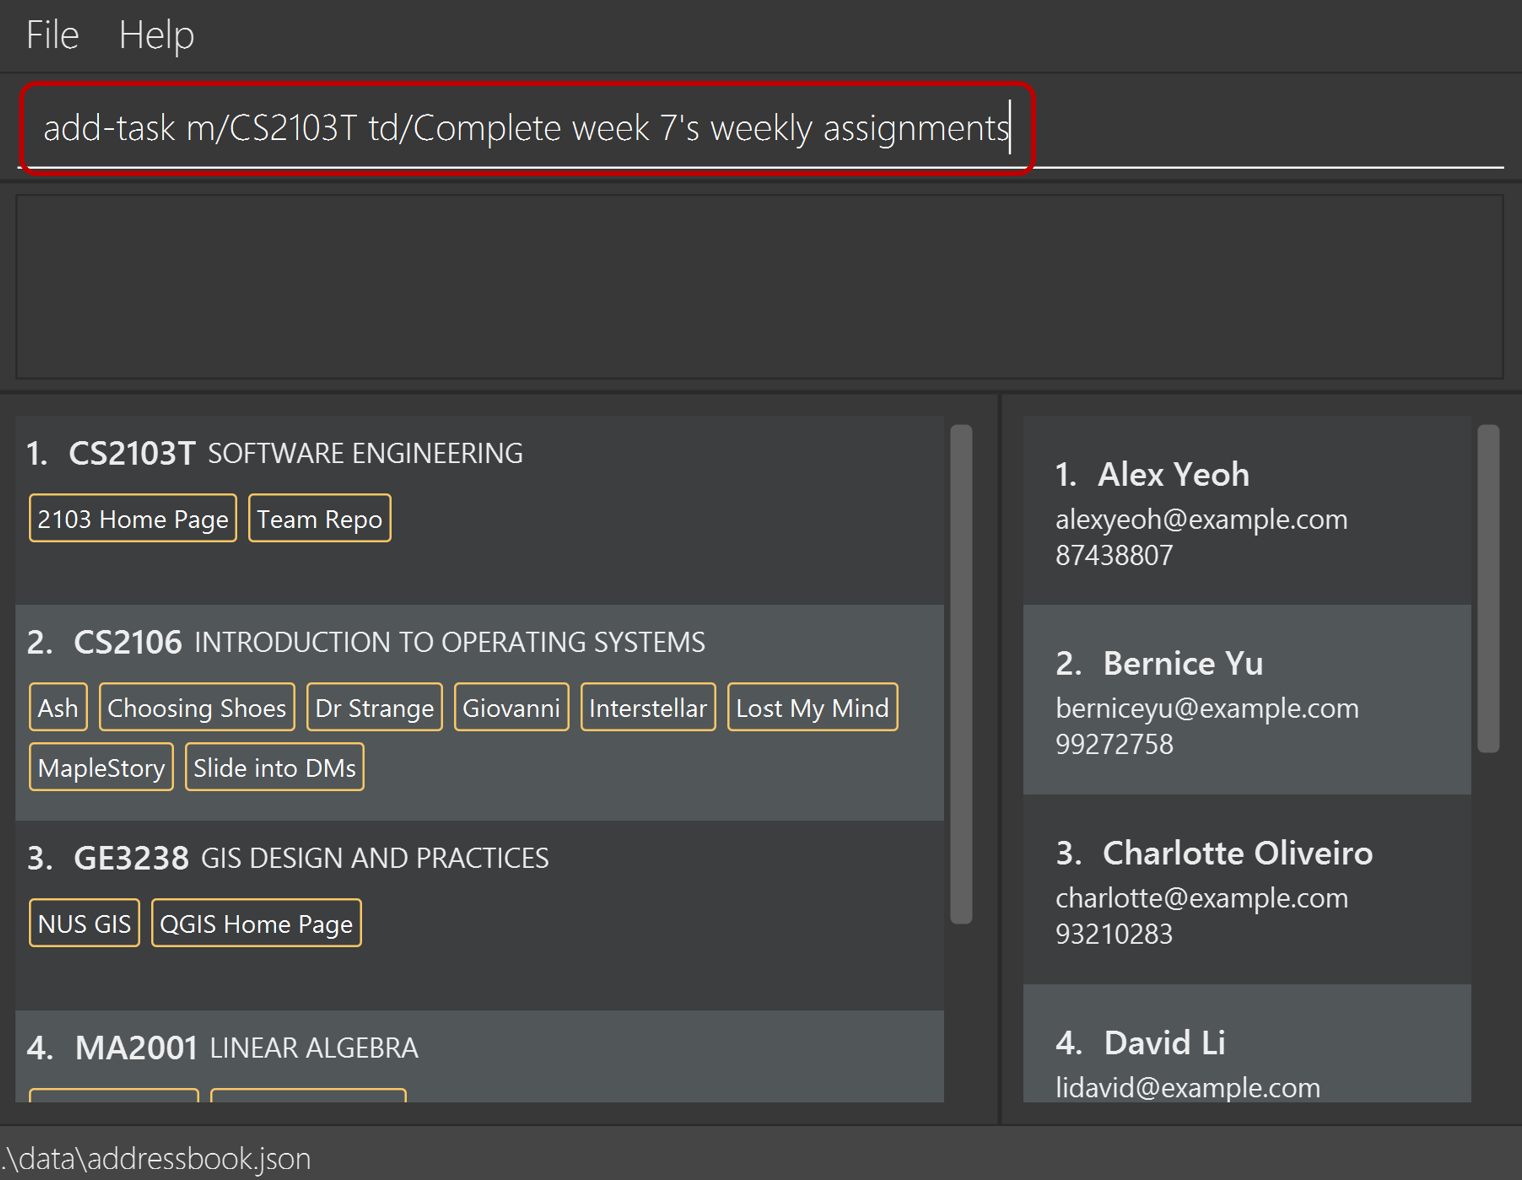
add-task m/CS2103T td/Complete week 7's weekly assignments
In the above example, we are adding the task Complete week 7's weekly assignments to the
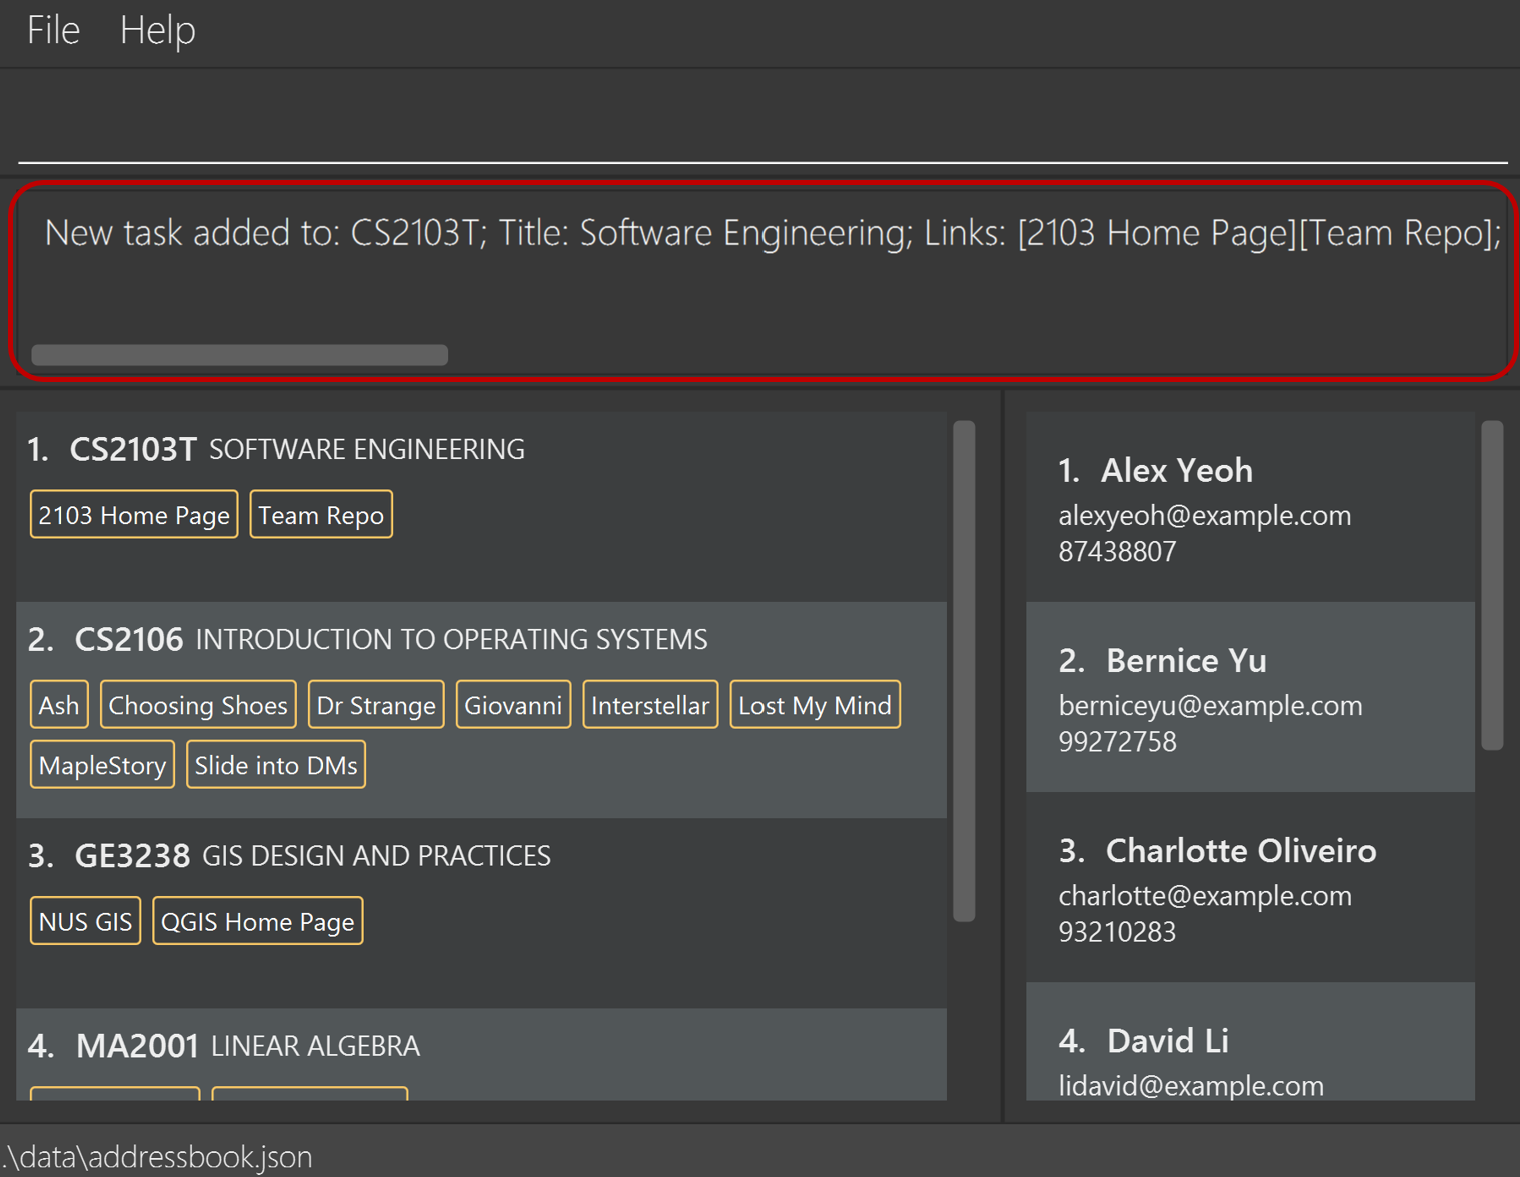
module CS2103T. Here’s a screenshot of Plannit before and after executing the
command:
| Before executing the command | After executing the command |
|---|---|
|
Enter the command into the command box and hit |
A message will appear indicating that a task has been added. |
You may view the tasks added to a module by navigating to a module’s page using the
goto command. Alternatively,
you may double-click on a module to “peek” at a
module’s tasks while on the home page.
2.2.2. Delete task
Suppose you have completed a task and would now like to remove it from
Plannit. You may delete the task using the delete-task command.
This command will require two prefixes:
| Field | Prefix | Constraints |
|---|---|---|
| Module Code | m/ |
|
| Task Number of Task | tn/ |
Task numbers must:
|
Format: delete-task m/MODULE_CODE tn/TASK_NUMBER
- Module code must correspond to a currently displayed module on screen (case-insensitive).
- You should provide a task number corresponding to that of an existing task in the module.
Example:
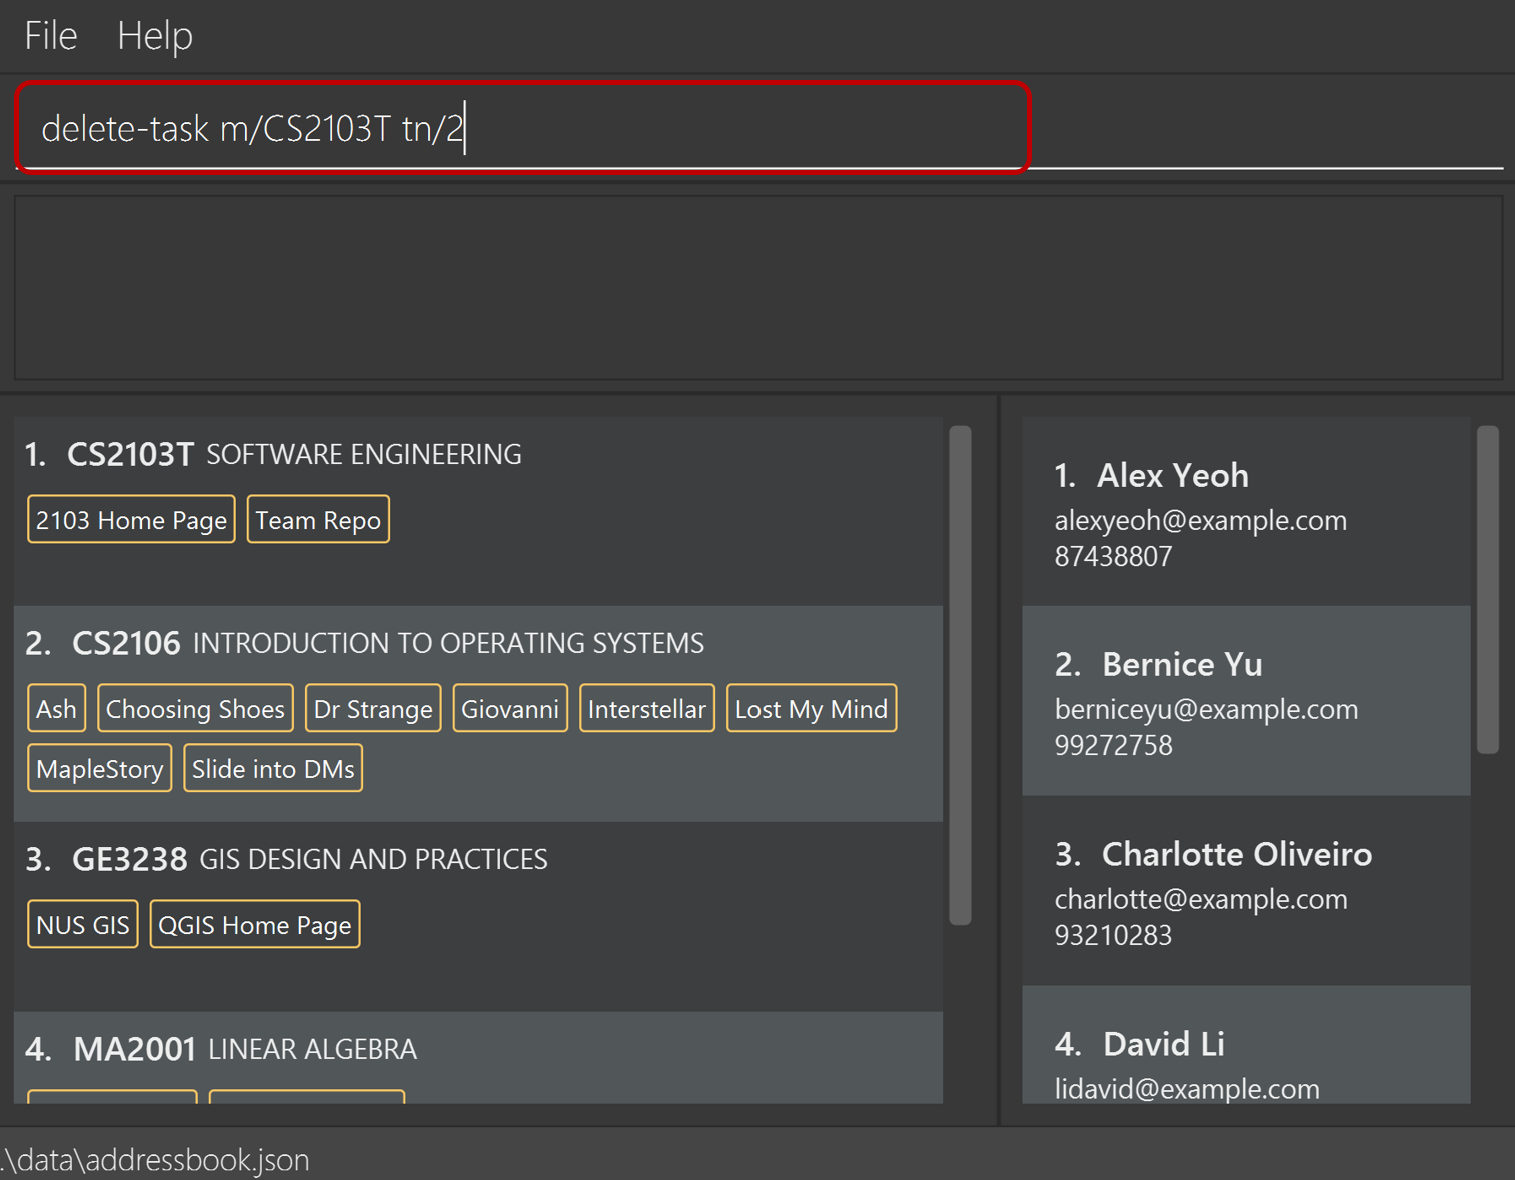
delete-task m/CS2103T tn/2
In the above example, we are deleting task number 2 from the module
CS2103T. Here’s a screenshot of Plannit before and after executing the
command:
| Before executing the command | After executing the command |
|---|---|
|
Enter the command into the command box and hit |
A message will appear indicating that a task has been deleted. |
2.2.3. Reorder tasks (swap)
Suppose you have an urgent task which you like to place at the very top of
your list. You may change the order of tasks in your module’s task list using
the swap-task command.
This command will require two prefixes:
| Field | Prefix | Constraints |
|---|---|---|
| Module Code | m/ |
|
| Task Numbers of Tasks whose ordering is to be swapped | ts/ |
The two task numbers must:
|
Format: swap-task m/MODULE_CODE ts/FIRST_TASK_NUMBER SECOND_TASK_NUMBER
- Module code must correspond to a currently displayed module on screen (case-insensitive).
- You should provide a pair of task numbers corresponding to those of existing tasks in the module.
- You may only specify two task numbers at once. Both task numbers must be different.
Example:
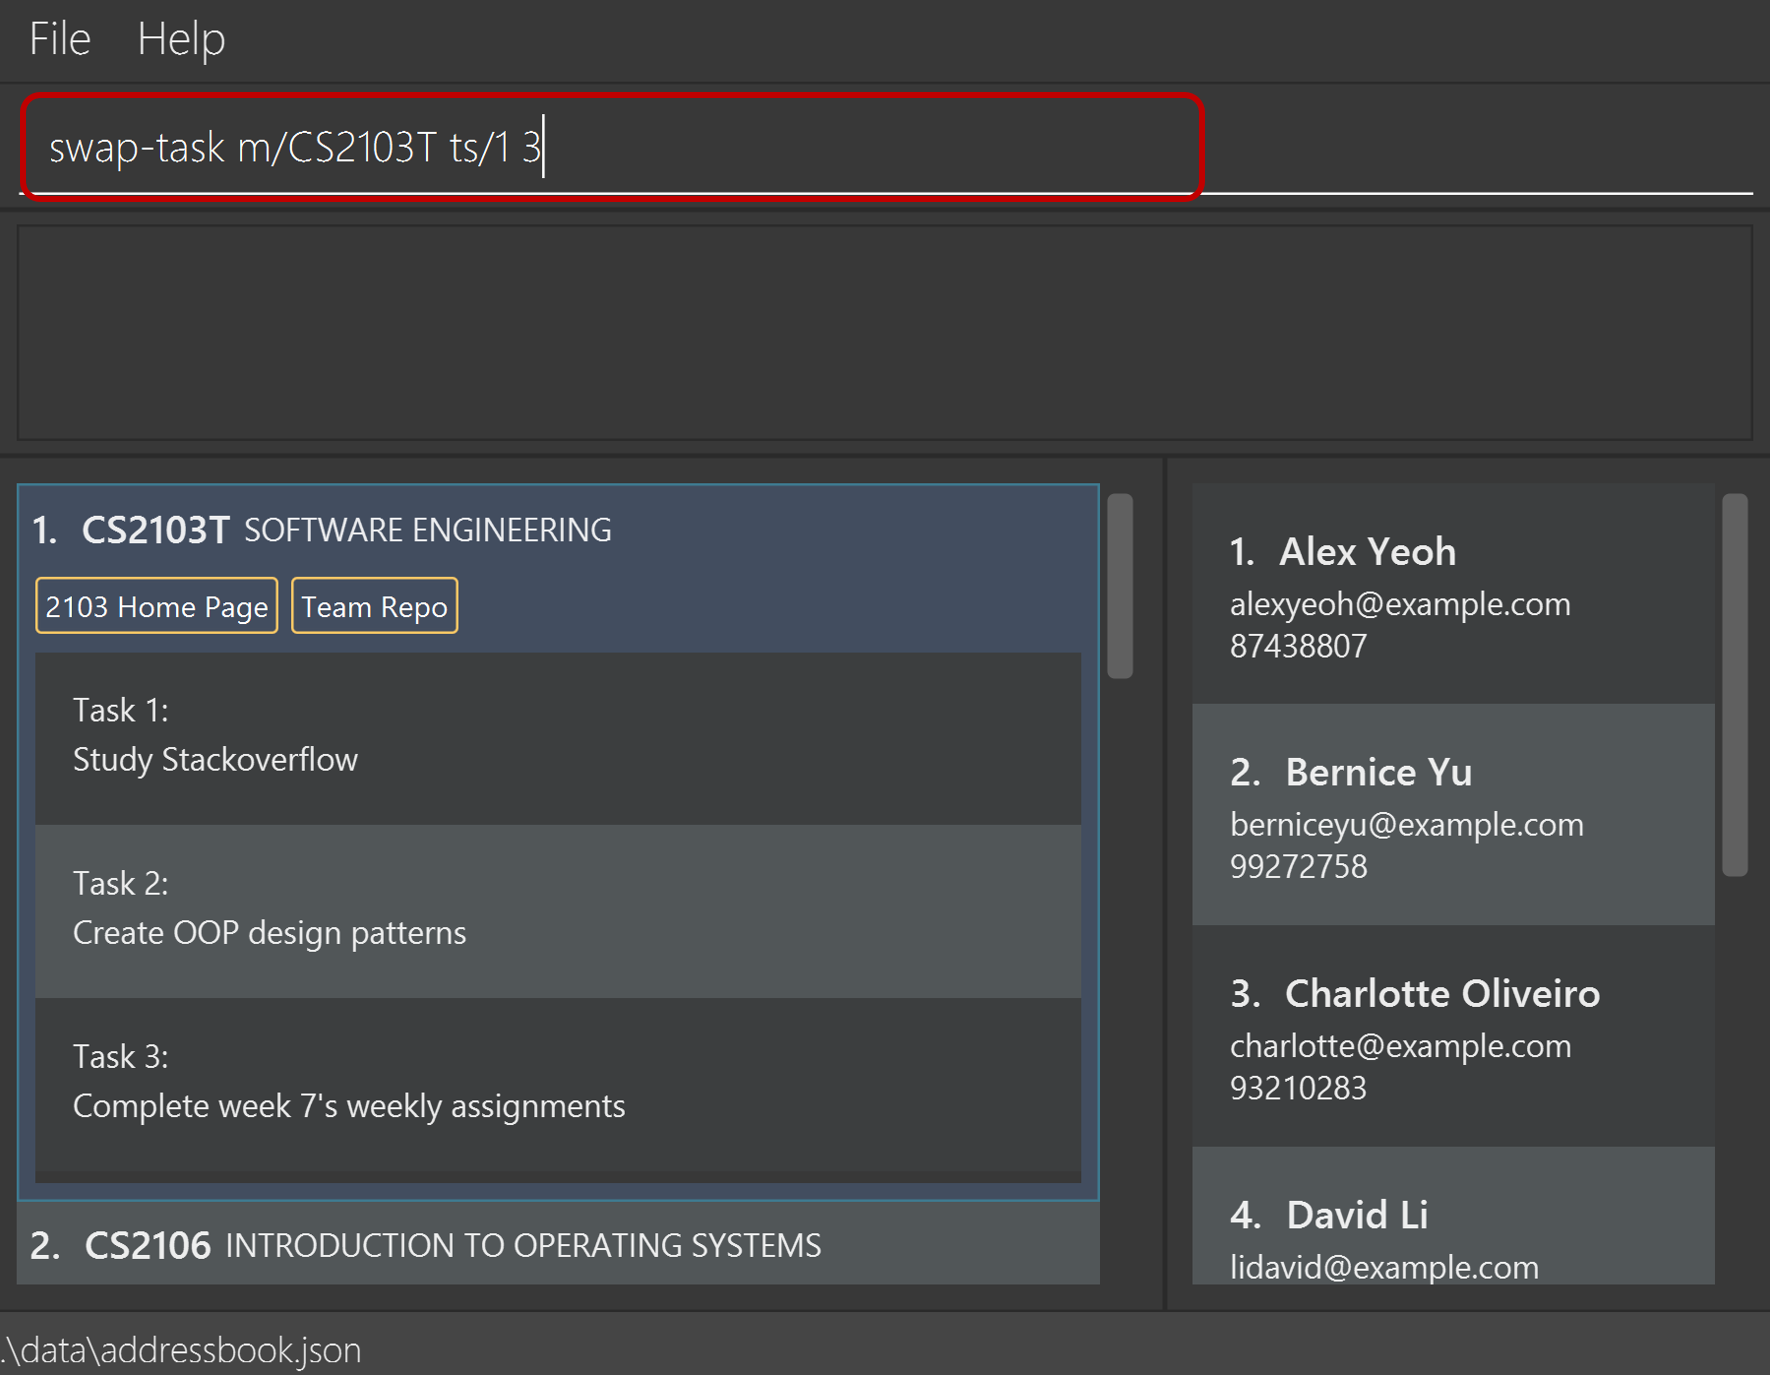
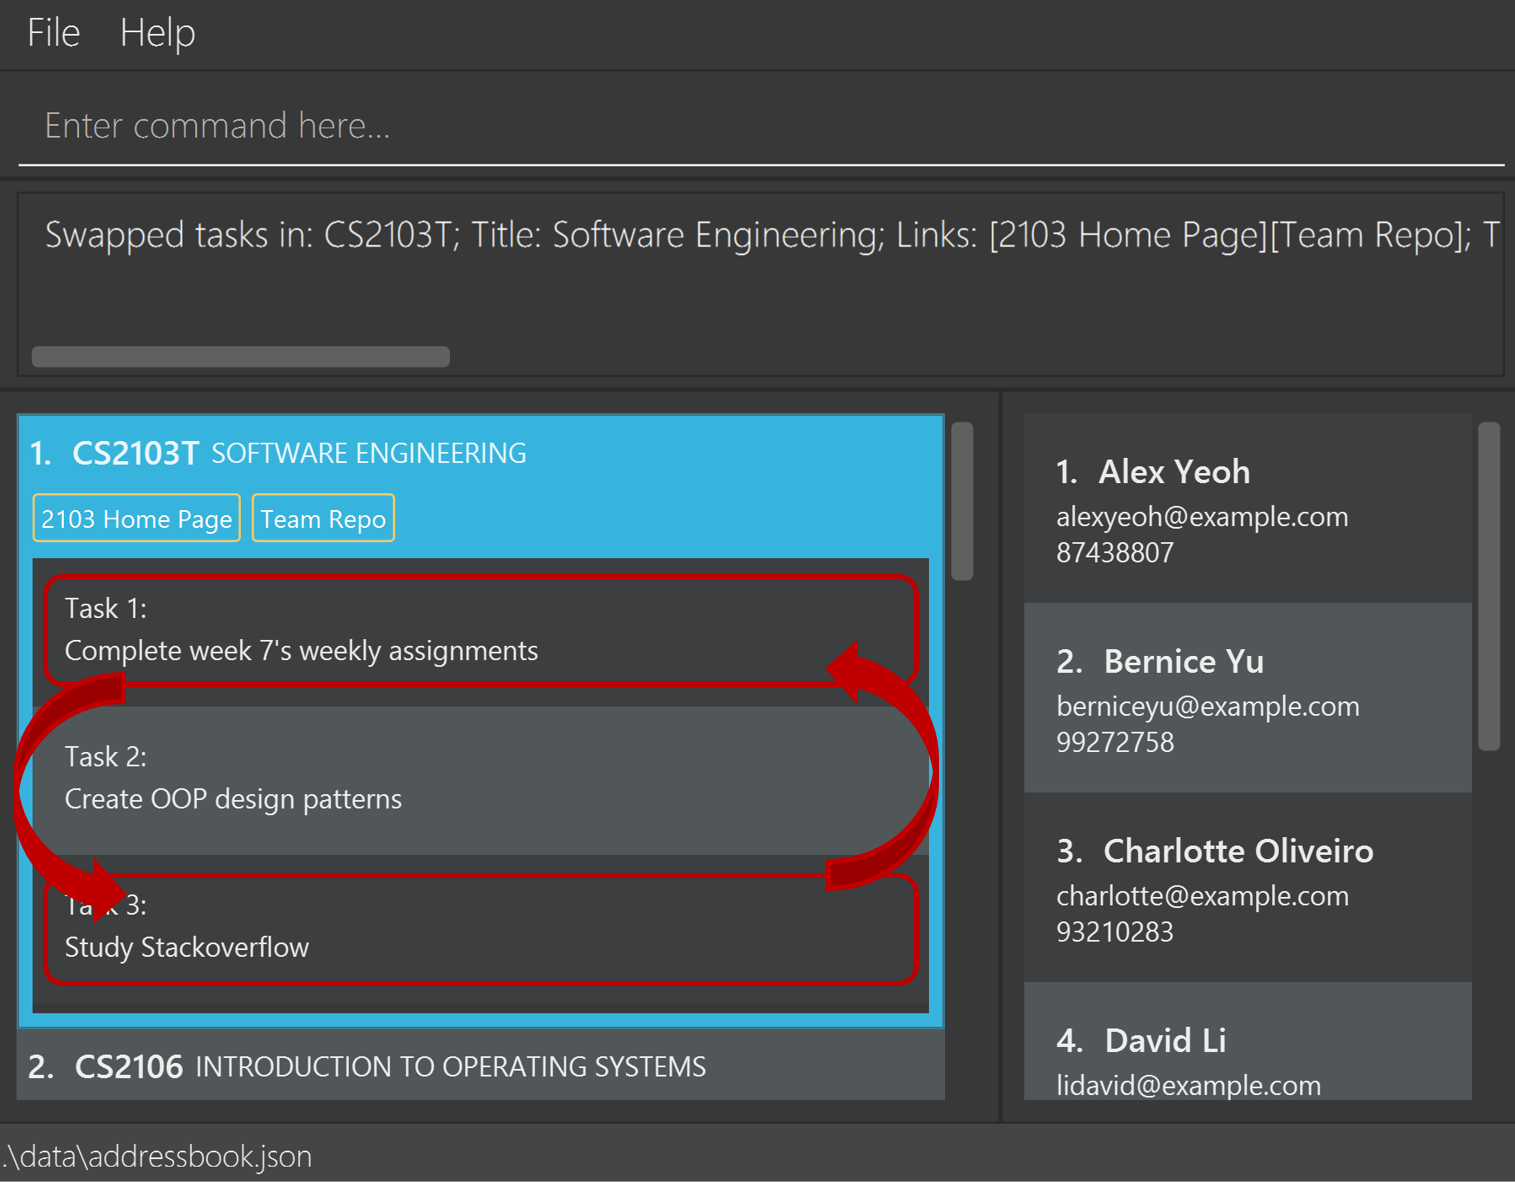
swap-task m/CS2103T ts/1 3
In the above example, we are swapping the position of the first and third
task within the task list of the module CS2103T. Here’s a screenshot of
Plannit before and after executing the command. Note that “peek”
has been enabled for clarity:
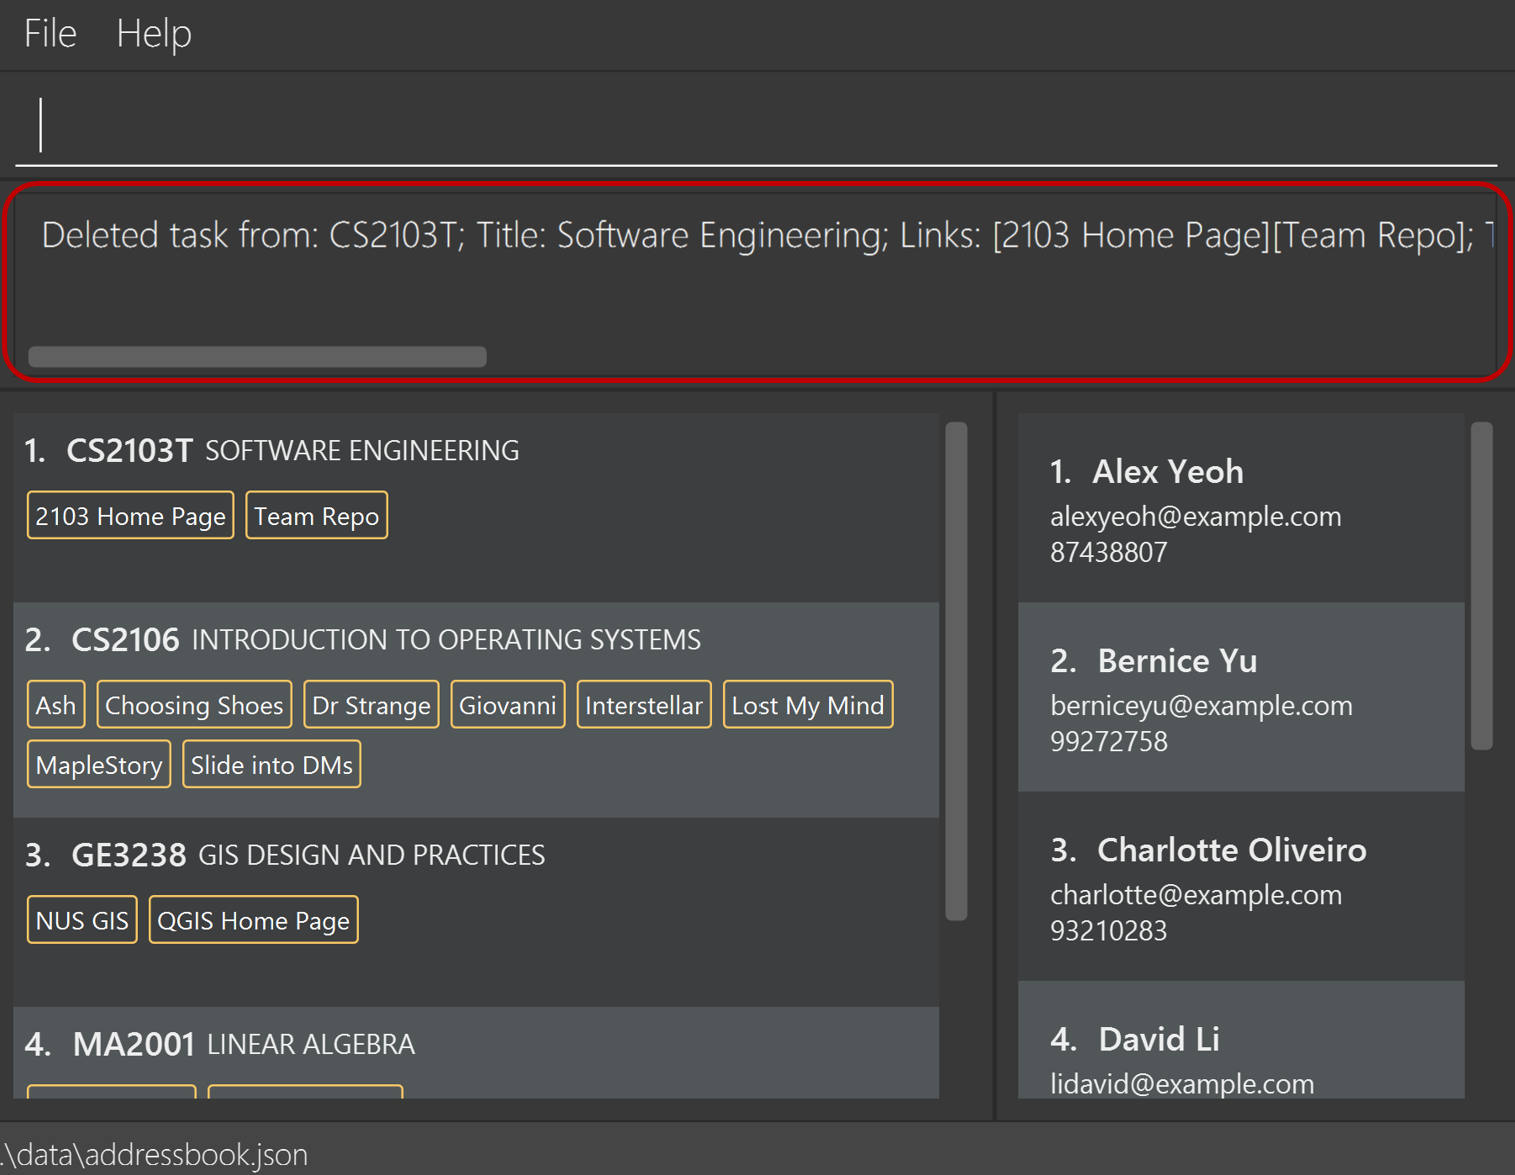
| Before executing the command | After executing the command |
|---|---|
|
Enter the command into the command box and hit |
Tasks 1 and 3 have swapped positions! |
2.2.4. Peeking at tasks
You may “peek” at a module’s tasks by clicking on the module while on the
home page.
Step 1: Let’s say you wish to view the tasks of CS2103T SOFTWARE
ENGINEERING (module number 1).
Step 2: You will notice a blue glow when hovering your mouse over the module.

Step 3: Double-clicking on the blue area will allow you to view the
tasks of CS2103T SOFTWARE ENGINEERING.
Step 4: Clicking again on the blue area will close the dropdown and hide the tasks.
You remain on the home page even when you “peek” at a module. To leave the home page and view more details of a specific module, you may use the
goto command.
2.3. Links
All links in Plannit are composed of a URL and an alias (case-sensitive). Aliases are short nicknames defined by you for each module-related link that you found to be helpful. The succinct nature of aliases empowers you to identify and launch module-related links from Plannit in a swift manner. Additionally, the personalised nature of aliases enables you to attach your own meanings to generically-named links, saving you the hassle of searching and remembering links.
E.g., Using the alias tutorial zoom to label the link nus-sg.zoom.us/j/81374731875?pwd=ZE9hWFlNVGJVNEREhVVEs5Zz09
allows you to join the zoom room effortlessly whenever you want to.
2.3.1. Add link
You may add link(s) to a specific module using the add-link command.
Links will be added by its URL and alias.
If there exists a link URL or alias that is detected as invalid within a command, none of the link(s) in the command will be added. Link aliases will be paired with link URLs according to their respective order of input (left-to-right).
Plannit provides no guarantee of the link URL’s existence.
| Field | Prefix | Constraints |
|---|---|---|
| Module Code | m/ |
|
| Link URL | l/ |
|
| Link Alias | la/ |
|
Format: add-link m/MODULE_CODE l/LINK_URL la/LINK_ALIAS [l/LINK_URL la/LINK_ALIAS]*
- Each link must belong to a specific module.
- Module code must correspond to a currently displayed module on screen (case-insensitive).
- You cannot add a link using a link alias that already exists in the module.
- You cannot add a link using a link URL that already exists in the module.
(HTTP headers are ignored for uniqueness of link URLs.)
- E.g., ‘https://www.google.com’, ‘http://www.google.com’, ‘www.google.com’ are considered the same link URL
Example:
add-link m/CS2040 l/visualgo.net/en la/visualgo
In the above example, we are adding the link with the URL visualgo.net/en
to the module with module code CS2040, represented by the link alias visualgo.
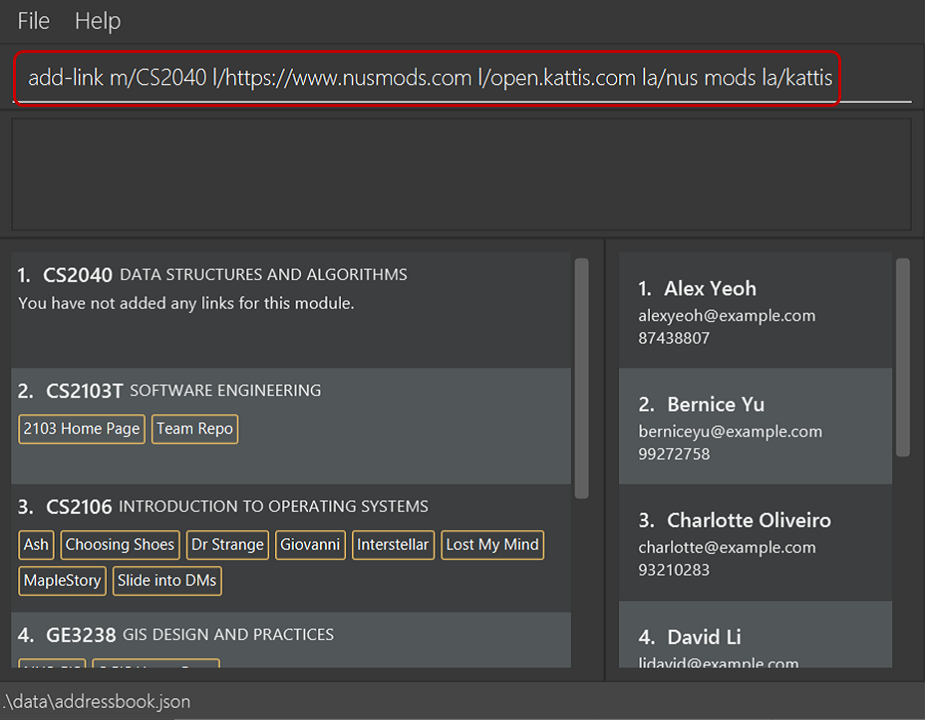
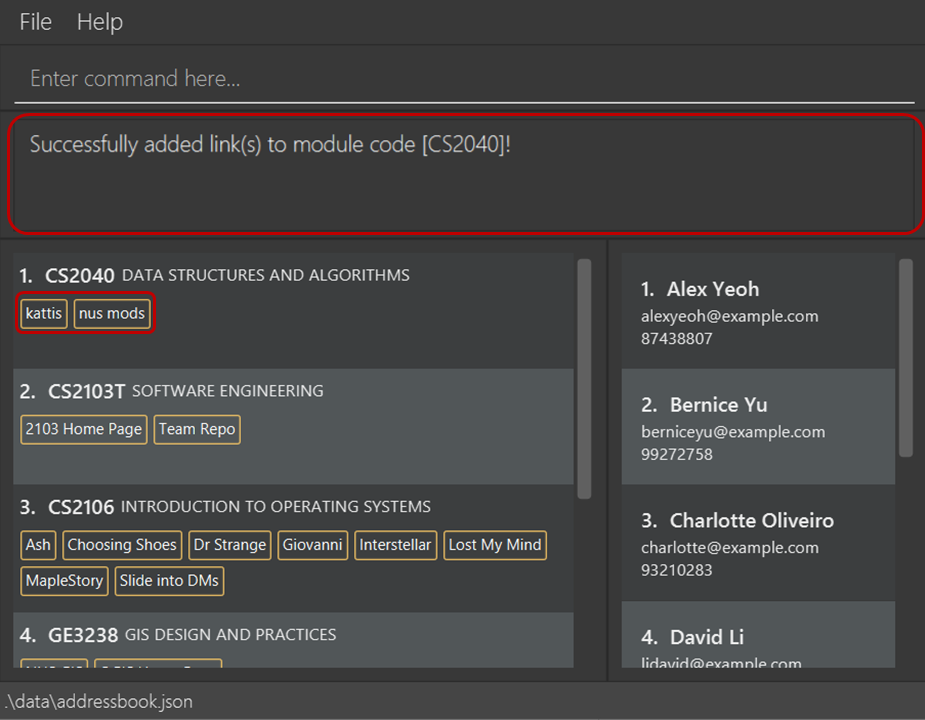
add-link m/CS2040 l/https://www.nusmods.com l/open.kattis.com la/nus mods la/kattis
In the above example, we are adding the links with the URL https://www.nusmods.com and open.kattis.com
to the module with module code CS2040, represented by the link alias nus mods and kattis respectively.
Here’s a screenshot of Plannit before and after executing the command:
| Before executing the command | After executing the command |
|---|---|
|
|
2.3.2. Delete link
You may delete link(s) from a specific module using the delete-link command.
Links will be deleted by means of their corresponding alias.
Multiple links can be deleted at once using their corresponding alias. If there exists a link alias that is detected as invalid within a chained command, none of the links in the command will be deleted.
| Field | Prefix | Constraints |
|---|---|---|
| Module Code | m/ |
|
| Link Alias | la/ |
|
Format: delete-link m/MODULE_CODE la/LINK_ALIAS [la/LINK_ALIAS]*
- Module code must correspond to a currently displayed module on screen (case-insensitive).
- You cannot delete a link using a non-existent link alias within the module.
Example:
delete-link m/CS2040 la/visualgo
In the above example, we are deleting the link with the URL visualgo.net/en
from the module with module code CS2040, using its corresponding link alias visualgo.
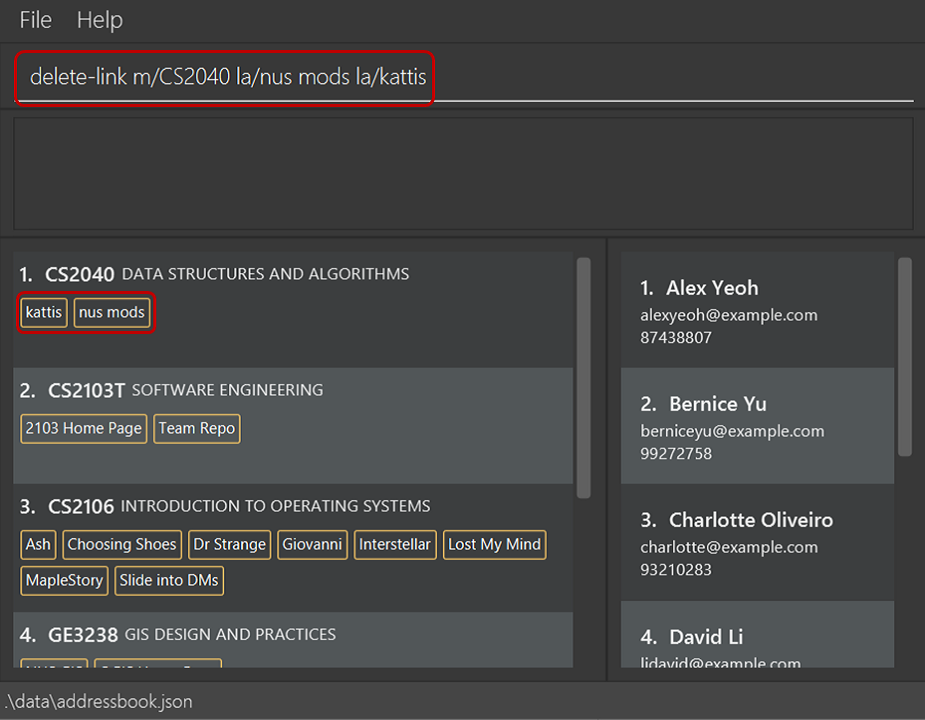
delete-link m/CS2040 la/nus mods la/kattis
In the above example, we are deleting the links with the URL https://www.nusmods.com and open.kattis.com
from the module with module code CS2040, using their corresponding link alias nus mods and kattis respectively.
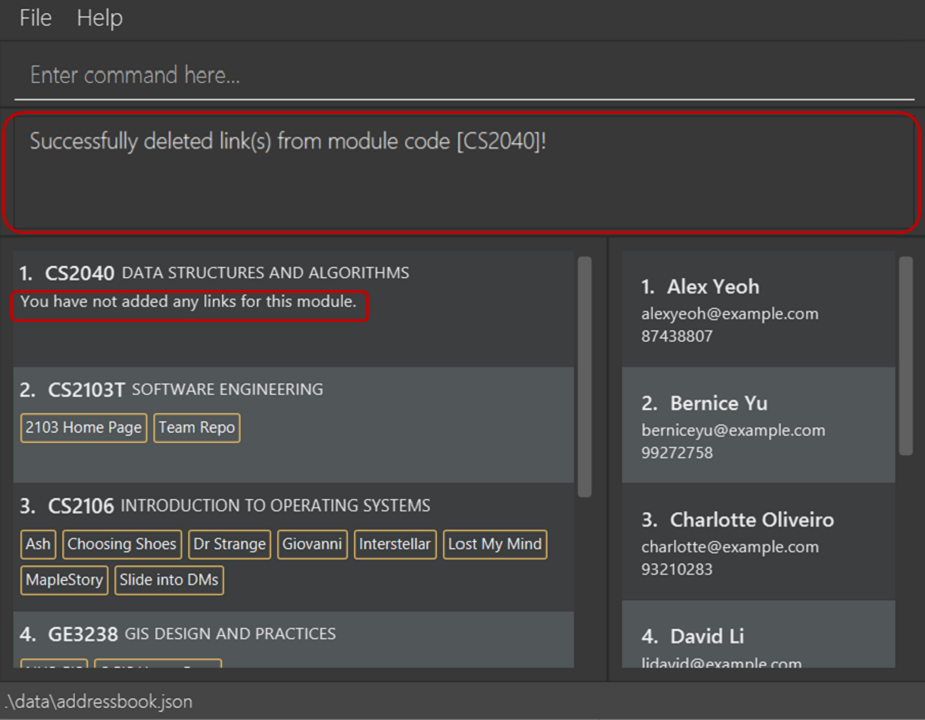
Here’s a screenshot of Plannit before and after executing the command:
| Before executing the command | After executing the command |
|---|---|
|
|
2.3.3. Open link
You may open link(s) from a specific module to your default browser using the open-link command.
Links will be opened by means of their corresponding alias.
Hover your cursor over aliases in Plannit to peek at their associated URL.
An alternative way to open links is by means of clicking on their aliases on the application window.
Multiple links can be opened at once using its corresponding alias according to their order of input (left to right). If there exists a link alias that is detected as invalid within a chained command, the links to its left will be opened while the links to its right will not be opened.
Permissions from your operating system may be required for some users to open links from Plannit using either way
(They are enabled by default for most users)
| Field | Prefix | Constraints |
|---|---|---|
| Module Code | m/ |
|
| Link Alias | la/ |
|
Format: open-link m/MODULE_CODE la/LINK_ALIAS [la/LINK_ALIAS]*
- Module code must correspond to a currently displayed module on screen (case-insensitive).
- You cannot open a link using a non-existent link alias within the module.
Example:
open-link m/CS2040 la/visualgo
In the above example, we are opening the link with the URL visualgo.net/en
from the module with module code CS2040, using its corresponding link alias visualgo.
open-link m/CS2040 la/nus mods la/kattis
In the above example, we are opening the links with the URL https://www.nusmods.com and open.kattis.com
from the module with module code CS2040, using their corresponding link alias nus mods and kattis respectively.
2.4. Contacts
The terms “contact” and “person” have similar meanings and for the majority of the time, can be understood as referring to the same entity. The only scenario that calls for a distinction is when you are inputting a command word; we use person instead of contact.
2.4.1. Add person
Suppose you want to track the contact details of a module-mate. You may do so by adding his contact into Plannit using
the add-personcommand.
This command will require three prefixes:
| Field | Prefix | Constraints |
|---|---|---|
| Name | n/ |
|
e/ |
Can only be of the format local-part@domain
|
|
| Phone | p/ |
Can only be 8 digits long |
Format: add-person n/NAME e/EMAIL p/PHONE_NUMBER
- You cannot add a duplicate name into Plannit.
Example:
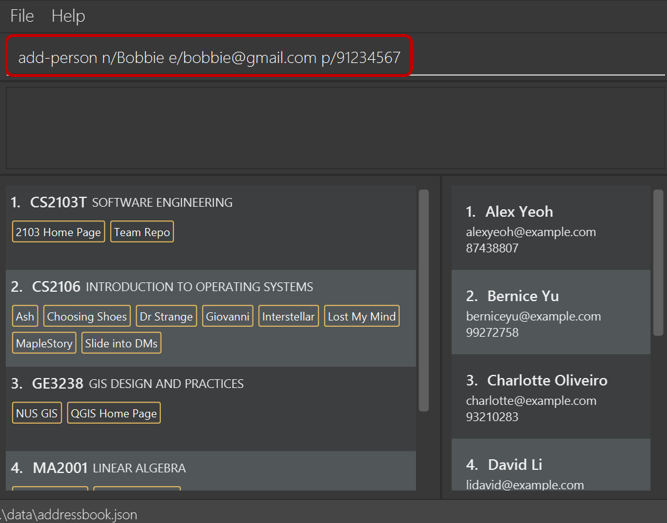
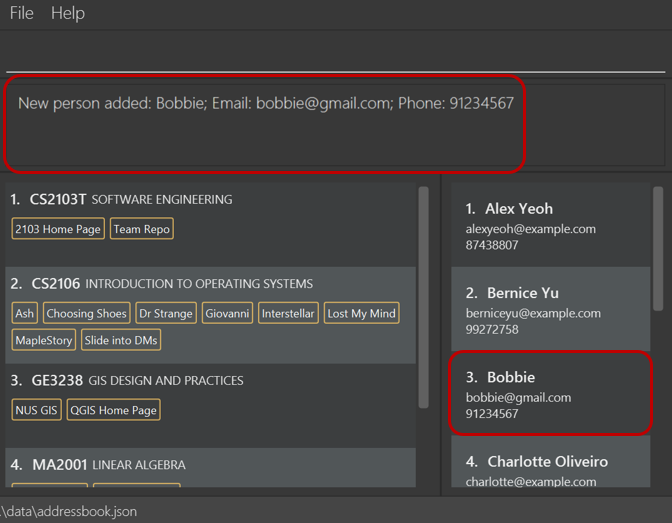
add-person n/Bobbie e/bobbie@gmail.com p/91234567
In the above example, we are adding a contact with name Bobbie, email bobbie@gmail.com, and phone number
91234567 into Plannit. Here’s a screenshot of Plannit before and after executing the command:
| Before executing the command | After executing the command |
|---|---|
|
Enter the command into the command box and hit |
Bobbie has been added! |
Adding a person to Plannit will bring you back to the home page.
2.4.2. Add person to module
You can add a person to a module using the add-person-to-module command. In other
words, an association between a person and a module will be created.
This would be useful when you want to find study buddies. In this case, you can add a fellow
student studying the same module using the add-person-to-module command, then use goto to
find your list of potential study buddies. Read more about goto here.
This command will require two prefixes:
| Field | Prefix | Constraints | |
|---|---|---|---|
| Module Code | m/ |
|
|
| Name | n/ |
|
Format: add-person-to-module m/MODULE_CODE n/NAME
- If a person has already been added to a module, the person cannot be added to the module again.
- You can only add a person to a module if both the person and the module are currently displayed on screen.
Example:
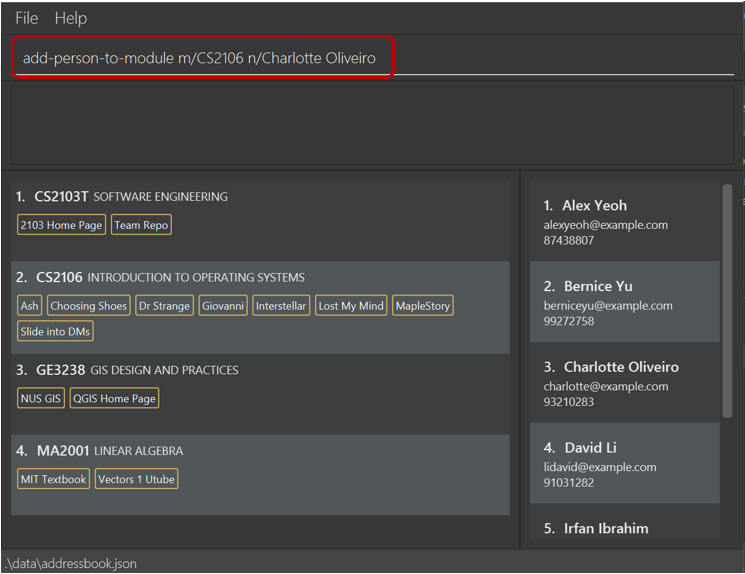
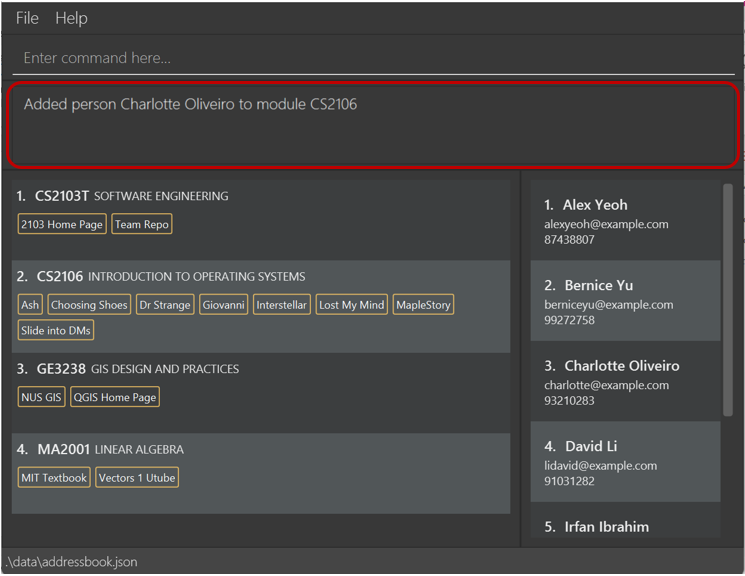
add-person-to-module m/CS2106 n/Charlotte Oliveiro
In the above example, we are adding the person Charlotte Oliveiro to module CS2106.
Here’s a screenshot of Plannit before and after executing the command:
| Before executing the command | After executing the command |
|
Enter the command into the command box and hit |
A message will appear indicating that |
If you wish to view a person added to a particular module, you may do so by navigating to that module using the
goto command.
2.4.3. Delete person
Suppose one of your contacts in Plannit graduated from NUS and you do not want to track his contact details anymore.
You may delete his contact from Plannit using the delete-person command.
This command will require one prefix:
| Field | Prefix | Constraints |
|---|---|---|
| Name | n/ |
|
Format: delete-person n/NAME
- You cannot delete a non-existent contact in Plannit.
- You can only delete a person from Plannit if the person is displayed on the current screen.
Example:
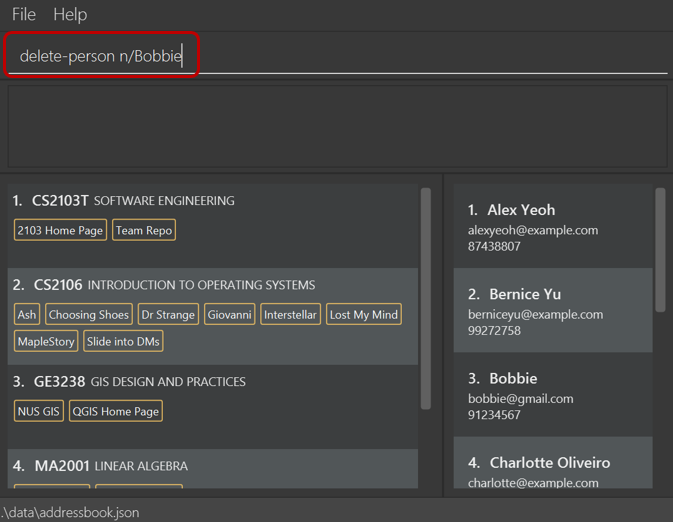
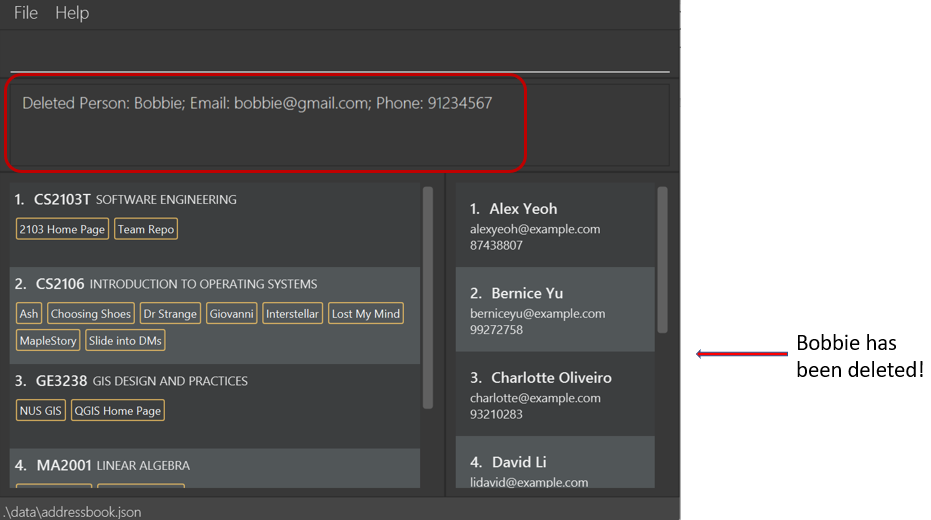
delete-person n/Bobbie
In the above example, we are deleting the contact with name Bobbie from Plannit. Here’s a screenshot of Plannit before
and after executing the command:
| Before executing the command | After executing the command |
|---|---|
|
Enter the command into the command box and hit |
Bobbie has been deleted! |
Deleting a person from Plannit will bring you back to the home page.
2.4.4. Delete person from module
You can remove the association between a person and a module (if it exists) using the delete-person-from-module
command.
This would be useful when a particular friend of yours dropped out of a module. In this case, you can remove the
association between him and the module using this feature, and goto will no longer display his contact.
Read more about goto here.
This command will require two prefixes:
| Field | Prefix | Constraints | |
|---|---|---|---|
| Module Code | m/ |
|
|
| Name | n/ |
|
Format: delete-person-from-module m/MODULE_CODE n/NAME
- You can only delete the specified person from the specified module if the person was originally associated to the module.
- You can only delete a person from a module if both the specified module and person are displayed on the current screen.
Example:
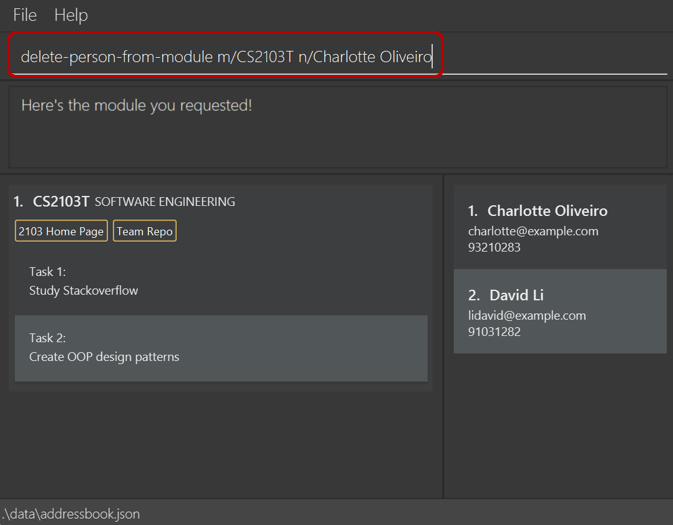
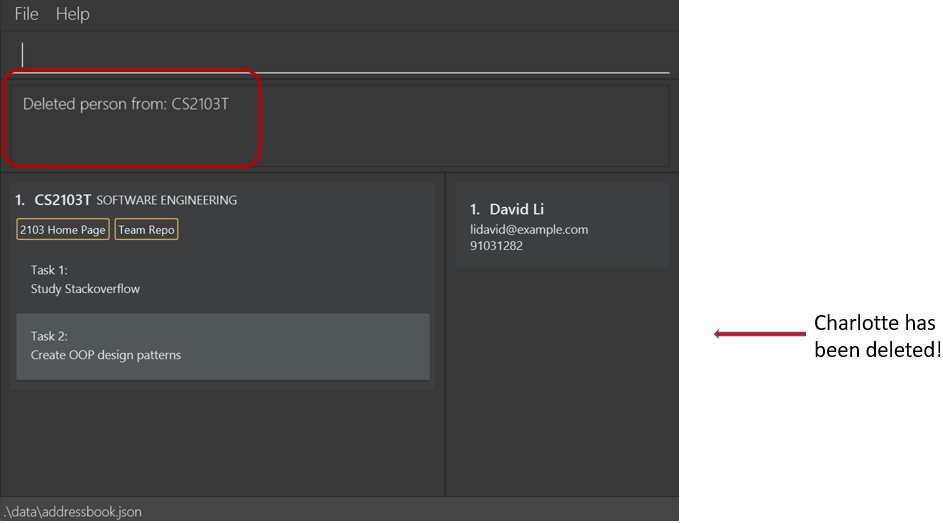
delete-person-from-module m/CS2103T n/Charlotte Oliveiro
In the above example, we are deleting the person Charlotte Oliveiro from the module CS2103T. Here’s
a screenshot of Plannit before and after executing the command:
| Before executing the command | After executing the command |
|---|---|
|
Enter the command into the command box and hit |
Charlotte Oliveiro has been deleted from the module CS2103T! |
Deleting a person will bring you back to the home page.
2.4.5. Edit person
Suppose you accidentally made a typo in the name of a contact in Plannit.
You may edit his contact details using the edit-person command.
This command will require an index and minimally any of the three prefixes:
| Field | Prefix | Constraints |
|---|---|---|
| Name | n/ |
|
e/ |
Can only be of the format local-part@domain
|
|
| Phone | p/ |
Can only be 8 digits long |
Format: edit-person INDEX ([n/NAME] [e/EMAIL] [p/PHONE_NUMBER])
-
INDEXis the currently displayed index number of the contact you are editing for on the screen.
Examples:
edit-person 2 n/Charmander
In the above example, we are editing the contact with a displayed-index number of ‘2’ on the screen to now have the name
Charmander in Plannit.
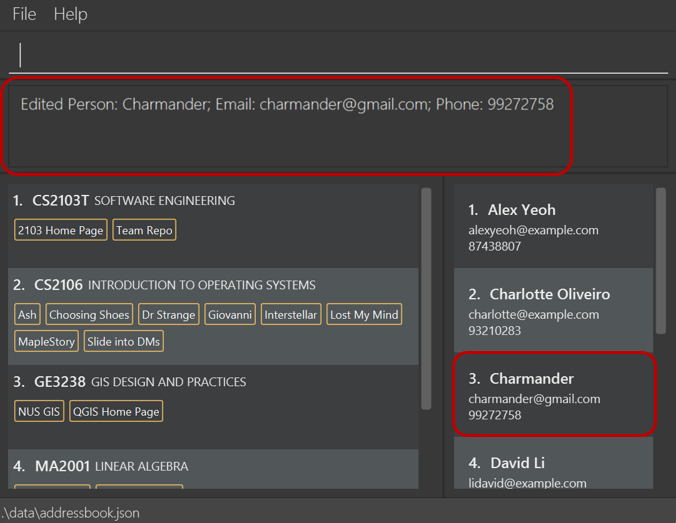
edit-person 2 n/Charmander e/charmander@gmail.com
In the above example, we are editing the contact with a displayed-index number of ‘2’ on the screen to now have the name
Charmander and email charmander@gmail.comin Plannit.
Here’s a screenshot of Plannit before and after executing the command for the last example:
| Before executing the command | After executing the command |
|---|---|
|
Enter the command into the command box and hit |
Bernice Yu has been edited to Charmander! |

Editing a person will bring you back to the home page.
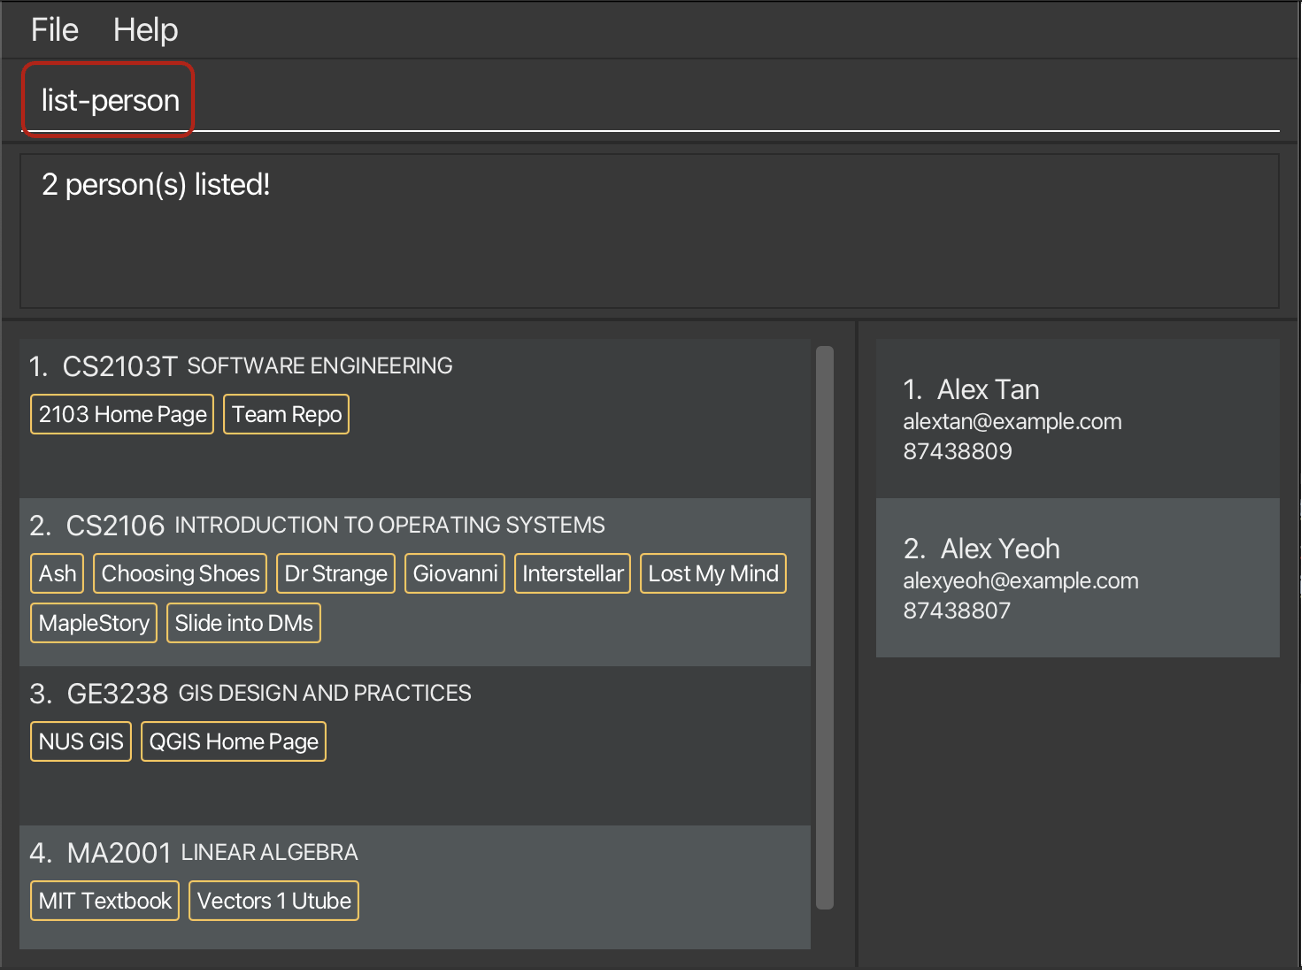
2.4.6. Find person
Suppose you want to filter the list of persons to find persons whose names starts with specific characters,
you can search for them on the home page using the find-person command.
Format: find-person KEYWORD
- The KEYWORD is case-insensitive.
Examples:
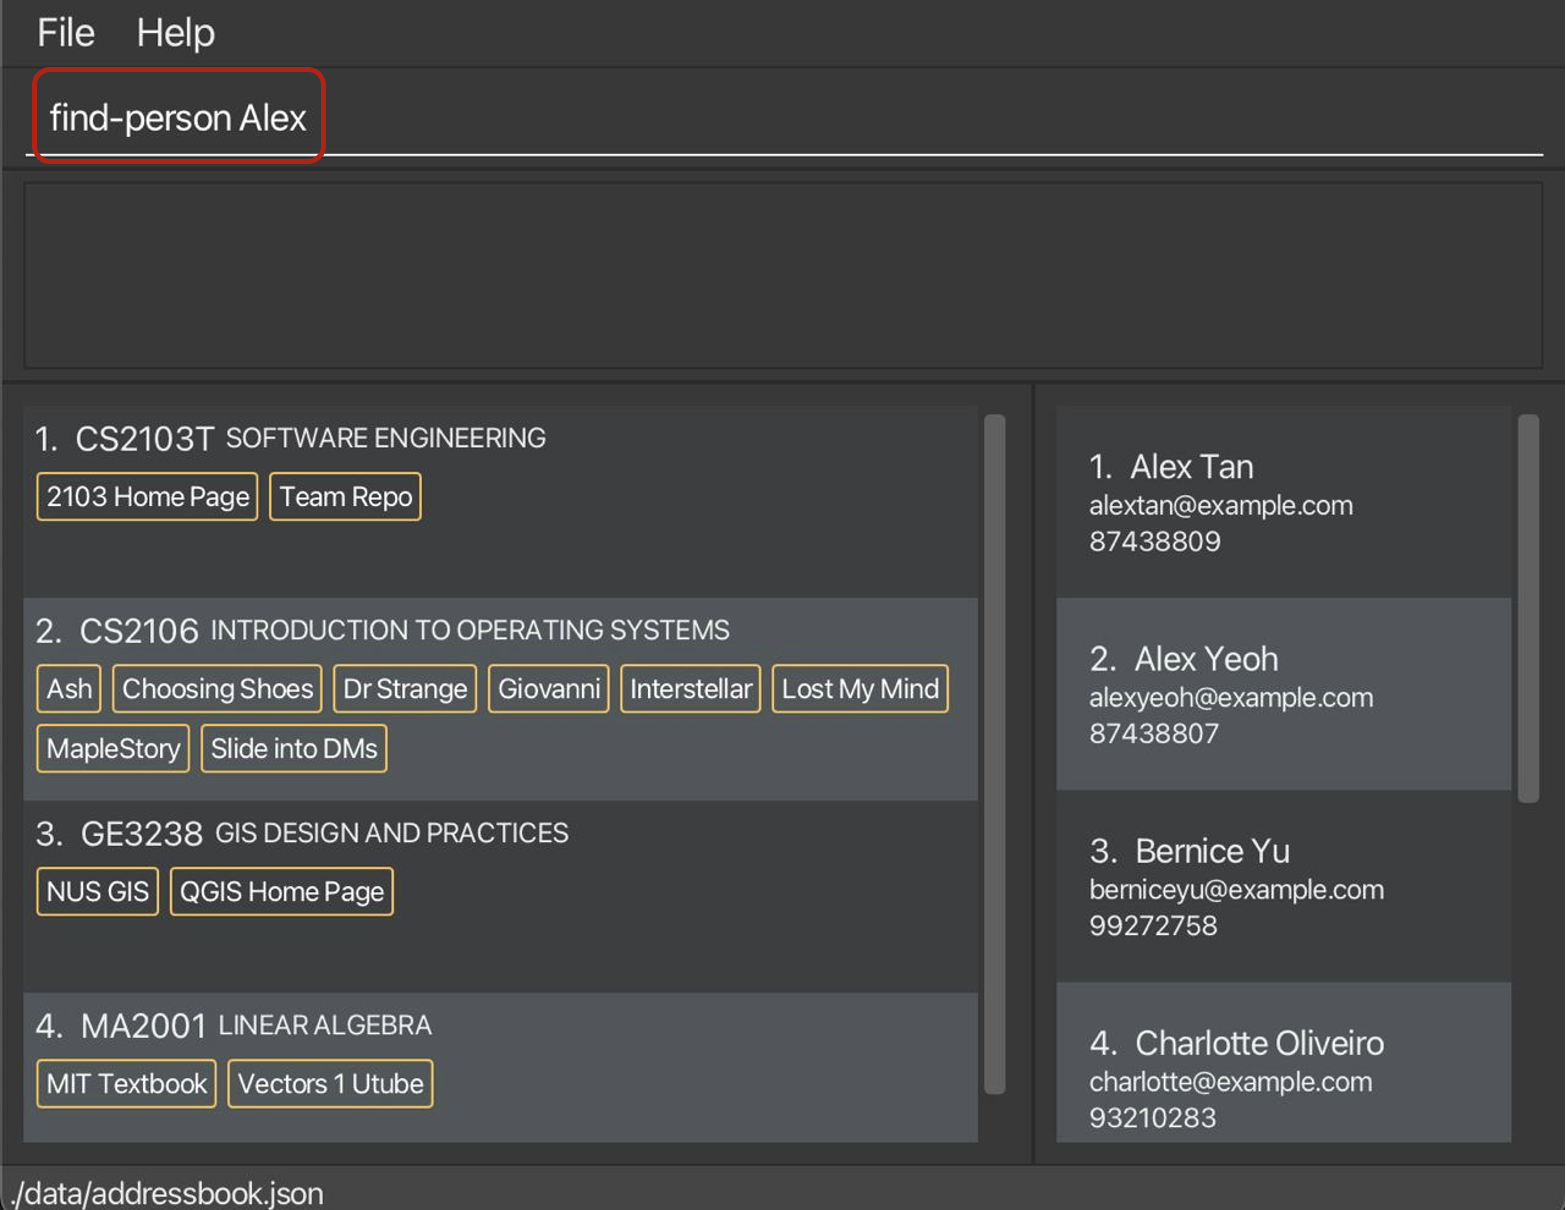
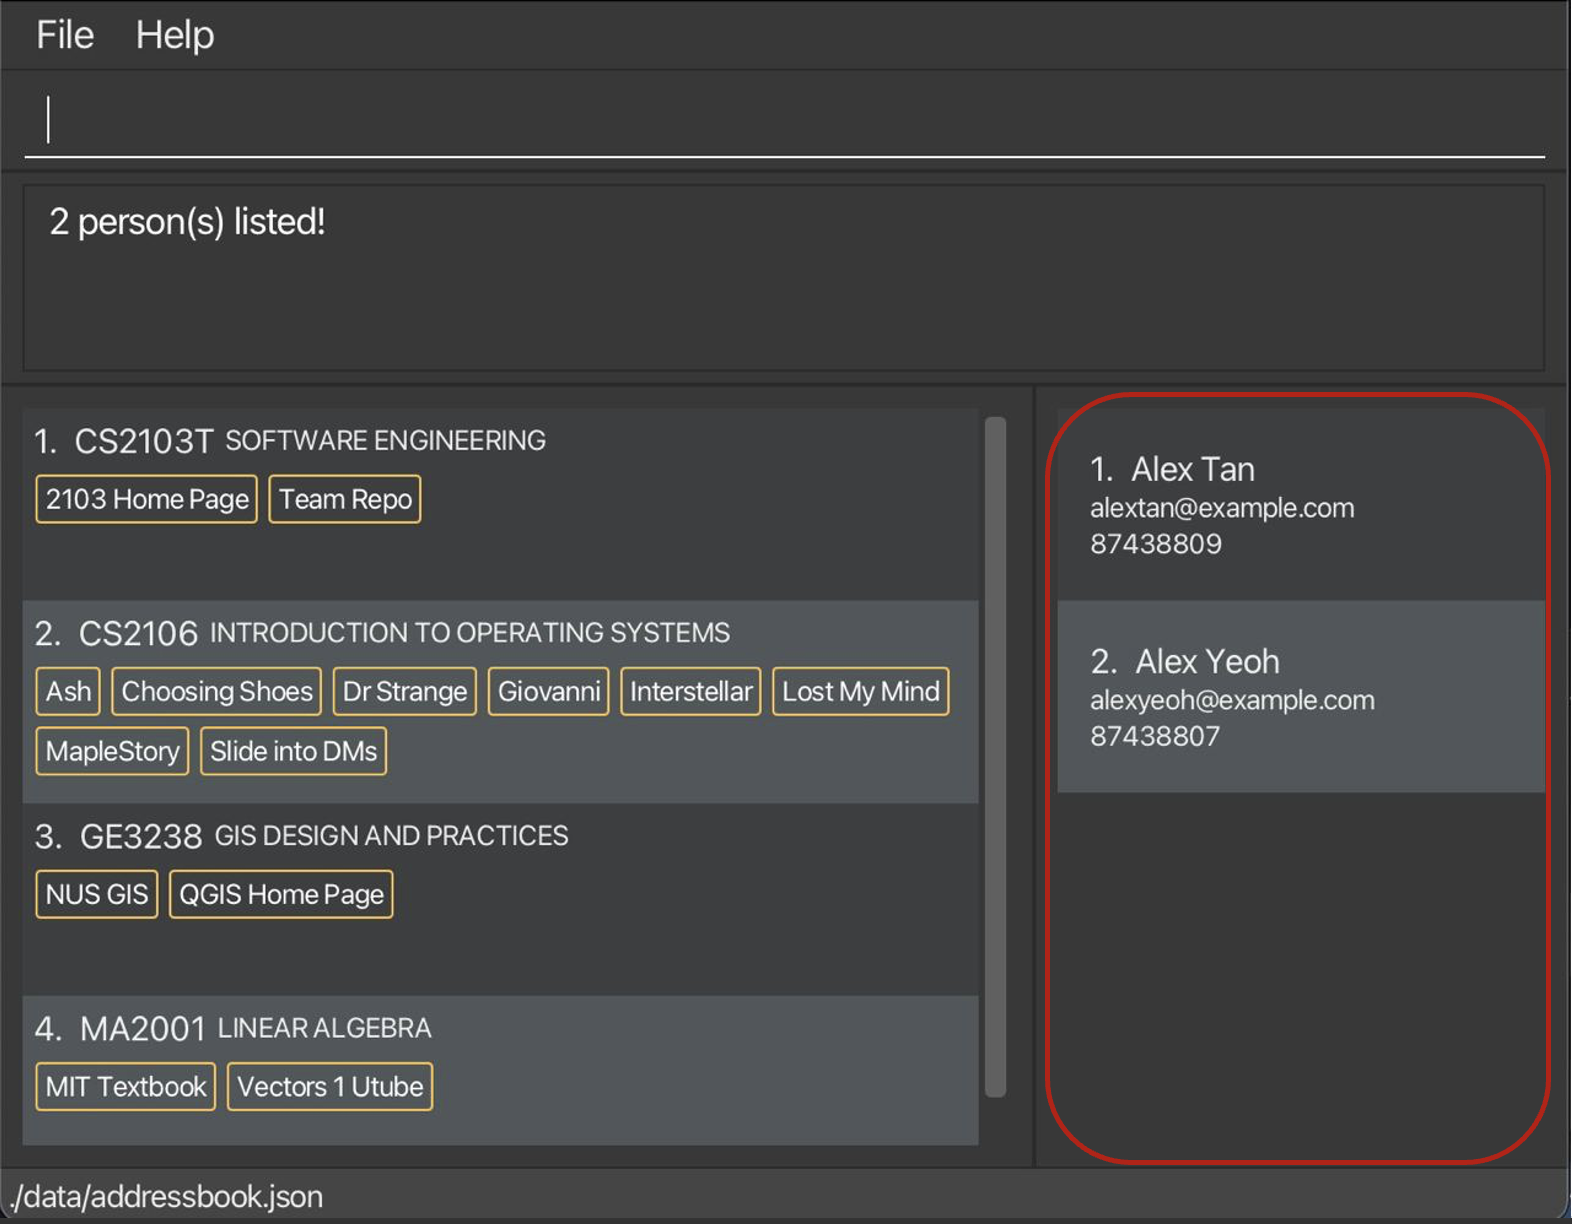
find-person alex
OR
find-person Alex
In either of the above examples, we find every person whose name starts with Alex in Plannit. Here’s a screenshot of Plannit before and after executing the command:
| Before executing the command | After executing the command |
|---|---|
|
Enter the command into the command box and hit |
The person list is now updated with persons whose name starts with |
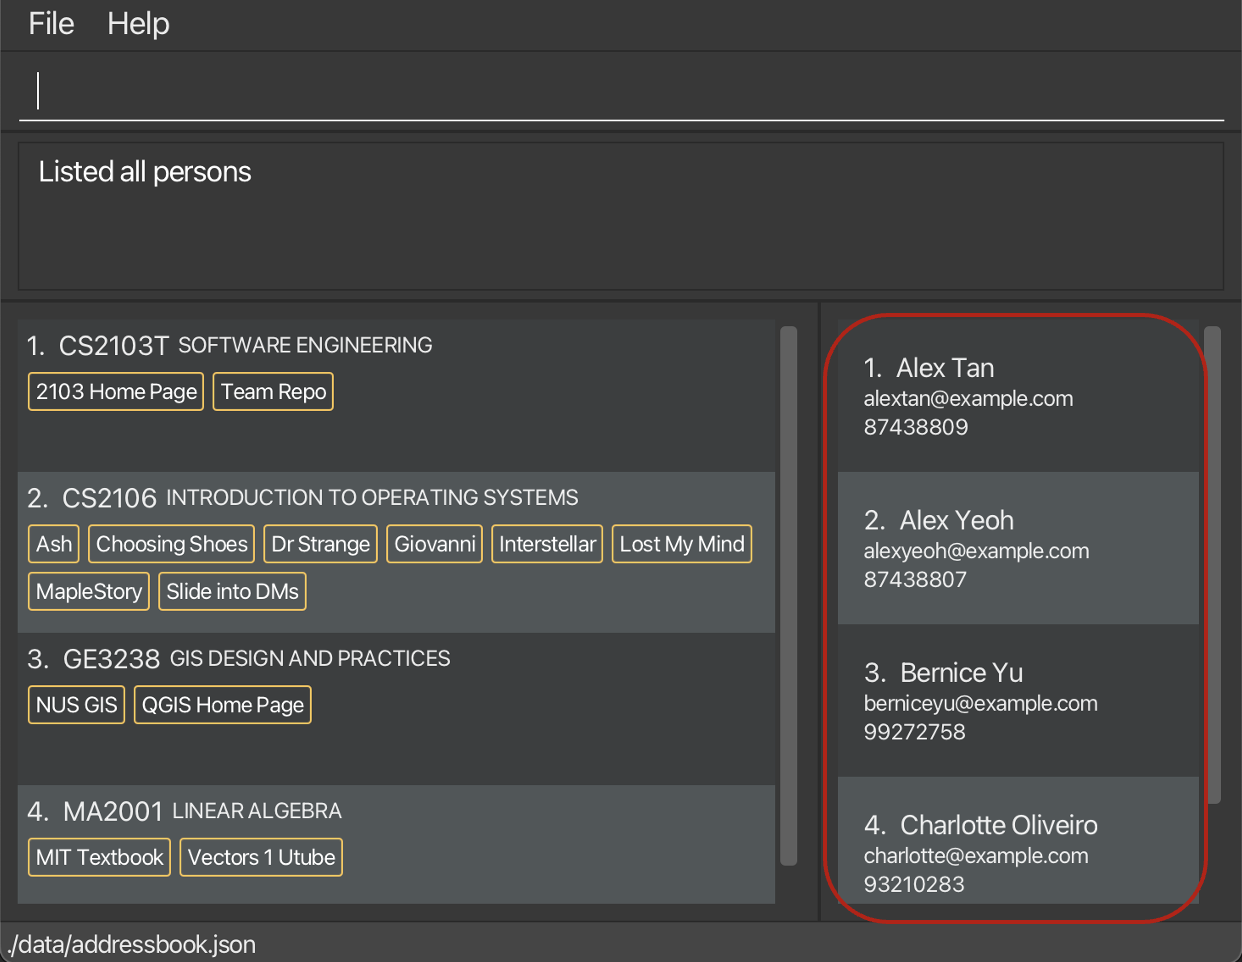
2.4.7. List person
Suppose you want to see every person stored in Plannit, you can do so on the home page using the list-person command.
Format: list-person
Here’s a screenshot of Plannit before and after executing the command:
| Before executing the command | After executing the command |
|---|---|
|
Enter the command into the command box and hit |
The person list has now been updated with every person! |
2.5. Navigation
With navigation functionalities, you now have the ability to navigate between different modules in Plannit!
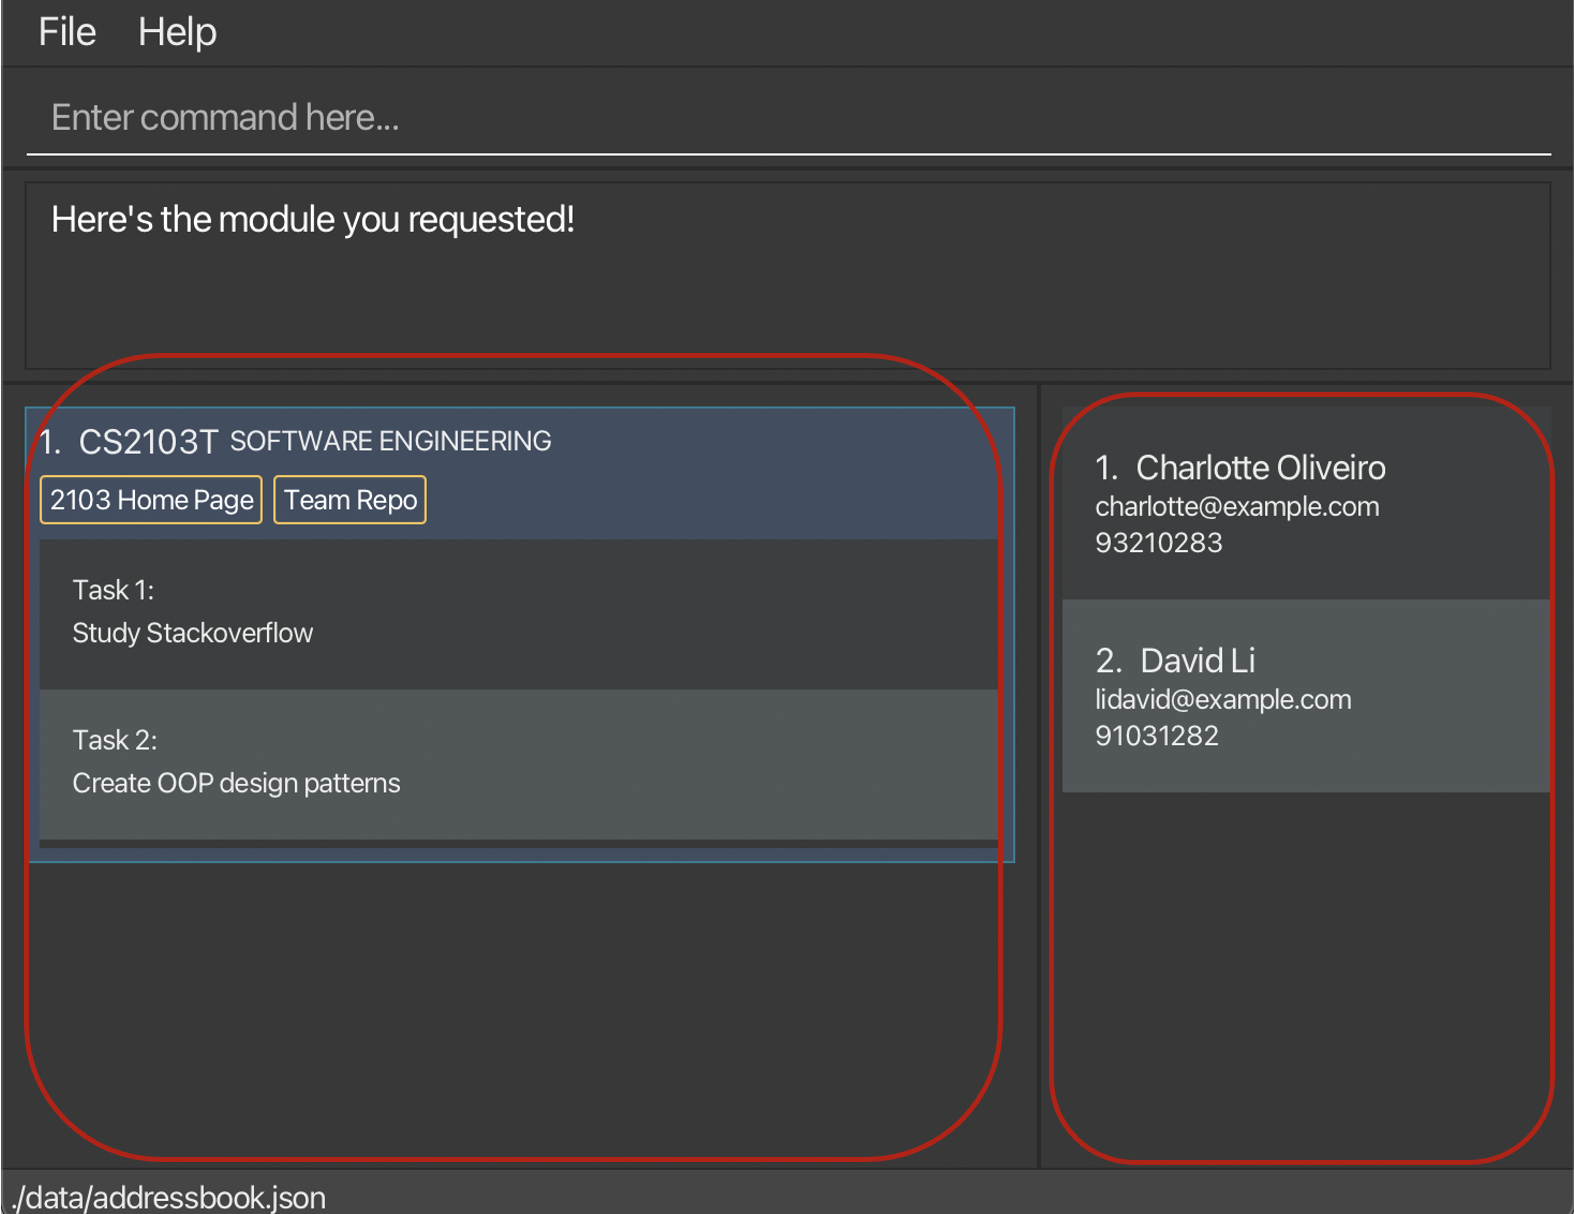
2.5.1. Navigate between modules
Suppose you want to focus on a single module, you can do so using the goto command.
This gives you a clear view of the tasks, links, and contacts associated with the particular module.
Format: goto MODULE_CODE
- You should provide a module code of an existing module in Plannit.
Example:
goto CS2103T
In the above example, we are navigating to the module with module code CS2103T. Here’s
a screenshot of Plannit before and after executing the command:
| Before executing the command | After executing the command |
|---|---|
|
Enter the command into the command box and hit |
The screen is now updated with the module's information! |

home command.
![]() Note:
Note:
You will leave the home page after executing the goto command. This is different from the
behavior of find-module command.
After using the goto command, usage of the following commands will be restricted:
find-module, list-module,
find-person, list-person.
To re-enable the restricted commands, you may execute any commands that bring you back to the home page
(i.e. home).
For Macbook user: If tasks are not shown, double-click on the module to open it!
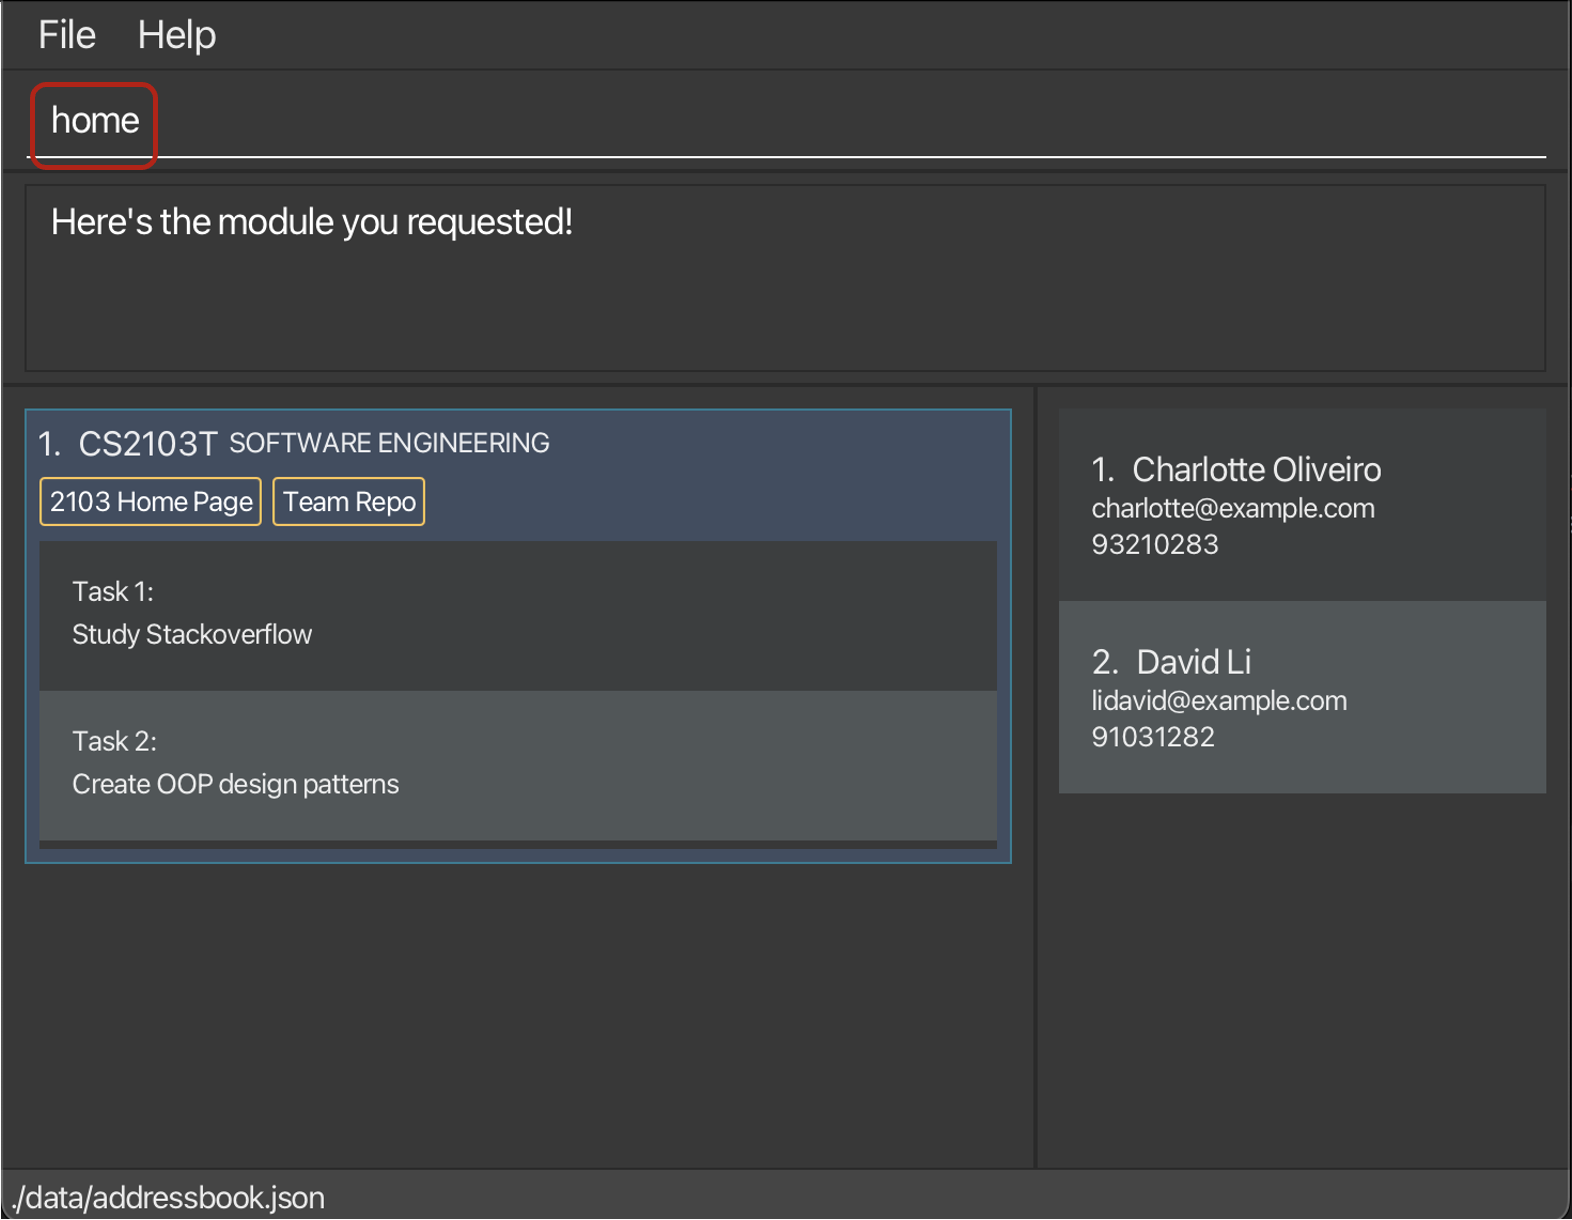
2.5.2. Navigate to home
Suppose you want to return to the home page to have an overview of all modules and contacts in Plannit,
you can do so using the home command.
Format: home
Here’s a screenshot of Plannit before and after executing the command:
| Before executing the command | After executing the command |
|---|---|
|
Enter the command into the command box and hit |
You are now back on the home screen! |
![]() Tips:
Tips:
You may click on a module to “peek” at a module’s task while on the home page.
For more detailed information regarding a specific module, you may navigate to that
module using the goto command.
The following commands also navigate you back to the home page:
add-module, delete-module, add-person.
![]() Note:
After using the
Note:
After using the goto command, executing the home command will
re-enable the following commands:
find-module, list-module,
find-person, list-person.
2.6. Clear data
If you want to purge all data and have a fresh start, you may do so using the clear command.
Format: clear
Here’s a screenshot of Plannit before and after executing the command:
| Before executing the command | After executing the command |
|---|---|
|
Enter the command into the command box and hit |
All data has been cleared! |
Clearing the data is an irreversible process!
2.7. View help
If you’re feeling lost regarding our features, use the help command to
open a window with a link that directs you to our user guide!
Format: help
Minor enhancement [coming in v1.5]
Stay tuned for Plannit v1.5, where we will be including a table showing all commands within the help window!
2.8. Exiting The Program
Exits the program.
Format: exit
2.9. Saving The Data
Your data is saved in the hard disk automatically after any command that changes the data. There is no need to save manually.
2.10. Loading The Data
If saved data exists, data is automatically loaded when the program starts. There is no need to load manually.
2.11. Editing The Data File
Your data is saved as a JSON file [JAR file location]/data/addressbook.json. Advanced users are welcome to update
data directly by editing that data file.
If your changes to the data file makes its format invalid, Plannit will discard all data and start with an empty data file at the next run.
3. FAQ
Q: I noticed a bug in the application. Is there an avenue to report it?
A: You may create an issue on our GitHub repository.
Q: Can I add my friend’s Telegram handle to Plannit?
A: Plannit has no limit of the length of person names. Hence, you may
consider adding your friend’s Telegram handle to the person name when adding him or her to Plannit.
Q: How do I transfer my data to another computer?
A: Install the app in the other computer and overwrite the empty data file it creates with
the file that contains the data of your previous Plannit home folder.
Q: Can I restore a module, link, task or contact which I have removed by
accident?
A: Unfortunately, the current version of Plannit does not support
undo-ing of commands, and any lost data will not be recovered.
Q: Can I change the colour theme of Plannit?
A: Unfortunately, Plannit is currently only available in dark mode.
4. Glossary
| Term | Meaning |
|---|---|
| Command Line Interface (CLI) | An application which interacts with users through text. Users provide inputs as text commands and results are given to users as text outputs. |
| Graphical User Interface (GUI) | An application which interacts with users through visual elements such as windows, icons, menus and buttons. |
| local-part@domain | The local-part should only contain alphanumeric characters and these special characters, excluding the parentheses, (+_.-). The local-part may not start or end with any special characters. This is followed by a ‘@’ and then a domain name. The domain name is made up of domain labels separated by periods. The domain name must: 1) end with a domain label at least 2 characters long 2) have each domain label start and end with alphanumeric characters 3) have each domain label consist of alphanumeric characters, separated only by hyphens, if any. |
| Module deliverables | Anything that the module requires you to complete. |
| Parameter | The input (of a specific field) which you wish to supply to the application. |