Developer Guide
- Table of Contents
Acknowledgements
- Libraries used: JavaFX, Jackson, JUnit5.
- This project is based on the AddressBook-Level3 project created by the SE-EDU initiative.
Setting up, getting started
Refer to the guide Setting up and getting started.
Design
.puml files used to create diagrams in this document can be found in the diagrams folder. Refer to the PlantUML Tutorial at se-edu/guides to learn how to create and edit diagrams.
Architecture
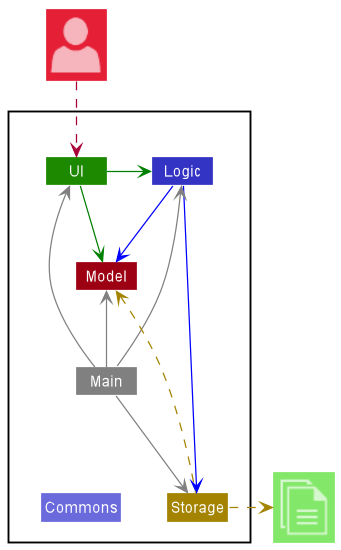
The Architecture Diagram given above explains the high-level design of the App.
Given below is a quick overview of main components and how they interact with each other.
Main components of the architecture
Main has two classes called Main and MainApp. It is responsible for,
- At app launch: Initializes the components in the correct sequence, and connects them up with each other.
- At shut down: Shuts down the components and invokes cleanup methods where necessary.
Commons represents a collection of classes used by multiple other components.
The rest of the App consists of four components.
-
UI: The UI of the App. -
Logic: The command executor. -
Model: Holds the data of the App in memory. -
Storage: Reads data from, and writes data to, the hard disk.
How the architecture components interact with each other
The Sequence Diagram below shows how the components interact with each
other for the scenario where the user issues the command delete-person n/Amy.
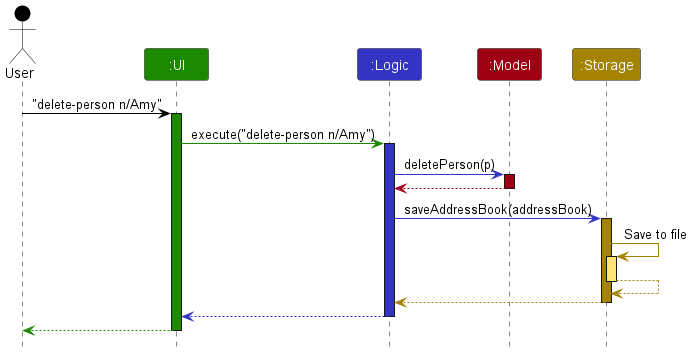
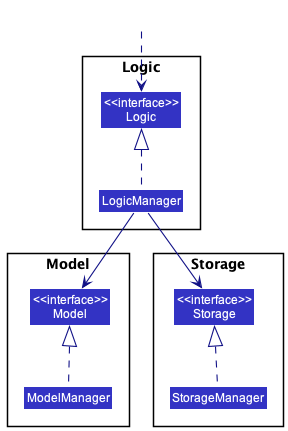
Each of the four main components (also shown in the diagram above),
- defines its API in an
interfacewith the same name as the Component. - implements its functionality using a concrete
{Component Name}Managerclass (which follows the corresponding APIinterfacementioned in the previous point.
For example, the Logic component defines its API in the Logic.java interface and implements its functionality using the LogicManager.java class which follows the Logic interface. Other components interact with a given component through its interface rather than the concrete class (reason: to prevent outside component’s being coupled to the implementation of a component), as illustrated in the (partial) class diagram below.
The sections below give more details of each component.
UI component
The API of this component is specified in Ui.java
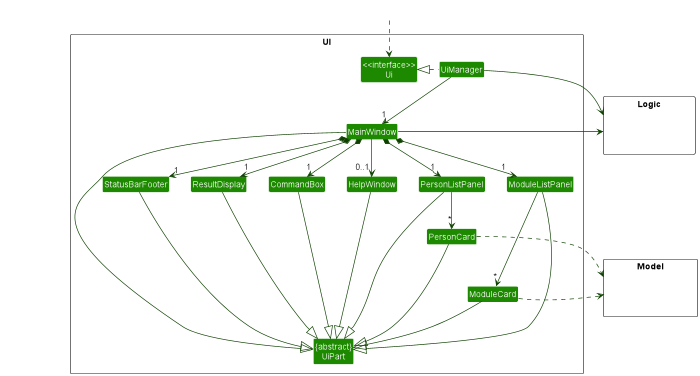
The UI consists of a MainWindow that is made up of parts e.g.CommandBox, ResultDisplay, PersonListPanel, StatusBarFooter etc. All these, including the MainWindow, inherit from the abstract UiPart class which captures the commonalities between classes that represent parts of the visible GUI.
The UI component uses the JavaFx UI framework. The layout of these UI parts are defined in matching .fxml files that are in the src/main/resources/view folder. For example, the layout of the MainWindow is specified in MainWindow.fxml
The UI component,
- executes user commands using the
Logiccomponent. - listens for changes to
Modeldata so that the UI can be updated with the modified data. - keeps a reference to the
Logiccomponent, because theUIrelies on theLogicto execute commands. - depends on some classes in the
Modelcomponent, as it displaysPersonobject residing in theModel.
Logic component
API : Logic.java
Here’s a (partial) class diagram of the Logic component:
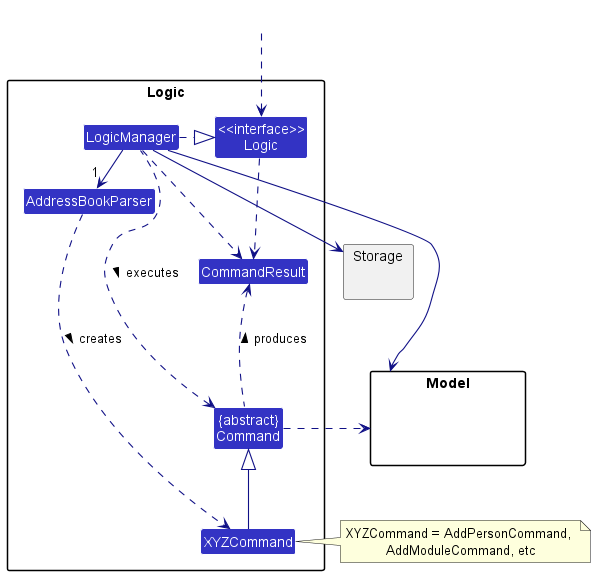
How the Logic component works:
- When
Logicis called upon to execute a command, it uses theAddressBookParserclass to parse the user command. - This results in a
Commandobject (more precisely, an object of one of its subclasses e.g.AddPersonCommand) which is executed by theLogicManager. - The command can communicate with the
Modelwhen it is executed (e.g. to add a person). - The result of the command execution is encapsulated as a
CommandResultobject which is returned back fromLogic.
The Sequence Diagram below illustrates the interactions within the Logic
component for the execute("delete-person n/Alex") API call.
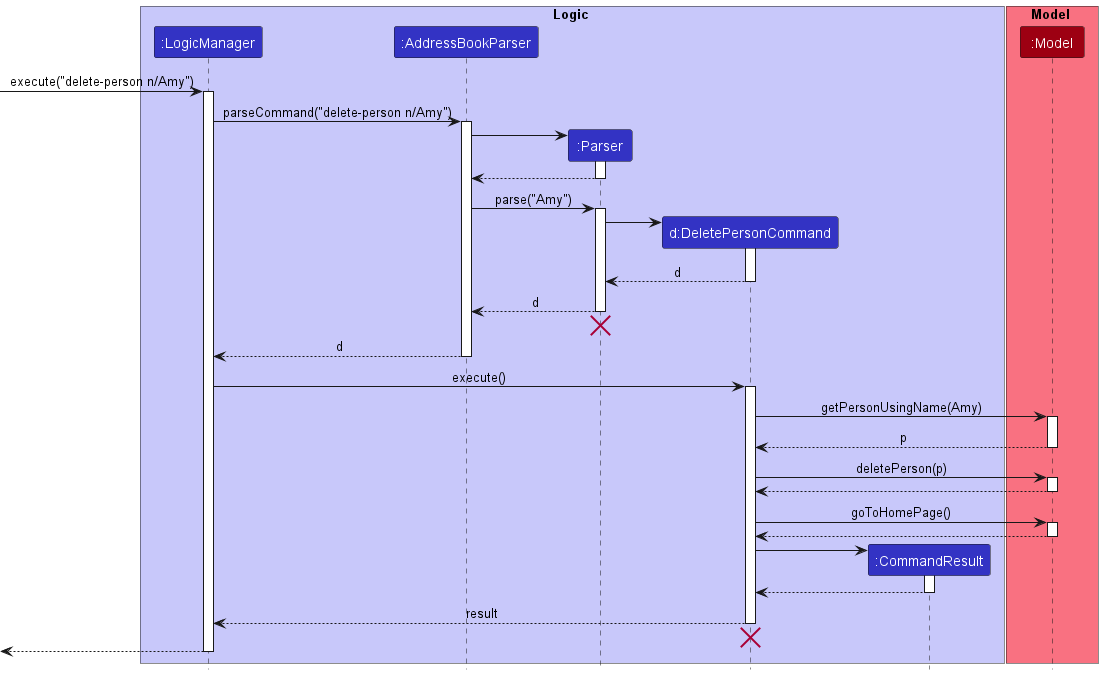
DeletePersonCommandParser and DeletePersonCommand should
end at the destroy marker (X) but due to a limitation of PlantUML, the
lifeline reaches the end of diagram.
Here are the other classes in Logic (omitted from the class diagram above) that are used for parsing a user command:
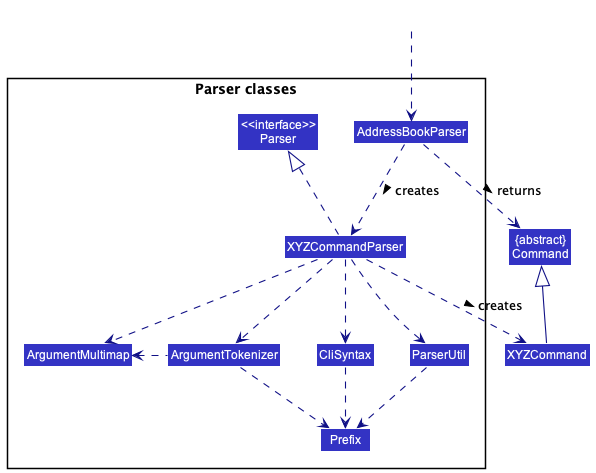
How the parsing works:
- When called upon to parse a user command, the
AddressBookParserclass creates anXYZCommandParser(XYZis a placeholder for the specific command name e.g.AddPersonCommandParser) which uses the other classes shown above to parse the user command and create aXYZCommandobject (e.g.AddPersonCommand) which theAddressBookParserreturns back as aCommandobject. - All
XYZCommandParserclasses (e.g.AddPersonCommandParser,DeletePersonCommandParser, …) inherit from theParserinterface so that they can be treated similarly where possible e.g. during testing.
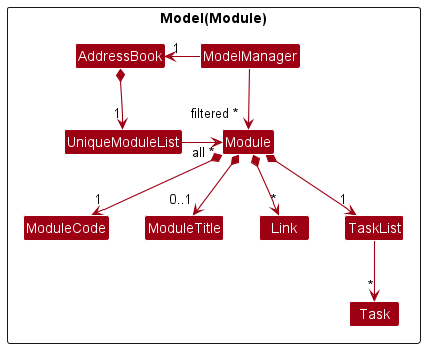
Model component
API : Model.java
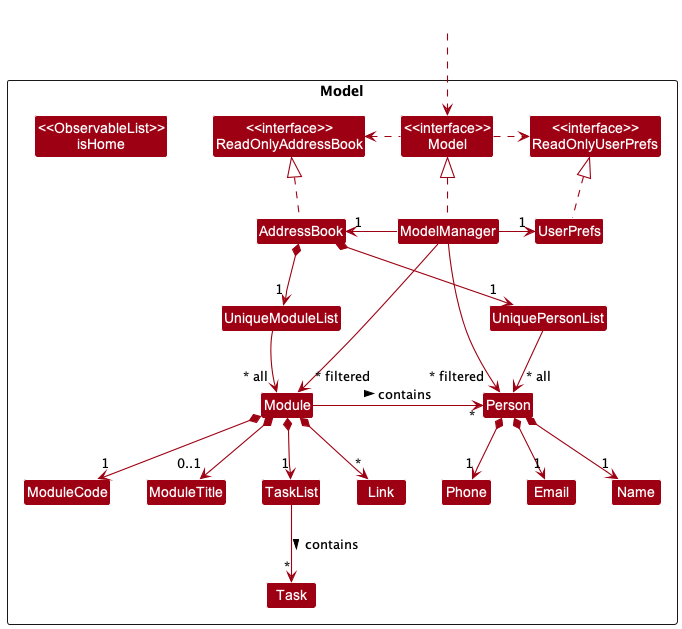
The Model component,
- stores the address book data i.e.:
- all
Personobjects (which are contained in aUniquePersonListobject). - all
Moduleobjects (which are contained in aUniqueModuleListobject).
- all
- stores the current
isHomestatus of the application in anObservableList<Boolean>object which is exposed to outsiders as an unmodifiableObservableList<Boolean>that can be ‘observed’ e.g. the UI can be bound to this object so that the UI automatically updates when theisHomestatus changes. - stores the currently ‘selected’
Personobjects (e.g. results of a search query) as a separate filtered list which is exposed to outsiders as an unmodifiableObservableList<Person>that can be ‘observed’ e.g. the UI can be bound to this list so that the UI automatically updates when the data in the list change. - stores the currently ‘selected’
Moduleobjects (e.g. results of a search query) as a separate filtered list which is exposed to outsiders as an unmodifiableObservableList<Module>that can be ‘observed’ e.g. the UI can be bound to this list so that the UI automatically updates when the data in the list change. - stores a
UserPrefobject that represents the user’s preferences. This is exposed to the outside as aReadOnlyUserPrefobjects. - does not depend on any of the other three components (as the
Modelrepresents data entities of the domain, they should make sense on their own without depending on other components).
Storage component
API : Storage.java
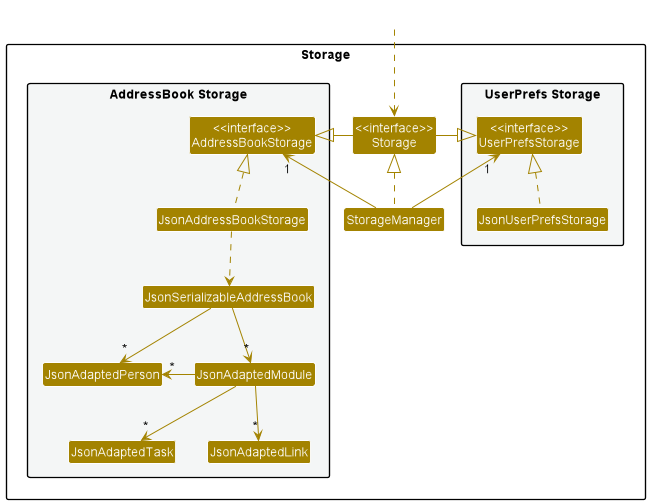
The Storage component,
- can save both address book data and user preference data in json format, and read them back into corresponding objects.
- inherits from both
AddressBookStorageandUserPrefStorage, which means it can be treated as either one (if only the functionality of only one is needed). - depends on some classes in the
Modelcomponent (because theStoragecomponent’s job is to save/retrieve objects that belong to theModel)
Common classes
Classes used by multiple components are in the seedu.addressbook.commons package.
Implementation
This section describes some noteworthy details on how certain features are implemented.
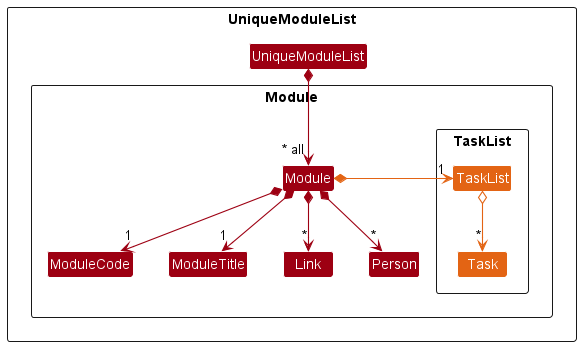
Module subcomponent
General Design
A Module class is used to represent a module. A Module contains the following attributes:
-
ModuleCode, representing module code -
ModuleTitle, representing module title (optional field). If there is no module title, then the module title is stored as an empty string. -
TaskList, representing a list ofTasks, which in turn represent a module-related task -
TreeSetofLinkobjects, storing the set of links associated to theModule -
HashSetofPersonobjects, storing the set of people associated to theModule
More details regarding tasks can be found here. More details regarding links can be found here. More details regarding persons can be found here. More details regarding module-to-person associations can be found here.
Here are the ways in which different classes in the Model component interact
with Module:
- A
UniqueModuleListrepresents the list ofModuleobjects. - The list of modules is stored in the
AddressBookclass. - The
ModelManagerclass stores theAddressBookcontaining the list of unfilteredModuleobjects, and a separate instance variable storing the list of filteredModuleobjects.
The UML class diagram of the Module-related parts of Model component is shown below:
The Storage component has been updated for persistent storage of modules. JsonAdaptedModule
has been added to represent a Module object in JSON format.
Add Module Feature
One feature related to modules is the add module feature. This feature is especially important because without the ability to add modules, it would be impossible to add tasks and links. Associating a person to a module would also be impossible.
The implementation of deleting and editing module are similar. Hence, they will be omitted.
Implementation of add module feature
The add module mechanism is facilitated by AddModuleCommand and AddModuleCommandParser.
AddModuleCommandParser will parse the module code (compulsory field) and the module title
(optional field), and return an AddModuleCommand object. Upon calling AddModuleCommand#execute(),
a module object with the appropriate module code and module title will be
added via the Model#addModule() method.
Below shows a description of an example scenario for adding a command.
Step 1: User enters command add-module m/CS2105 to add module CS2105 to Plannit.
Step 2: AddressBookParser, the parser for Plannit, will parse the user command to return an
AddModuleCommand object.
Step 3: The resulting AddModuleCommand object is then executed. The validity of the input
module code provided is checked. This involves a check of whether the input is a duplicate module
(case-insensitive, removing leading and trailing whitespaces).
Step 4: After successful checks, the module CS2105 will be added into Plannit.
Step 5: Model#goToHomePage() is called, hence Plannit goes back to the home page.
Step 6: The saveAddressBook() method of StorageManager is called to save the
newly-updated list of modules to a JSON file.
Step 7: JsonAddressBookStorage is called, which serializes/converts the new list of modules
into JSON format, so that it can be saved into a file. The file will be read whenever Plannit
starts up so that it can load saved module and person data.
Step 8: Plannit’s Graphical User Interface (GUI) displays message that the addition of module has been successful.
The following sequence diagram summarizes what happens when the user requests to add module
CS2105 to Plannit via add-module command, excluding updating the storage file.
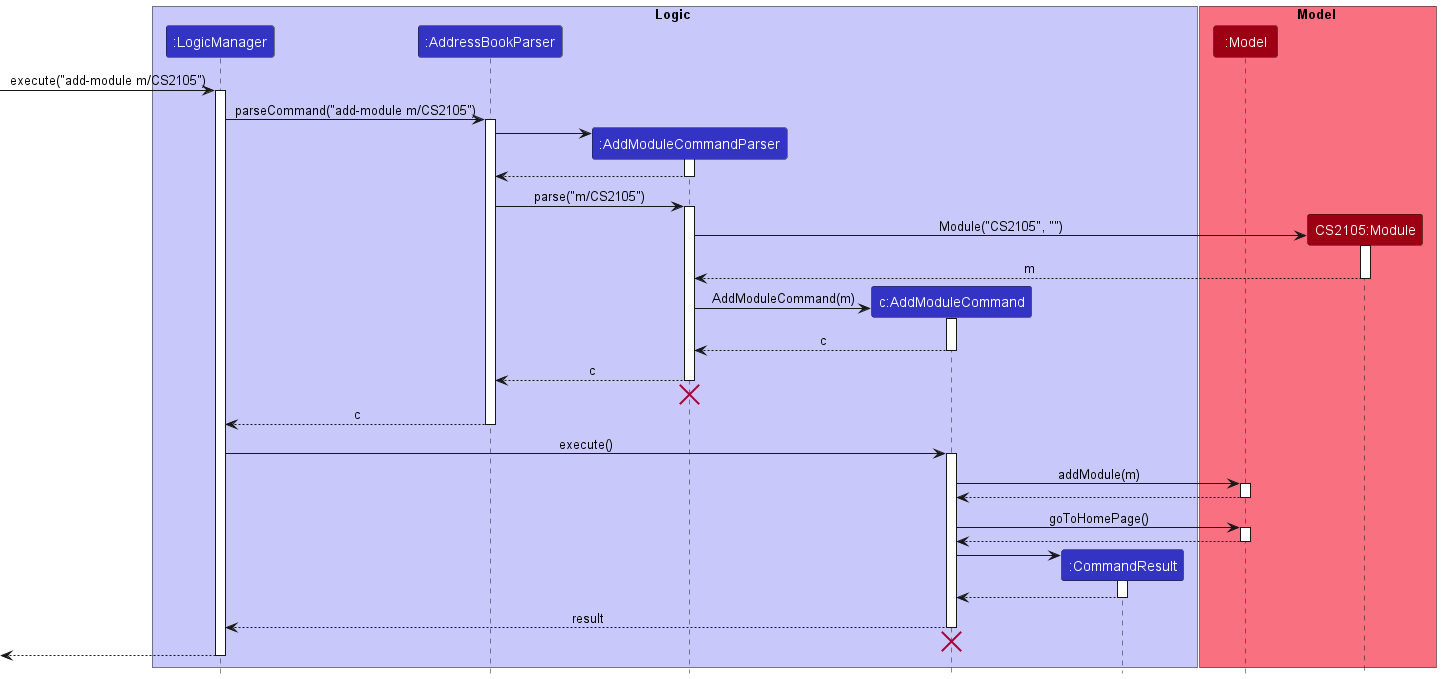
AddModuleCommand and AddModuleCommandParser should end at the
destroy marker (X) but due to a limitation of PlantUML, the lifeline reaches the end of diagram.
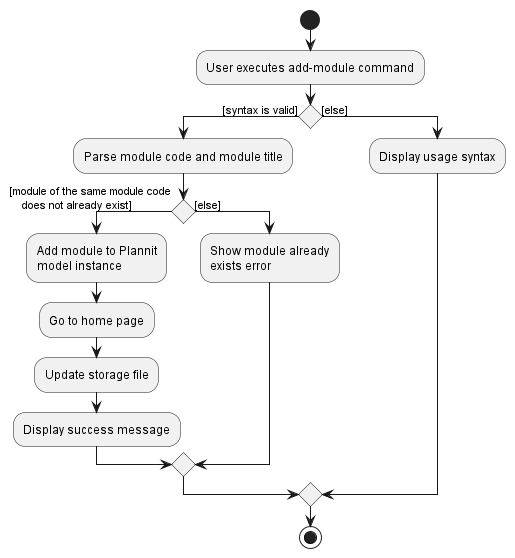
The following activity diagram summarizes what happens when the user requests to add a module to
Plannit via add-module command.
Alternatives Considered
Aspect: The class-level design of how to integrate the Module class to the Model component.
-
Alternative 1 (current choice): Reuse the same
AddressBookto also store the list of uniqueModuleobjects.-
Pros: A duplicate class
AddressBookforModelmethods is not necessary. -
Cons:
AddressBook,ModelManagerand other classes would need to be updated to includeModule. Hence, the interfacesReadOnlyAddressBookandModelalso need to be updated to support theModule-related methods.
-
-
Alternative 2: Create another
AddressBook-like class to store the list ofModuleobjects.-
Pros: Functionality for
PersonandModuleare now separate. This better adheres to the Single Responsibility Principle becauseAddressBookonly does operations regardingPersonrather than doing operations regarding bothPersonandModule. -
Cons: More classes to implement. In particular,
AddressBookandReadOnlyAddressBookneed to be duplicated into separate classes to supportModule.
-
Rationale behind current choice:
- Duplicating
AddressBookwill result in duplicating dependent classes such asReadOnlyAddressBook,JsonAddressBookStorageandJsonSerializableAddressBook, hence complicating the implementation. For example, the storage component will now need to deal with twoAddressBookinstances, hence requiring either two separate storage files, or changing the implementation to combine the contents of the two differentAddressBook-like classes into one file. CombiningPersonandModuleinto oneAddressBookwould avoid this issue. - While dealing with lists of
PersonandModuleobjects are two different functionalities, both functionalities deal with a list of user-provided objects. Therefore, the cohesion should not significantly decrease.
Link subcomponent
Add link feature
The add link feature allows for the user to add links with corresponding aliases to a Module in Plannit.
Links in Plannit are represented by the Link class. A Link object contains two required fields,
a String URL and a String alias. For each Plannit Module, Link objects are stored in a TreeSet.
The implementation of the delete link feature is highly similar to this, but without a String URL input.
Implementation
The add link mechanism is facilitated by AddLinkCommandParser and AddLinkCommand.
AddLinkCommandParser implements the Parser interface to validate the Module and
pair link URLs with their aliases from the user input.
It then creates a AddLinkCommand object with the pairings for the specified Module.
AddLinkCommand extends the Command class to add Link objects into a Module in Plannit.
Given below is an example usage scenario and how the add link mechanism behaves at each step.
Step 1: The user decides to add a link to a current module in Plannit using the following input:
add-link m/CS1231 l/<link URL> la/<link alias>
Step 2: The LogicManager calls the LogicManager#execute() method on the user input.
Then, the LogicManager calls the AddressBookParser#parseCommand() method
with the user input String to create a Command object.
Step 3: The AddressBookParser finds the command keyword add-link in the user input.
Thus, a new AddLinkCommandParser object is instantiated to parse the arguments from the user input
to create a new AddLinkCommand object.
Step 4: Within the new AddLinkCommandParser object, the parse method is used on the arguments to validate
its module code, link URL, and alias. Also, it forms a new Link object with its link URL and alias.
A new AddLinkCommand is created with the module code and Link object, which is returned to LogicManager.
Step 5: The AddLinkCommand#execute() method is then called by the LogicManager.
This method will first obtain the Module object with the module code indicated by the user.
A copy of the Module’s fields is then created and the Link object is added to the copied TreeSet of links.
Step 6: A new Module is created with the modified and copied fields, which replaces
the original Module object in Plannit using the Model#setModule() method.
The following sequence diagram shows how the add link feature works:
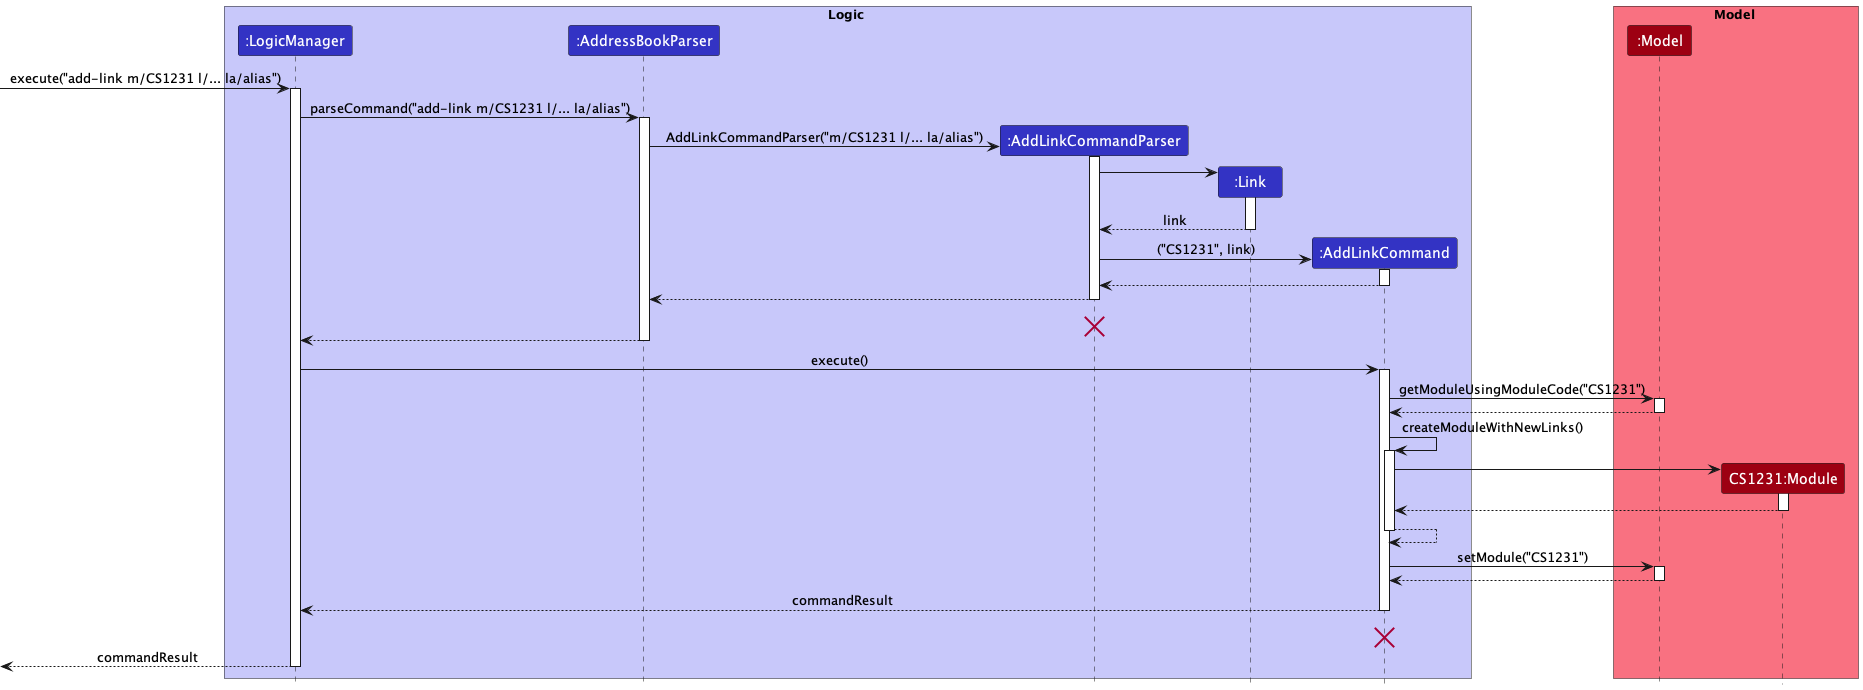
AddLinkCommand and AddLinkCommandParser should end at the destroy marker (X)
but due to a limitation of PlantUML, the lifeline reaches the end of diagram.
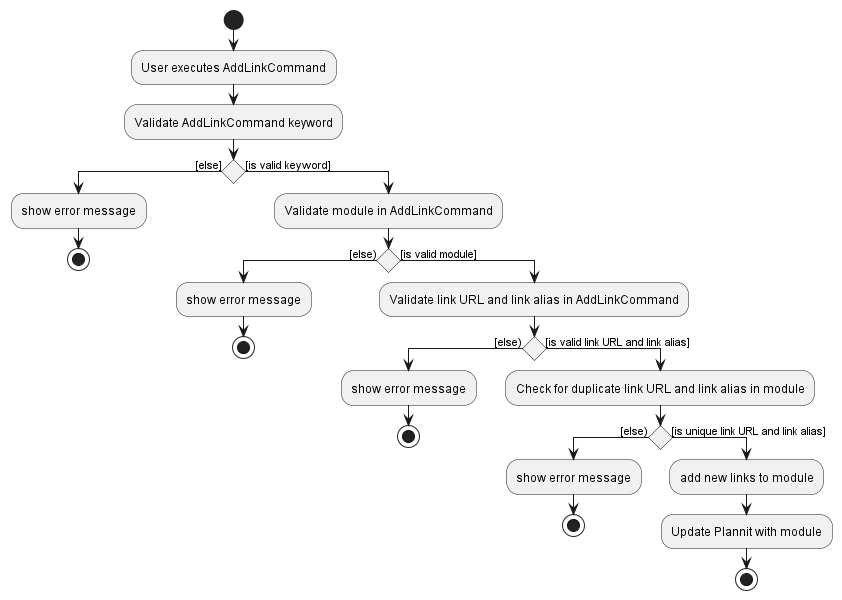
The following activity diagram shows how the add link feature works:
Design considerations:
Aspect: Link Representation:
-
Alternative 1 (current choice): Link objects require alias and URL.
- Pros:
- Fast identification, access, and deletion of links from the user’s perspective.
- Improved sorted display of links (shorter and standardised format).
- Cons:
- Longer time for the user to type input.
- Pros:
-
Alternative 2: Link objects require URL only and its alias is an optional input.
- Pros:
- Greater flexibility for different user preferences.
- Cons:
- Inconsistent link display format
- Slow identification, access, and deletion of links from the user’s perspective.
- Pros:
-
Alternative 3: Link objects require URL only and its alias is an optional input with a default alias.
- Pros:
- Greater flexibility for different user preferences.
- Cons:
- Default alias may be confusing and/or undesirable.
- Slow identification, access, and deletion of links from the user’s perspective.
- Pros:
-
Alternative 4: Link objects require URL only with no alias.
- Pros:
- Easy to implement.
- Cons:
- Cluttered and unorganised display of links.
- Slow identification, access, and deletion of links from the user’s perspective. Rationale behind current choice:
- Pros:
Rationale behind current choice:
Link Representation: Each link requires an alias and URL such that users are able to make sense of each URL present in Plannit. By enforcing the user to select their own alias, they are more likely to remember what each alias means in the long run. Aliases are also especially useful in differentiating between similarly named URLs, i.e. same domain but the remainder of the url has no semantic meaning to the user (e.g. zoom links).
Aspect: Link Storage:
-
Alternative 1 (current choice): Link objects stored in a
TreeSetobject withinModule.- Pros:
- Consistent display order of links in Plannit.
- Cons:
- Harder to implement.
- Pros:
-
Alternative 2: Link objects stored in an
ArrayListobject withinModule.- Pros:
- Easy to implement.
- Cons:
- No standardised display order of links across
Moduleobjects.
- No standardised display order of links across
- Pros:
-
Alternative 3: Link objects stored in a
HashSetobject withinModule.- Pros:
- Fast performance when accessing and deleting links in terms of time.
- Cons:
- Display order of links changes after each modification to the
HashSetof links for aModule.
- Display order of links changes after each modification to the
- Pros:
Rationale behind current choice:
TreeSet was selected as to ensure a consistent sorting order across all modules such that users will spend the least amount of the time searching for their required alias for each module, thus boosting their productivity.
Person subcomponent
The terms ‘contact’ and ‘person’ have similar meanings and for the majority of the time, can be understood as referring to the same entity. The only scenario that calls for a distinction is when you are inputting a command word; we use person instead of contact.
General design
Every contact added into Plannit is represented as a Person object.
Every Person object has three compulsory attributes:
NameEmailPhone
The UML class diagram of the Person-related parts of the Model component is shown below:
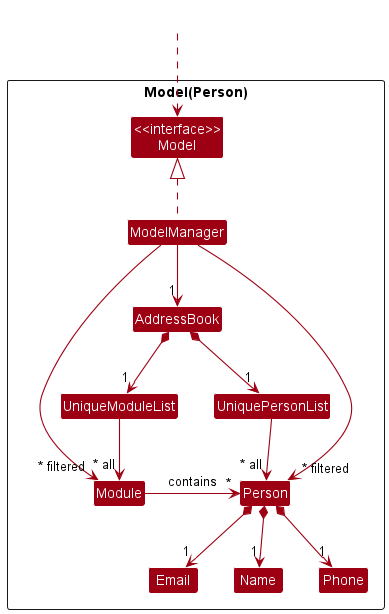
With reference to the diagram above, here are the ways in which different classes in the Model component interact with the Person class:
- A
UniquePersonListobject holds all thePersonobjects in Plannit.- This
UniquePersonListobject is stored in theAddressBookclass.
- This
- The
ModelManagerclass stores a filtered list ofPersonobjects, which is the list used to determine whichPersonobjects to display on the GUI.
Delete Person Feature
One feature related to contacts is the delete person feature, where a contact is deleted from Plannit. This
particular feature is highlighted because its implementation involves additional interactions with the Module
component.
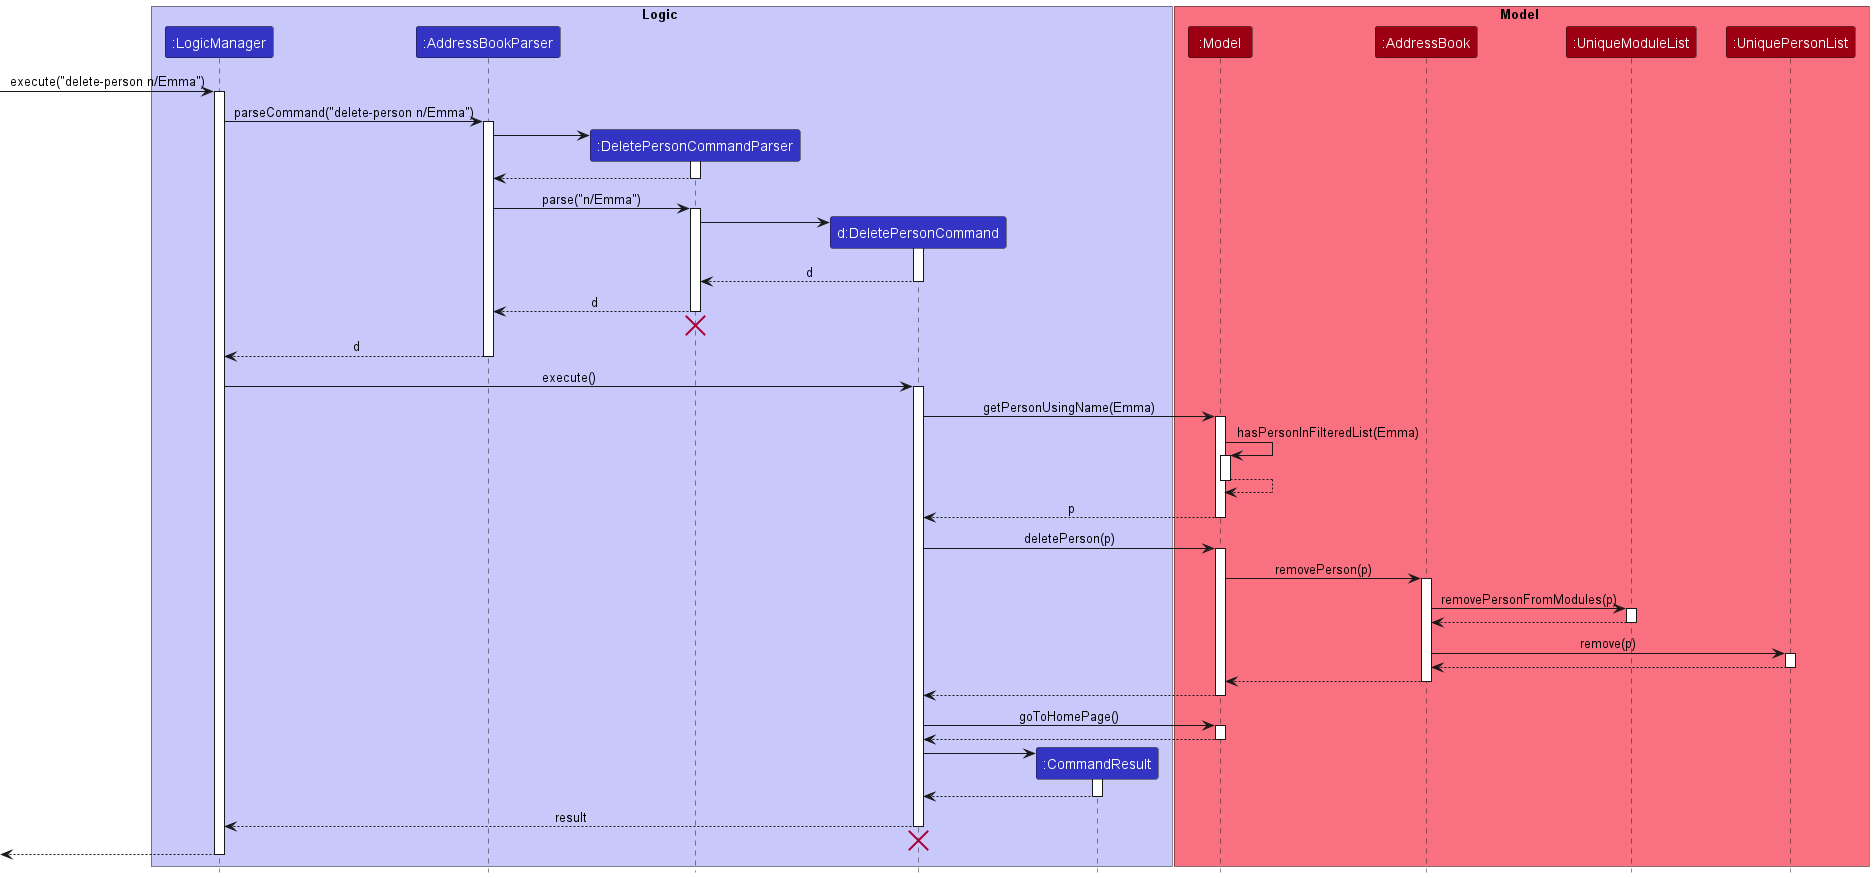
Implementation of delete person feature
The delete person mechanism is facilitated by DeletePersonCommand and DeletePersonCommandParser.
DeletePersonCommandParser parses the user input in a meaningful way and uses it to create a DeletePersonCommand.
DeletePersonCommand then calls the Model#deletePerson() operation, which in turn calls
AddressBook#removePerson() to delete a contact in Plannit.
Given below is an example usage scenario and how the delete person mechanism behaves at each important step. Before proceeding on with this section, it is highly recommended that you read the Module-Person association section to be able to fully comprehend the example scenario below.
Step 1. There currently exists 3 persons in Plannit, with 2 of them already added to a module.
Step 2. The user executes delete-person n/Emma command and this creates a deletePersonCommand to delete Emma
(that is currently displayed on the GUI) from the address book. Upon execution, UniqueModuleList#removePersonFromModules
() and UniquePersonList#remove() are eventually called. UniqueModuleList#removePersonFromModules() removes all
occurrences of the person in every module.
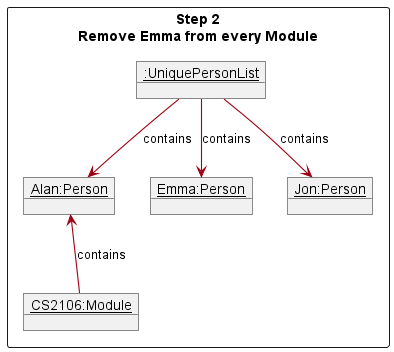
Step 3. UniquePersonList#remove() removes the person from UniquePersonList.
Afterwards, there would no longer be any references to the deleted Person object, and Java will eventually remove it
from memory.

The following sequence diagram shows how the delete person operation works.
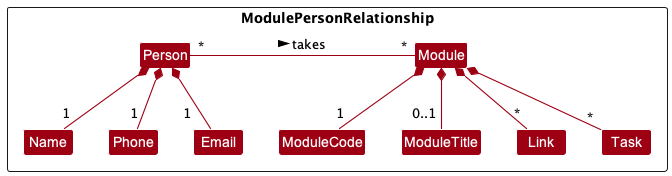
Module and Person association
A person can take several modules. To model this interaction, every person in Plannit thus has the ability to be
associated to a module. The relationship between Person and Model is displayed in the Object Oriented Domain Model diagram below:
Add Person To Module Feature
One feature related to the module-person association is the add person to module feature. The feature allows an already
existing contact in Plannit to have an association with a module. This particular feature is highlighted because it is
an implementation that involves interactions between two different kinds of Model objects, namely Person and
Module. Note that the implementation of this feature is largely similar to the other feature under this section,
namely the delete person from module feature.
Implementation of add person to module feature
The add person to module mechanism is facilitated by AddPersonToModuleCommand and AddPersonToModuleCommandParser.
AddPersonToModuleCommandParser parses the user input in a meaningful way and uses it to create a AddPersonToModuleCommand.
AddPersonToModuleCommand then calls the Model#getModuleUsingModuleCode() and Model#getPersonUsingName() operations
to obtain the concerned module and person instances. Note that the specified instances must be in the currently filtered
display lists, else an exception is thrown. The obtained module instance is then copied over and used to construct a
new module object. Finally, the person instance of concern is added to the newly created module object, and we then replace
the old module object in UniqueModuleList with the new module object.
Given below is an example usage scenario and how the add person to module mechanism behaves at each important step.
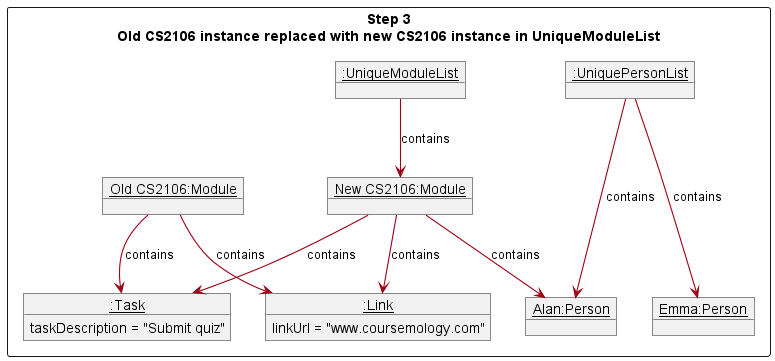
Step 1. There currently exists 2 persons (Alan and Emma) in Plannit, and the user wants to add an association between Alan and the module CS2106.

Step 2. The user executes add-person-to-module m/CS2106 n/Alan command and this creates a
addPersonToModuleCommand. Upon execution, Model#getModuleUsingModuleCode() and Model#getPersonUsingName() are used
to obtain the existing CS2106 module and Alan person instances. AddPersonToModuleCommand#createModuleWithAddedPerson()
is then called to create a new CS2106 module instance by copying all fields of the old CS2106 instance and also adding
the Alan person instance in.
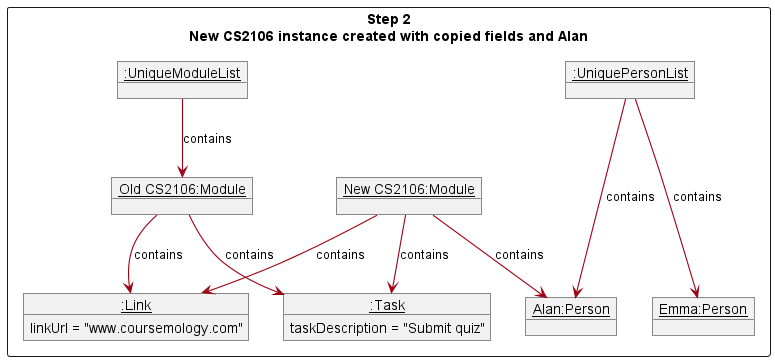
Step 3. Model#setModule() replaces the old CS2106 instance with the new CS2106 instance in UniqueModuleList.
Afterwards, there would no longer be any references to the old CS2106 object, and Java will eventually remove it
from memory.
Design considerations:
Aspect: Implementation direction:
-
Alternative 1 (current choice): Store
Personas aSetfield inModule.- Pros: No need for extra classes, making it easier to implement.
- Cons: Does not fully model the bidirectional relationship that a module has with a person.
-
Alternative 2: Store
Personas aSetfield inModuleand at the same time, storeModuleas aSetfield inPerson- Pros: The bidirectional relationship is fully reflected in code.
- Cons: Harder to implement as deleting a module object now requires deletion of that module in every person’s set of modules as well.
-
Alternative 3: Have an association class that models the “person is taking module” association.
- Pros: The dependencies of the
ModuleandPersonclass does not increase as no direct reference to the other type is now required. - Cons: Harder to implement as this requires creation of new classes and many more test cases.
- Pros: The dependencies of the
Rationale behind current choice:
- Despite the benefit of having code that fully reflects the relationship in the real world, going for a simpler implementation helps to reduce code complexity and lowers risk of bugs.
- Despite the benefit of having lower dependencies, the use of an association class substantially increases the risk of bugs as the implementation would be very different from existing (heavily-tested) code.
Task subcomponent
Implementation
A Task class is used to represent a task that is to be completed by the
user. Tasks are assigned to a specific module. The following Command
classes were implemented to allow users to interact with Task objects:
-
AddTaskCommandallows the user to add a task to a specifiedModulein Plannit. -
DeleteTaskCommandallows the user to delete a task from a specifiedModulein Plannit. -
SwapTaskCommandallows the user to swap the order ofTasks within a specifiedModulein Plannit.
Each Module within the UniqueModuleList stores a TaskList
instance, which in turn stores a list of Task objects. This TaskList
object is used to maintain the list of Task objects within the module by
supporting operations to add, delete and swap tasks.
Module objects are instantiated with an empty TaskList.
Similar to UniqueModuleList and UniquePersonList, a TaskList contains the following:
-
internalList- AnObservableList<>containing the tasks of a module. This list is used for the adding and removing of objects in the data structure. -
internalUnmodifiableList- AnObservableList<>that is an unmodifiable copy ofinternalList. This list is used when external objects requests a copy of the current list of objects.
However, there exists two key differences:
-
TaskListis used to storeTaskobjects as opposed to the storage ofModuleinUniqueModuleListandPersoninUniquePersonListrespectively. - A different
TaskListinstance exists in eachModuleobject, meaning multiple instances of theTaskListobject can exist within anAddressBookinstance. On the other hand, there will always be only oneUniqueModuleListinstance and oneUniquePersonListinstance in theAddressBookinstance.
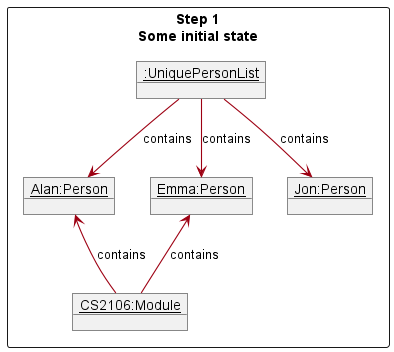
Here’s a (partial) object diagram of an AddressBook instance to
demonstrate the above point:
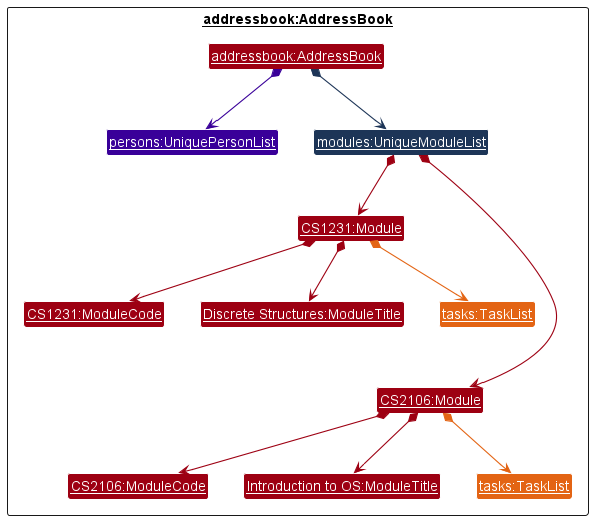
UniquePersonList (in purple) and
UniqueModuleList (in blue). However, there are two instances of TaskList
(in orange), corresponding to the number of modules.
Given below is an example usage scenario and how the mechanism
behaves when a user adds a new Task with the add-task command. The behavior
for the deleting and swapping of tasks is highly similar.
Step 1. The user requests to add a task into a module present in Plannit by
inputting the add-task command followed by the m/ flag to indicate the
module code argument and the td/ flag indicate the task description argument.
E.g.:
add-task m/CS1231 td/Submit the weekly assignment
Step 2: The LogicManager uses the AddressBookParser and
AddTaskCommandParser to parse the user input. After validating the
arguments provided by the user, the ModuleCode of the module to add the
task to and the task description of the new task is extracted by the AddTaskCommandParser.
Step 3: An AddTaskToModuleDescriptor object is then instantiated to
contain the extracted ModuleCode and a new Task with the extracted task
description.
Step 4: This AddTaskToModuleDescriptor is used to instantiate an
AddTaskCommand object that is returned to the LogicManager.
Step 5: The AddTaskCommand#execute() method is then called by the
LogicManager. This method will first obtain the Module with the
ModuleCode indicated by the user by calling Model#getModule(). A copy of
the Module’s fields are then created.
Step 6: A new Task is then added to the copied TaskList field.
Step 7: A new Module is then created using the copied fields along
with the updated TaskList field.
Step 8: The Module currently existing in the Model is then
replaced with this new updated Module using the Model#setModule() method.
The following sequence diagram summarizes what happens when a user executes
the add-task command:
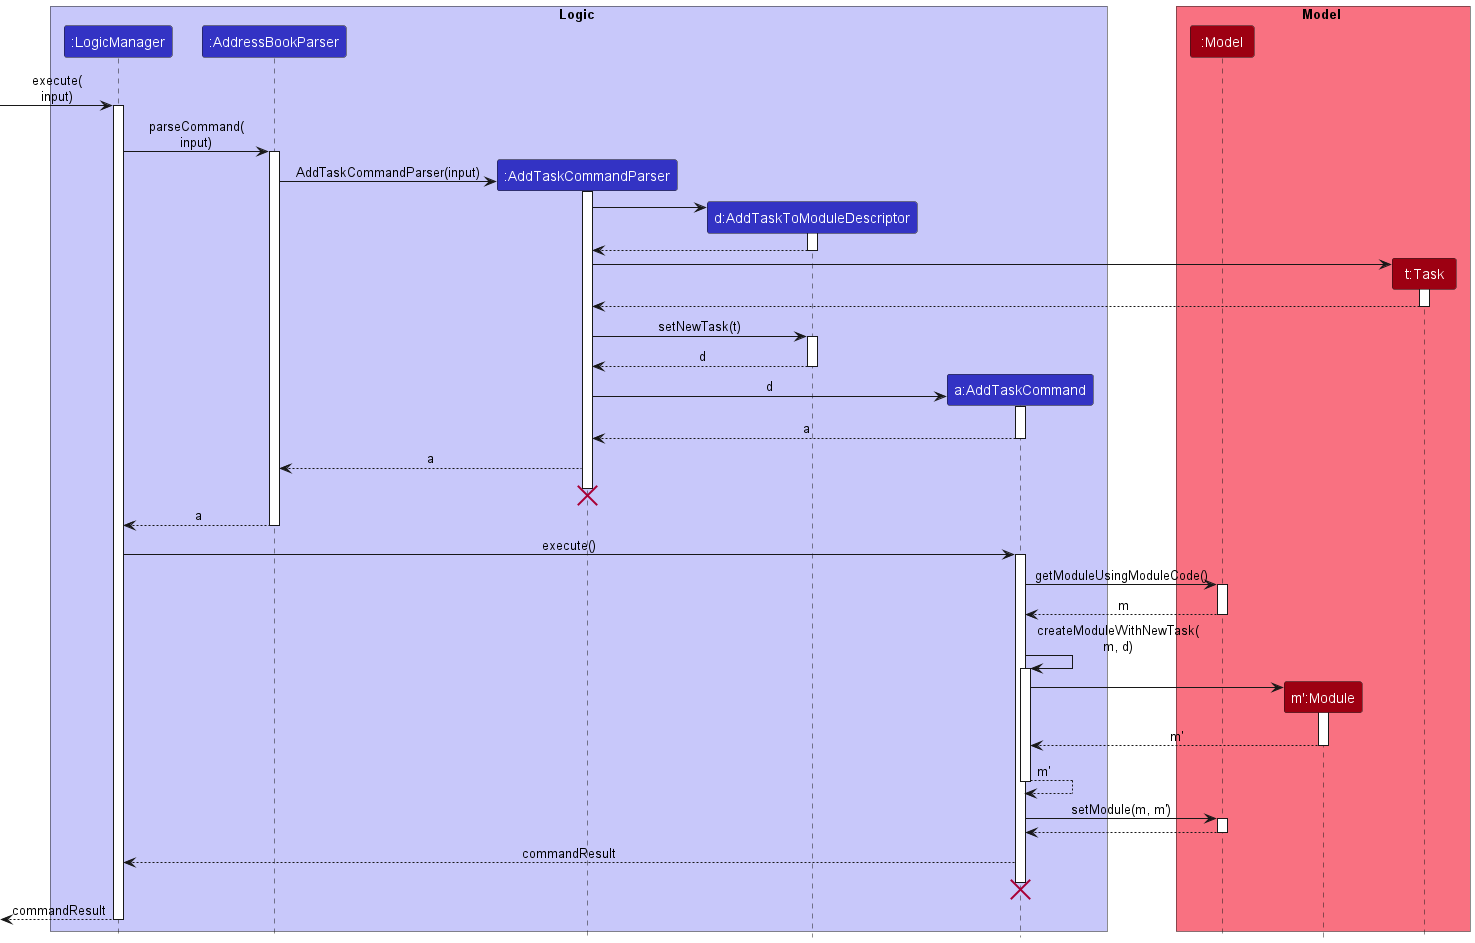
AddTaskCommand, and AddTaskCommandParser should
end at the destroy marker (X) but due to a limitation of PlantUML, the lifeline reaches the end of diagram.
Design considerations:
Aspect: Data structure to store Task:
-
Alternative 1 (current choice): Define a new
TaskListclass- Pros: Methods handling the adding, deleting and maintaining of
Tasks can be abstracted away into theTaskList. - Cons: Additional complexities brought about by implementing a new class.
- Pros: Methods handling the adding, deleting and maintaining of
-
Alternative 2: Store
Taskas anArrayListfield inModule.- Pros:
Modulecan directly handle the adding, deleting and maintaining of itsTasks. - Cons: Poor adherence to SOLID design principles.
- Pros:
Rationale behind current choice:
- Despite the additional complexities, it is good practice to adhere with the SOLID design principles.
- Furthermore, the additional complexities and potential for new bugs can be mitigated by robust unit and integration testing.
Aspect: Manner of handing arguments to AddTaskCommand constructor:
-
Alternative 1 (current choice): Pass arguments as a single
AddTaskToModuleDescriptorobject.- Pros: Neater to store all arguments in a single data structure.
Will be highly beneficial when more fields are added to a
Taskin the future. - Cons: Additional complexities brought about by implementing a new class.
- Pros: Neater to store all arguments in a single data structure.
Will be highly beneficial when more fields are added to a
-
Alternative 2: Pass arguments directly into the
AddTaskCommandconstructor- Pros: Simpler to implement.
- Cons: Number of arguments taken in by the constructor will
increase when more fields are added to a
Taskin the future.
Rationale behind current choice:
- Despite the additional complexities, a
Taskobject is likely to have additional fields (e.g.Date,Priority) in future iterations. Should we pass fields directly in to the constructor as arguments, the number of parameters in the constructor would increase. This would greatly affect the readability of the code. - The additional complexities and potential for new bugs can be mitigated by robust unit and integration testing.
Search and Navigation
Find module feature
Implementation
Find module mechanism is facilitated by the FindModuleCommand and FindModuleCommandParser.
It allows users to obtain a list of modules starting with the keyword provided.
It uses the following methods provided by the Model interface.
-
Model#updateFilteredModuleList(): Update the current module list and filter it according to the givenPredicate<Module>, reflecting the changes accordingly in the GUI. -
Model#getHomeStatusAsBoolean(): Obtains the home status of Plannit.
Given below is an example usage scenario of how the mechanism behaves when a user searches for modules in Plannit.
Step 1. The user requests to search for a module in the Plannit by
inputting the find-module command followed by a keyword.
E.g.:
find-module CS
Step 2: The LogicManager uses the AddressBookParser and FindModuleCommandParser
to parse the user input. After validating the arguments provided by the user, the user input
is used to instantiate a ModuleCodeStartsWithKeywordPredicate object.
Step 3: A FindModuleCommand object is instantiated using the ModuleCodeStartsWithKeywordPredicate
obtained in Step 2, which is then returned to the LogicManager.
Step 4: LogicManager calls the FindModuleCommand#execute() method. This method will first
obtain the home status of Plannit by calling Model#getHomeStatusAsBoolean() and check if Plannit
is currently at home.
Step 5: The module list is then filtered using the Model#updateFilteredModuleList() method according
to the ModuleCodeStartsWithKeywordPredicate object instantiated in Step 2.
Step 6: A new CommandResult object is returned, indicating success.
The following sequence diagram summarizes what happens when a user executes the find-module command:
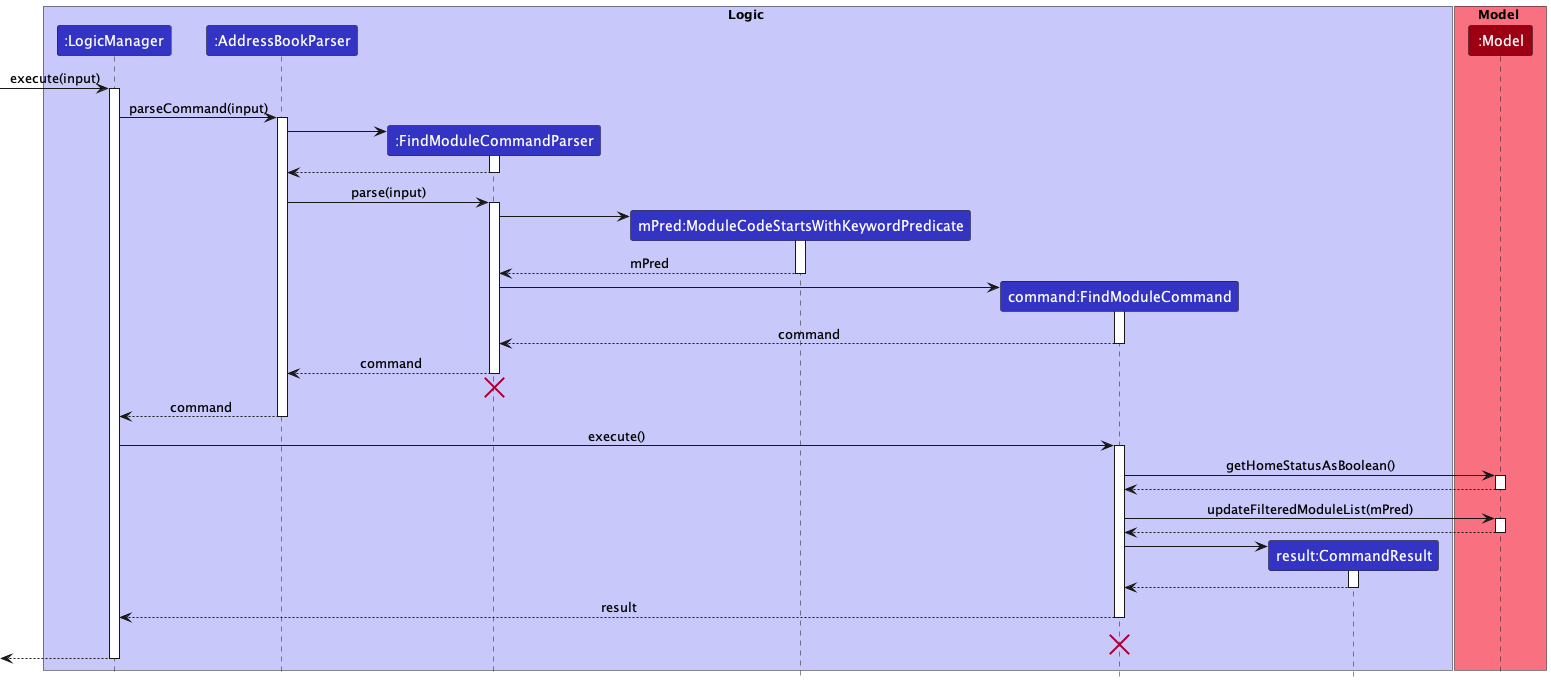
FindModuleCommandParser
and FindModuleCommand should end at the destroy marker (X) but due to a limitation of PlantUML, the lifeline reaches
the end of diagram.
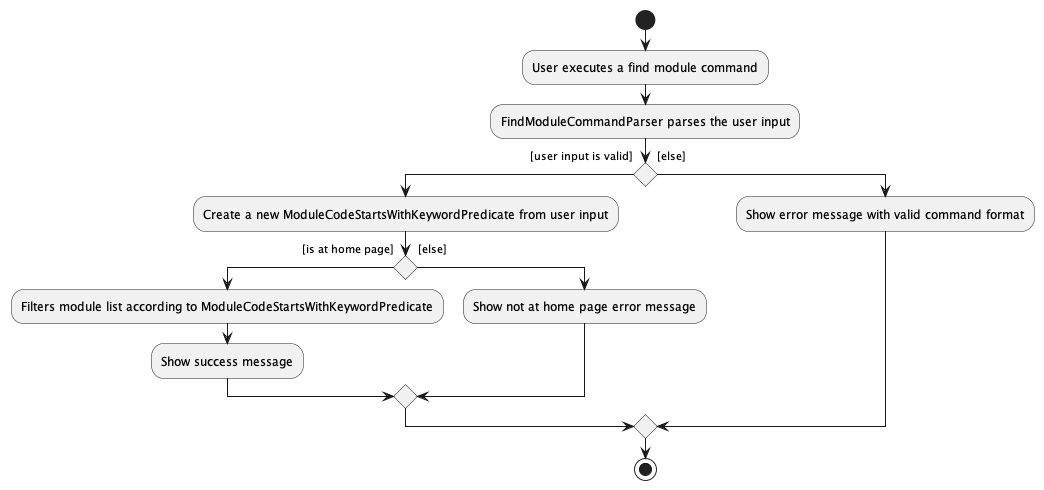
The following activity diagram summarizes what happens when a user executes a FindModuleCommand:
List module feature
Implementation
List module mechanism is facilitated by the ListModuleCommand.
It allows users to obtain a list of every module in Plannit.
It uses the following methods provided by the Model interface.
-
Model#updateFilteredModuleList(): Update the current module list and filter it according to the givenPredicate<Module>, reflecting the changes accordingly in the GUI. -
Model#getHomeStatusAsBoolean(): Obtains the home status of Plannit.
Given below is an example usage scenario of how the mechanism behaves when a user list all modules in Plannit.
Step 1. The user requests to list all modules in Plannit by
inputting the list-module command.
E.g.:
list-module
Step 2: The LogicManager uses the AddressBookParser to parse the user input.
After validating the arguments provided by the user, the user input is used to instantiate
a ListModuleCommand object, which is returned to the LogicManager.
Step 3: LogicManager calls the ListModuleCommand#execute() method. This method will first
obtain the home status of Plannit by calling Model#getHomeStatusAsBoolean() and check if Plannit
is currently at home.
Step 4: The module list is then filtered using the Model#updateFilteredModuleList() method according
to the Model#PREDICATE_SHOW_ALL_MODULES predicate.
Step 5: A new CommandResult object is returned, indicating success.
The following sequence diagram summarizes what happens when a user executes the list-module command:
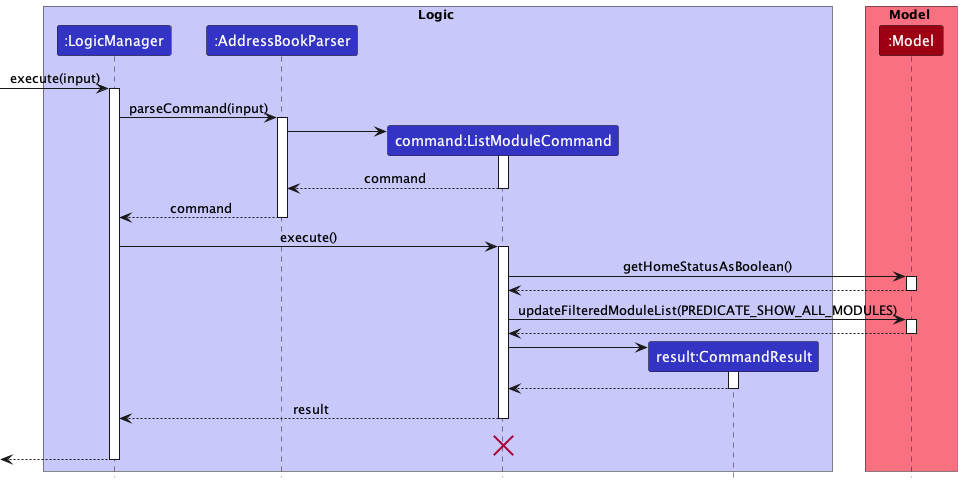
ListModuleCommand should
end at the destroy marker (X) but due to a limitation of PlantUML, the lifeline reaches the end of diagram.
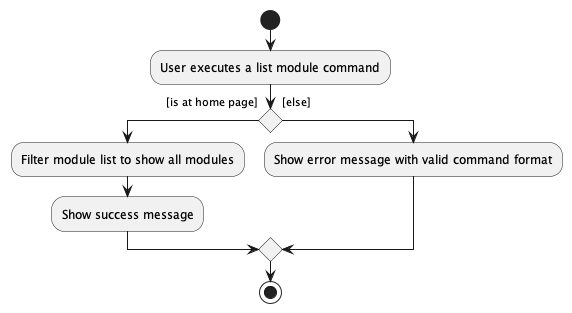
The following activity diagram summarizes what happens when a user executes a ListModuleCommand:
Navigate to module feature
Implementation
Navigate to module mechanism is facilitated by the GoToCommand and GoToCommandParser.
It allows users to navigate to a specific module given their respective module code, displaying information
(i.e. tasks, links and persons) that are associated to that module.
It uses the following methods provided by the Model interface.
-
Model#getModuleUsingModuleCode(): Retrieves aModuleobject using theModuleCodeobject associated with thatModule. -
Model#updateFilteredModuleList(): Update the current module list and filter it according to the given predicatePredicate<Module> predicate, reflecting the changes accordingly in the GUI. -
Model#updateFilteredPersonList(): Update the current person list and filter it according to the given predicatePredicate<Person> predicate, reflecting the changes accordingly in the GUI. -
Model#setHomeStatus(): Sets the home status of Plannit.
Given below is an example usage scenario of how the mechanism behaves when a user navigates to a module in Plannit.
Step 1. The user requests to navigate to a module present in the Plannit
by inputting the goto command followed by the module code of the module.
E.g.:
goto CS1231
Step 2: The LogicManager uses the AddressBookParser and GoToCommandParser
to parse the user input. After validating the arguments provided by the user, the user input
is used to perform the following actions:
- Extract the
ModuleCodeof the module to navigate to in theGoToCommandParserusing the methodParserUtil#parseModuleCode(). - Instantiate a
ModuleCodeMatchesKeywordPredicateobject.
Step 3: A GoToCommand object is instantiated using the ModuleCodeMatchesKeywordPredicate and ModuleCode
obtained in Step 2 which is returned to the LogicManager.
Step 4: LogicManager calls the GoToCommand#execute() method. This method will first
obtain the Module associated with the ModuleCode obtained in Step 2 by calling
Model#getModuleUsingModuleCode().
Step 5: The module list is then filtered using the Model#updateFilteredModuleList() method according
to the ModuleCodeMatchesKeywordPredicate object instantiated in Step 2.
Step 6: A PersonIsInModulePredicate object is then instantiated with the Module object
obtained in Step 4.
Step 7: The person list is then filtered using the Model#updateFilteredPersonList() method according
to the PersonIsInModulePredicate object instantiated in Step 6.
Step 8: The home status of Plannit is set to false via Model#SetHomeStatus().
Step 9: A new CommandResult object is returned, indicating success.
The following sequence diagram summarizes what happens when a user executes the goto command:
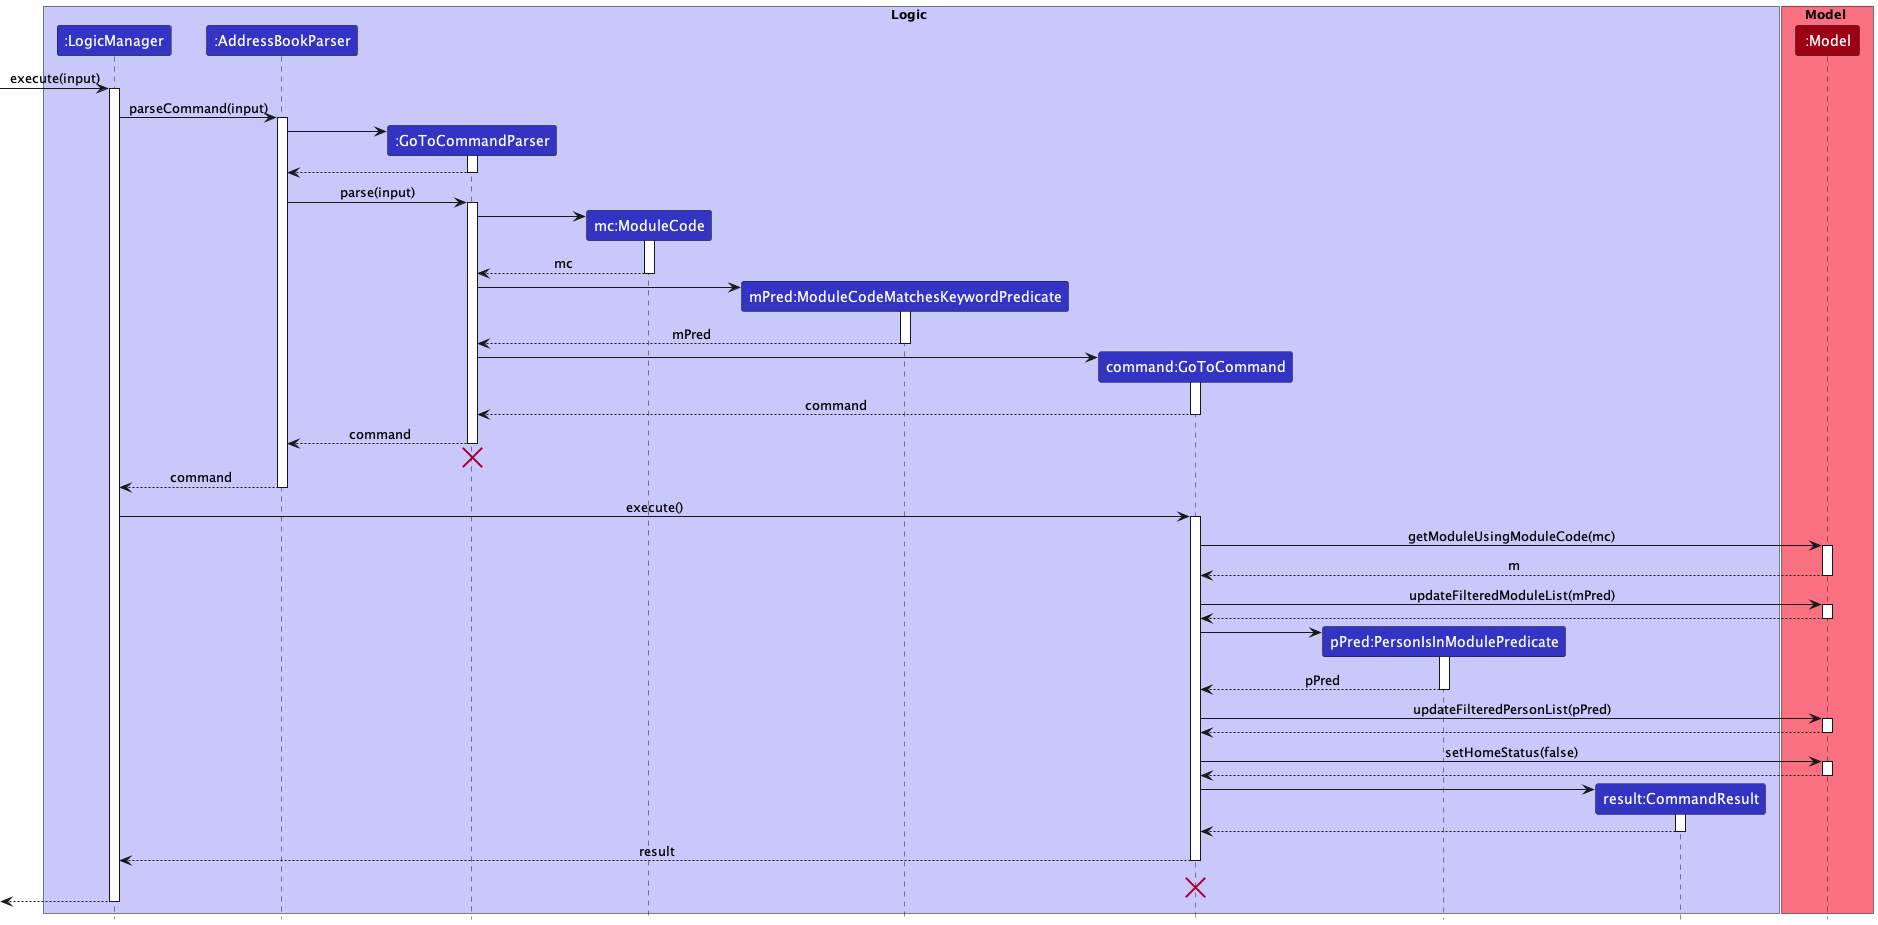
GoToCommandParser
and GoToCommand should end at the destroy marker (X) but due to a limitation of PlantUML, the lifeline reaches
the end of diagram.
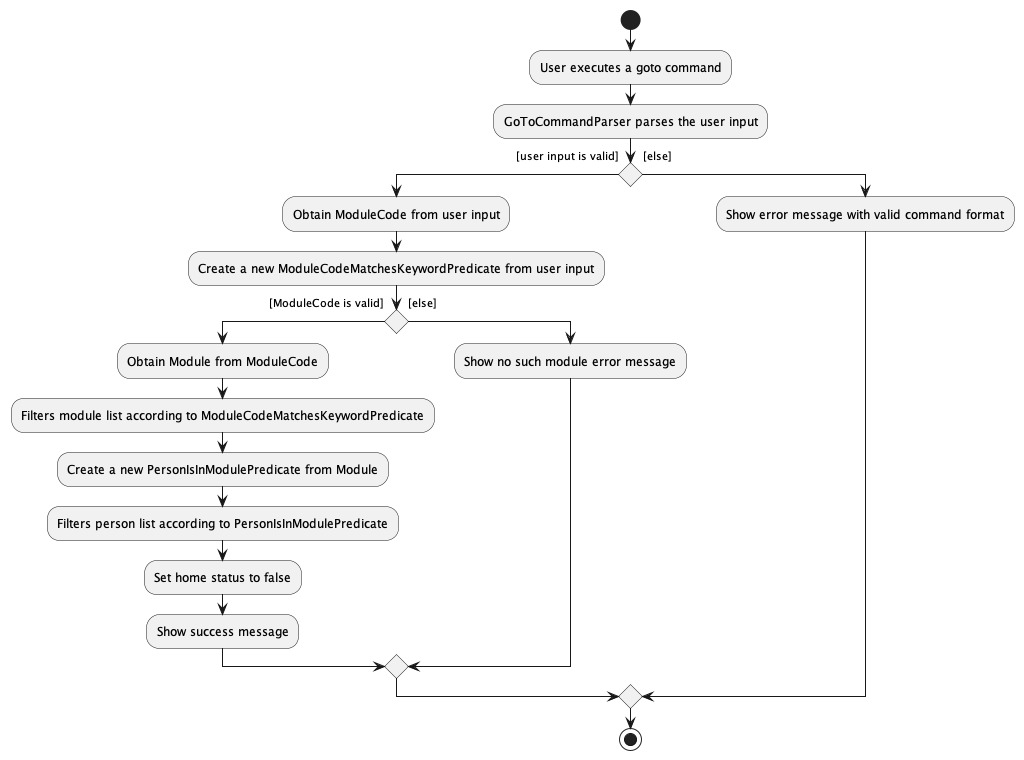
The following activity diagram summarizes what happens when a user executes a GoToCommand:
Navigate to home feature
Implementation
Navigate to home mechanism is facilitated by the HomeCommand.
It navigates users back to the home page of Plannit, showing all modules and persons stored in Plannit.
It uses the following methods provided by the Model interface.
-
Model#goToHomePage(): Sets home status to true and update module list and person list to show all modules and persons respectively, reflecting the changes accordingly in the GUI.
Given below is an example usage scenario of how the mechanism behaves when a user navigates back to the home page of Plannit.
Step 1. The user requests to go home by inputting the home command.
E.g.:
home
Step 2: The LogicManager uses the AddressBookParser to instantiate
a HomeCommand object, which is returned to the LogicManager.
Step 3: LogicManager calls the HomeCommand#execute() method. This method will then
call the Model#goToHomePage() method which perform the following actions:
- Set home status to true.
- Update module list to show all modules.
- Update person list to show all persons.
Step 5: A new CommandResult object is returned, indicating success.
The following sequence diagram summarizes what happens when a user executes the home command:
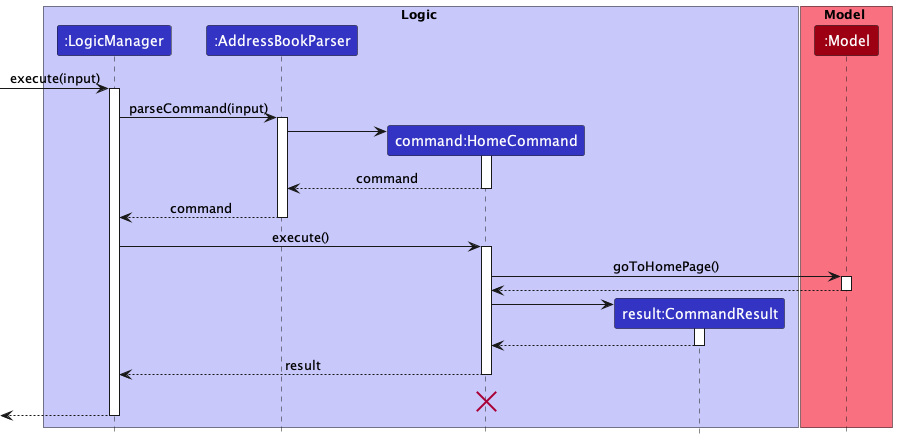
HomeCommandshould end
at the destroy marker (X) but due to a limitation of PlantUML, the lifeline reaches the end of diagram.
Design consideration:
Aspect: How goto executes
-
Alternative 1 (current choice): Navigate to a single module by module code and update home status.
- Pros:
- Provides an intuitive and more versatile way for users to navigate between modules.
- Provides an intuitive usage of commands by limiting the scope of possible commands usable when out of the home page.
- Cons: Unable to search for multiple persons with different attributes.
- Pros:
-
Alternative 2: Navigate to a single module by module code.
- Pros: Provides an intuitive and more versatile way for users to navigate between modules.
- Cons: Might result in confusion when some commands are usable out of the home page.
-
Alternative 3: Navigate to a single module by index.
- Pros: Allows for quicker input as compared to typing out the entire module code
- Cons: Requires user to navigate back to home page before going to another module which might be unintuitive for users.
Rationale behind current choice:
-
Alternative 1 was chosen as it provides a more intuitive way for prospective users.
-
The following commands
list-moduleandfind-moduleare disabled as they are not meant to be used in tandem withgotocommand as the filtering of modules is not needed when there exist only one module. -
The following commands
list-personandfind-personare disabled as they are not meant to be used in tandem withgotocommand as essential persons within a module (i.e. professors, tutor assistant and friends) are likely to be limited in numbers.
Hence, to prevent confusion we chose Alternative 1.
Documentation, logging, testing, configuration, dev-ops
Appendix: Requirements
Product scope
Target user profile:
- Tech-Savvy NUS Student
- Reasonably fast typer
- Comfortable using CLI apps
- Forgets which friends have common modules with him
- Takes a lot of modules
- Takes modules where information are spread over multiple websites
- Tends to work at night
Value proposition:
Plannit is an all-in-one application that streamlines the execution of module deliverables by empowering NUS students with the ability to manage tasks, links and module-mates (i.e. students in the same module) to increase their productivity.
User stories
Priorities: High (must have), Medium (nice to have), Low (unlikely to have)
| Priority | As a … | I want to … | So that I can… |
|---|---|---|---|
High |
User | Add a contact | View them in future settings |
High |
User | Delete a contact | Trim my contact list to keep it updated |
High |
User | Add a module into Plannit | Add details of the module |
High |
User | Delete a module into Plannit | Remove unnecessary modules after the semester ends |
High |
User | Add tasks for each module into Plannit | Keep track of tasks for each module |
High |
User | Delete tasks from module on Plannit | Remove tasks that have been completed |
High |
User | Add links | Store module-related links for future access |
High |
User | Open links | Access module-related links |
High |
User | Delete links | Remove module-related links when the semester ends |
High |
User | Easily navigate through different modules | Quickly view relevant modules details |
High |
Busy User | See the overview of tasks on the home page | Get a quick summary of upcoming tasks |
Medium |
User | Edit module details | Rectify mistakes and update module details when needed |
Medium |
User | Edit a contact | Rectify mistakes and update contact details when needed |
Medium |
User | Set different priorities to prioritise my tasks | I know is important and should be done first |
Medium |
Forgetful Student | Organise contacts by module | I can discuss difficult assignment questions with them and delete them once the semester is completed |
Medium |
Organised Person | Filter contacts by names | Search for contacts relevant for my case |
Medium |
Expert User | Search a keyword | Go to the module which has the relevant topic I have in mind |
Medium |
User | Detect (and delete) duplicate items | Avoid adding a same item twice |
Medium |
New potential user | See the app populated with sample data | Easily see how the app will look like when it is in use |
Medium |
Forgetful student | Group contacts by tags | Find out which friends are taking what modules |
Medium |
Expert User | Purge existing module data | Save time deleting all the module data when the semester ends |
Low |
Expert User | Archive existing data | Restore the data in case I mess up |
Use cases
(For all use cases below, the System is the Plannit application and the Actor is the user, unless specified otherwise)
Use case: UC01 - Add a module
Main Success Scenario (MSS)
- User requests to add module.
- Plannit adds the module.
- Plannit displays to the user that the module addition is successful.
Use case ends
Extensions
- 1a. The module already exists.
- 1a1. Plannit displays an error message.
Use case ends
Use case: UC02 - Delete a module
Main Success Scenario (MSS)
- User requests to list modules.
- Plannit displays a list of modules.
- User requests to delete a specific module in the list.
- Plannit deletes the module.
Use case ends.
Extensions
-
1a. The list is empty.
Use case ends.
-
3a. The given index is invalid.
- 3a1. Plannit displays an error message.
Use case resumes at step 2.
Use case: UC03 - Find module
Preconditions:
- User is on the home page.
Main Success Scenario (MSS)
- User chooses to search up on modules with module code starting with specific keyword.
- Plannit requests for keyword.
- User enters the keyword.
- Plannit searches and displays a list of modules with module code starting with the specified keyword.
Use case ends.
Use case: UC04 - List module
Preconditions:
- User is on the home page.
Main Success Scenario (MSS)
- User chooses to obtain every module in Plannit.
- Plannit returns a list with every module in Plannit.
Use case ends.
Use case: UC05 - Find person
Preconditions:
- User is on the home page.
Main Success Scenario (MSS)
- User chooses to search up on person with names starting with specific keyword.
- Plannit requests for keyword.
- User enters the keyword.
- Plannit searches and displays a list of persons with names starting with the specified keyword.
Use case ends.
Use case: UC06 - List person
Preconditions:
- User is on the home page.
Main Success Scenario (MSS)
- User chooses to obtain every person in Plannit.
- Plannit returns a list with every person in Plannit.
Use case ends.
Use case: UC07 - Add a task
Preconditions:
- User has completed UC01.
- Module list is not empty.
Main Success Scenario (MSS)
- User requests to add a task to a specific module in the list.
-
Plannit adds the task to the module.
Use case ends.
Extensions
-
1a. The given module is invalid.
- 1a1. Plannit displays an error message.
Use case ends.
-
1b. The given task is in an invalid format.
- 1b1. Plannit displays an error message.
Use case ends.
Use case: UC08 - Delete a task
Preconditions:
- User has completed UC01.
- Module list is not empty.
- Task list of module is not empty.
Main Success Scenario (MSS)
- User requests to delete a specific task from a module in the list.
- Plannit deletes the task from the module.
Use case ends.
Extensions
-
1a. The given module is invalid.
- 1a1. Plannit displays an error message.
Use case ends.
-
1b. The given task number is invalid.
- 1b1. Plannit displays an error message.
Use case ends.
Use case: UC09 - Swap task
Precondition
- User has completed UC01.
- Module list is not empty.
- Task list of module has at least two tasks.
Main Success Scenario (MSS)
- User requests to swap the order of two tasks belonging to a module in the list.
- Plannit displays to the user the list of tasks with the order of the two tasks swapped.
Extensions
-
1a. The given module is invalid.
- 1a1. Plannit displays an error message.
Use case ends.
-
1b. The given task number is invalid.
- 1b1. Plannit displays an error message.
Use case ends.
Use case: UC10 - Add a Module Link
Preconditions:
- User has completed UC01.
- Module list is not empty.
Main Success Scenario (MSS)
- User requests for the addition of a module-specific link.
- Plannit adds and associates the entered link to the specific module.
Use case ends.
Extension:
- 1a. Plannit detects the module does not exist.
- 1a1. Plannit displays an error message.
Use case ends.
- 1b. Plannit detects the link is already added.
- 1b1. Plannit displays an error message.
Use case ends.
Use case: UC11 - Delete a Module Link
Main Success Scenario (MSS)
- User requests for the deletion of a module-specific link.
- Plannit deletes the entered link from the specific module.
Use case ends.
Extension:
- 1a. Plannit detects the module does not exist.
- 1a1 Plannit displays an error message.
Use case ends.
- 1b. Plannit detects the link does not exist.
- 1b1 Plannit displays an error message.
Use case ends.
Use case: UC12 - Add a contact
Main Success Scenario (MSS)
- User chooses to add a contact.
- Plannit requests for the to-be-added contact detail.
- User enters the to-be-added contact details.
- Plannit adds the contact and notifies the user that the contact has been successfully added.
Use case ends.
Extensions
- 3a. The contact is duplicate, i.e. name already exists.
- 3a1. Plannit displays an error message notifying the user that a duplicate contact exists.
Use case ends.
- 3b. The email address is invalid.
- 3b1. Plannit displays an error message notifying the user that the email address is invalid.
Use case ends.
- 3c. The phone number is invalid.
- 3c1. Plannit displays an error message notifying the user that the phone number is invalid.
Use case ends.
Use case: UC13 - Delete a contact
Main Success Scenario (MSS)
- User chooses to delete a contact.
- Plannit requests for the name of the contact.
- User enters the contact’s name.
- Plannit searches for the contact and notifies user that the contact has been deleted.
Use case ends.
Extensions:
- 3a. Plannit detects that the specified contact does not exist.
- 3a1. Plannit displays a text, informing that the specified contact does not exist.
Use case ends.
Use case: UC14 - Find contact
Main Success Scenario (MSS)
- User chooses to search up his friend’s email.
- Plannit requests for name of friend.
- User enters the friend’s name.
- Plannit searches for the name and displays the friend’s details.
Use case ends.
Extensions:
- 3a. Plannit detects that the specified contact does not exist.
- 3a1. Plannit displays a text, informing that the specified contact does not exist.
Use case ends.
Use case: UC15 - Navigate to home page
Main Success Scenario (MSS)
- User requests to navigate to home page.
- Plannit displays the home page.
Use case ends.
Extensions
-
1a. Already at home page.
Use case ends.
Use case: UC16 - Navigate to Module
Main Success Scenario (MSS)
- User requests to navigate to a specific module.
- Plannit requests for the module code of the specific module.
- User enters the module code.
- Plannit displays the module details.
Use case ends.
Extensions
-
1a. Module with given module code does not exist.
- 1a1. Plannit displays an error message.
Use case ends.
Use case: UC17 - Exit program
Main Success Scenario (MSS)
- User requests to exit program.
- Plannit closes program.
Use case ends.
Non-Functional Requirements
Constraints
- Plannit cannot use NUS API to scrap data from LumiNUS/Canvas.
- Plannit should run independently of remote servers.
- Plannit cannot use a relational database management system.
- Plannit executable size should be smaller than 100MB.
Technical Environment
- Should work on any mainstream OS as long as it has Java
11or above installed. - Plannit should work on 64-bit environments.
- The GUI should:
- work well for standard screen resolutions 1920x1080 and higher, and for screen scales 100% and 125%.
- be usable for screen resolutions 1280x720 and higher, and for screen scales 150%.
- Plannit is packaged into one
JARfile. - The software should work without an installer.
- Plannit should work without an internet connection.
Performance
- Plannit should be able to hold up to 1000 entries without a noticeable sluggishness in performance for typical usage.
- Plannit should be able to save and load up to 1000 entries without a noticeable delay in performance.
- Plannit should respond to any user requests within 2 seconds as long as there are less than 1000 entries.
Quality
- Plannit should be usable by someone with better-than-average typing speed.
- Plannit should be beginner-friendly and easily picked up by new users.
- Font size should be of reasonable size.
- The colours of the application should not induce eye strain.
Process
- Development of Plannit should adhere to the following deadlines:
- v1.1: 28 September 2022 (Week 7, Wednesday)
- v1.2: 12 October 2022 (Week 9, Wednesday)
- v1.3: 26 October 2022 (Week 11, Wednesday)
- v1.4: 07 November 2022 (Week 13, Monday)
- The team should meet every Saturday at 9pm until the end of the project.
- Each team member should follow the forking workflow.
- At least 2 members need to approve a pull request before it can be successfully merged into the master branch on
GitHub. - Plannit’s implementation should follow Object-Oriented Programming paradigm primarily.
Project Scope
- Plannit does not automatically update module details/links.
- Plannit does not rigorously check for the validity of the email provided by the user.
- Plannit does not verify the existence or security of links provided by the user
- Plannit does not rigorously check for the validity of links provided by the user.
- Plannit does not rigorously check for the existence of phone number provided by the user.
- Plannit does not remind the user of upcoming tasks with notifications.
- Plannit does not check for invalid module codes.
Other noteworthy points
- Plannit’s code should be easily testable.
Glossary
- Entries: Modules, Contacts, Links, Tasks
- Mainstream OS: Windows, Linux, Unix, macOS
- Usable: All functions can be used even if the user experience is not optimal
- Work well: Should not cause any resolution-related inconveniences to the user
Appendix: Instructions for manual testing
Given below are instructions to test the app manually.
Assumption: The sample data is loaded into Plannit.
data/addressbook.json is not found.
To load the sample data, close Plannit (if a Plannit instance is active) and delete data/addressbook.json if it exists.
Remember to perform a backup before deletion if necessary. Then, open Plannit.
Launching the application
-
Initial launch
-
Download the
JARfile and copy it into an empty folder. -
Double-click the
JARfile or runjava -jar plannit.jarusing the terminal. Expected:- Shows the GUI with a set of sample contacts.
- The window size may not be optimum.
-
-
Saving window preferences
-
Resize the window to an optimum size. Move the window to a different location. Close the window.
-
Re-launch the app by double-clicking the
JARfile.
Expected:- The most recent window size and location is retained.
-
Adding a module
- Adding a module
- Test case:
add-module m/MA2104
Expected:- Module
MA2104included in module list. - Result display shows
MA2104successfully added. - Plannit returns to home page.
- Module
- Test case:
add-module m/CS2103T
Expected:- No module is added.
- Result display shows
CS2103Tcannot be added because module already exists.
- Test case:
add-module m/MA2104 t/Multivariable Calculus
Expected:- Module
MA2104with module titleMultivariable Calculusincluded in module list. - Result display shows
MA2104successfully added. Plannit returns to home page.
- Module
- Other incorrect
add-modulecommand (e.g.add-module,add-module MA2104)
Expected:- No module is added.
- Result display shows incorrect command format.
- Test case:
Editing a module
- Editing a module
- Test case:
edit-module 5 m/MA2104, assuming there are less than 5 modules currently displayed in Plannit
Expected:- No module is edited.
- Plannit notifies user of invalid index.
- Test case:
edit-module 0.4 m/MA2104
Expected:- No module is edited.
- Result display shows error message that indices must be integer.
- Test case:
edit-module 1 m/MA2104, assuming there is at least 1 module currently displayed in Plannit
Expected:- Module code of first module changed to
MA2104. - Plannit automatically sorts resulting list of modules in lexicographical order.
- Module code of first module changed to
- Other incorrect
edit-modulecommands (e.g.edit-module,edit-module 32)
Expected:- No module is edited.
- Result display shows error message about incorrect command format.
- Test case:
Deleting a module
-
Deleting a module with the module being displayed currently.
- Prerequisites:
- Listed all modules using the
list-modulecommand. - At least one module in the list.
- Listed all modules using the
- Test case:
delete-module m/CS2103T
Expected:- Module
CS2103Tis deleted from the list. - Details of the deleted module shown in the result display.
- Module
- Test case:
delete-module m/MA2104
Expected:- No module is deleted.
- Error details shown in the result display.
- Currently-displayed module list and person list remain the same.
- Other incorrect delete commands to try:
delete-module,delete-module m/MODULE_CODE,...(whereMODULE_CODEis a module code which does not exist in Plannit)
Expected:- Similar to previous.
- Prerequisites:
-
Deleting module while some, but not all, modules are being shown
- Prerequisites:
- Search module using
find-moduleor navigate to module usinggoto.
- Search module using
- Assumptions:
- For the following test cases,
goto CS2103Tis the most recent command before the deletion.
- For the following test cases,
- Test case:
delete-module m/CS2103T
Expected:- Module
CS2103Tis deleted from the list. - Details of the deleted module shown in the result display.
- Module
- Test case:
delete-module m/MA2104
Expected:- No module is deleted.
- Error details shown in the result display. Module list and person list remain the same.
- Test case:
delete-module m/GE3238
Expected: Similar to (3).- Note: GE3238 exists on Plannit but gets filtered away by
goto CS2103T.
- Note: GE3238 exists on Plannit but gets filtered away by
- Other incorrect
delete-modulecommands to try:delete-module,delete-module m/MODULE_CODE,...(whereMODULE_CODEis a module code which does not exist in Plannit)
Expected: Similar to (3).
- Prerequisites:
Finding modules
-
Finding modules while all modules are being shown
- Prerequisites:
- Must be at the home page.
- Multiple modules in Plannit.
- Test case:
find-module cS
Expected:- Module list is updated with modules with module code starting with
cS
(case-insensitive). - Number of modules listed shown in the status message.
- Module list is updated with modules with module code starting with
- Test case:
find-module Dummy
Assumption: There are no modules whose module codes start withDummyin Plannit.
Expected:- Module list is updated to show an empty list.
- Number of module listed shown in the status message.
- Test case:
find-module
Expected:- Module list remains the same.
- Command box remains the same.
- Error details shown in the status message.
- Prerequisites:
-
Finding modules while not all modules are being shown
- Prerequisites:
- Must be at the home page.
- Multiple modules in Plannit.
- Test case:
find-module CS2103T
Assumption: ModuleCS2103Tis not in the current module list
Expected:- Module list is updated with module code starting with
CS2103T(case-insensitive). - Number of modules listed shown in the status message.
- Module list is updated with module code starting with
- Prerequisites:
-
Finding modules while not at home page
- Prerequisites:
- Must not be at the home page.
- Test case:
find-module CS2103T
Expected:- Module list remains the same.
- Command box remains the same.
- Error details shown in the status message.
- Prerequisites:
Listing all modules
-
Listing modules while not all modules are shown
- Prerequisites:
- Must be at the home page.
- Multiple modules in Plannit.
- Test case:
list-module
Expected:- Module list is updated to show all modules.
- A success message is displayed to the user.
- Test case:
list-module 44321
Expected:- Same as the previous
- Prerequisites:
-
Listing all modules while not at home page
- Prerequisites:
- Must not be at the home page.
- Test case:
list-module
Expected:- Module list remains the same.
- Command box remains the same.
- Error details shown in the status message.
- Prerequisites:
Adding a task
- Adding a task to a module in Plannit
- Prerequisites:
- List all modules using the
list-modulecommand.
- List all modules using the
- Test case:
add-task m/CS2103T td/Complete week 7's weekly assignments
Expected:- A new task with the description “Complete week 7’s weekly assignments” will be added under the
CS2103Tmodule. - Details of the module with the new task is shown in the result display.
- A new task with the description “Complete week 7’s weekly assignments” will be added under the
- Test case:
add-task m/CS3203 td/Complete week 7's weekly assignments
Expected:- No task is added.
- Modules in module list remains the same.
- Command box remains the same.
- Error details shown in the status message.
- Other incorrect
add-taskcommands to try:add-task m/CS2103T,add-task
Expected: Similar to previous.
- Prerequisites:
Deleting a task
-
Deleting a task from a module in Plannit
- Prerequisites:
- List all modules using the
list-modulecommand.
- List all modules using the
- Test case:
delete-task m/CS2103T tn/2
Expected:- Second task of
CS2103Tis deleted. - Details of the module with the deleted task is shown in the result display.
- Second task of
- Test case:
delete-task m/CS3203 tn/2
Expected:- No tasks are deleted.
- Modules in module list remains the same.
- Command box remains the same.
- Error details shown in the status message.
- Other incorrect delete commands to try:
delete-task,delete-task m/CS2103T,delete-task tn/2,delete-task m/CS2103T tn/x,...(wherexis larger than the list size)
Expected: Similar to previous.
- Prerequisites:
Swapping the order of a pair of tasks
- Swapping the order of two tasks in a module in Plannit
- Prerequisites:
- List all modules using the
list-modulecommand.
- List all modules using the
- Test case:
swap-task m/CS2103T ts/1 2
Expected:- Positions of the first and second task of
CS2103Tare swapped. - Details of the module with the deleted task is shown in the result display.
- Positions of the first and second task of
- Test case:
swap-task m/CS3203 ts/1 2
Expected:- No task are swapped.
- Modules in module list remains the same.
- Command box remains the same.
- Error details shown in the status message.
- Other incorrect swap-task commands to try:
swap-task,swap-task m/CS2103T,swap-task ts/1 x,swap-task m/CS2103T ts/1 x,...(wherexis larger than the list size)
Expected: Similar to previous.
- Prerequisites:
Adding a link
-
Adding a link to a module in Plannit
- Prerequisite:
- Use the
list-modulecommand to display all existing modules (from the sample data) in Plannit.
- Use the
- Test case:
add-link m/CS2103T la/Google l/google.com
Expected:- A new link with url
google.comis added to the module with module codeCS2103T. - The new link is represented with a yellow-outlined box labelled with
Googlewithin the said module on Plannit.
- A new link with url
- Test case:
add-link m/CS2100 la/Google l/google.com
Expected:- The link with url
google.comis not added to the module with module codeCS2100. - Error details shown in the status message.
- The link with url
- Other incorrect add commands to try:
add-link,add-link m/CS2103T,add-link m/CS2103T la/Google
Expected: Similar to previous.
- Prerequisite:
Deleting a link
-
Deleting a link from a module in Plannit
- Prerequisite:
- Use the
list-modulecommand to display all existing modules (from the sample data) in Plannit.
- Use the
- Test case:
delete-link m/CS2103T la/Team Repo
Expected:- The link with the alias
Team Repois deleted from the module with module codeCS2103T. - The link which was represented with a yellow-outlined box labelled with
Team Repowithin the said module on Plannit disappears.
- The link with the alias
- Test case:
delete-link m/CS2103T la/hahahaha
Expected:- No links are deleted from the module with module code
CS2103T. - Error details shown in the status message.
- No links are deleted from the module with module code
- Other incorrect delete commands to try:
delete-link,delete-link m/CS2103T,delete-link m/CS2103T m/CS2106
Expected: Similar to previous.
- Prerequisite:
Opening a link
-
Opening a link from a module in Plannit
- Prerequisites:
- Use the
list-modulecommand to display all existing modules (from the sample data) in Plannit.
- Use the
- Test case:
open-link m/CS2103T la/Team Repo
Expected:- The link with the alias
Team Repois opened from the module with module codeCS2103Tinto your default browser.
- The link with the alias
- Test case:
open-link m/CS2103T la/hahahaha
Expected:- No links are opened from the module with module code
CS2103T. - Error details shown in the status message.
- No links are opened from the module with module code
- Other incorrect open commands to try:
open-link,open-link m/CS2103T,open-link m/CS2103T m/CS2106
Expected: Similar to previous.
- Prerequisites:
Adding a contact
-
Adding a person to Plannit
- Prerequisites:
- Person to be added does not have the same name (case-sensitive) as anyone else that is already in Plannit.
- Test case:
add-person n/Amy e/amy@gmail.com p/91234567
Expected:- A person with name Amy is added to Plannit.
- A success message is displayed to the user.
- Test case:
add-person n/Amy e/amy@gmail.com
Expected:- No person is added to Plannit because there is a missing field (phone number).
- Error details indicating invalid command format displayed to the user.
- Other incorrect add person commands to try:
add-person,add-person x,add-person p/81234567 e/amy@gmail.com
Expected:- No person is added to Plannit.
- An error message with relevant details is displayed to the user.
- Prerequisites:
Adding a contact to module
-
Adding a person to a module
- Prerequisites:
- Both the person to be added to the module and the module itself are currently displayed on Plannit.
- The person to be added to the module has not yet been added to the module.
- Test case:
add-person-to-module m/MA2001 n/Alex Yeoh
Assumption: bothMA2001andAlex Yeohare currently displayed on Plannit
Expected:-
Alex Yeohis added toMA2001. - Result display shows successful addition of
Alex YeohtoMA2001. - Subsequently, if
goto MA2001is executed next,Alex Yeohshould be one of the persons listed.
-
- Test case:
add-person-to-module m/MA2001 n/David LiExpected:- No person is added to module.
- Result display shows an error message stating that
David Lihas already been added toMA2001.
- Test case:
add-person-to-module m/GE3238 n/David Li
Assumption:David Liis not currently displayed on Plannit butGE3238is currently displayed on Plannit
Expected:- No person is added to module.
- Result display shows an error message stating that the input person is not in the currently displayed list
- Test inputs where command format is invalid (e.g.
add-person-to-module,add-person-to-module m/CS2103T) Expected:- No person is added to module.
- Result display shows that the command format is invalid.
- Prerequisites:
Deleting a contact
-
Deleting a person from Plannit while the contact to be deleted is shown.
- Prerequisites:
- Person to be deleted is currently displayed on screen.
- Test case:
delete-person n/Alex Yeoh
Expected:- Contact with name Alex Yeoh is deleted from the displayed list and Plannit.
- Details of the deleted contact displayed to the user.
- Test case:
delete-person n/BobAssumption: Bob is currently not displayed on screen
Expected:- No person is deleted.
- Error message detailing the fact that no Bob is currently displayed on screen.
- Other incorrect delete person commands to try:
delete-person,delete-person 123,delete-person m/Bob
Expected:- No person is deleted.
- An error message with relevant details is displayed to the user.
- Prerequisites:
Deleting a contact from module
-
Deleting a person from module while both the specified module and person are displayed on screen.
- Prerequisites:
- Both the person to be deleted from the module and the module itself are currently displayed on screen.
- The person to be deleted from the module must have already been added to the module.
- Test case:
delete-person-from-module m/CS2103T n/David Li
Expected:- Contact with name David Li is deleted from the CS2103T module.
- A successful message stating that a person got deleted from CS2103T is displayed to the user.
- Test case:
delete-person-from-module m/CS2103T n/Bob, assuming Bob is not added to the module CS2103T
Expected:- No person is deleted from CS2103T.
- Error message detailing the fact that Bob is currently not displayed in list is displayed.
- Other incorrect delete person from module commands to try:
delete-person-from-module,delete-person-from-module a/CS2103T n/Bob
Expected:- No person is deleted from any module.
- An error message with relevant details is displayed to the user.
- Prerequisites:
Editing a contact
-
Editing a person in Plannit while the contact to be edited is shown.
- Prerequisites:
- Person to be edited is currently displayed on screen.
- Test case:
edit-person 1 n/Armin
Expected:- First contact on the list is edited to have the name Armin.
- Details of the edited contact displayed to the user.
- Test case:
edit-person x n/Bob(where x is larger than index of the last person)
Expected:- No person is edited.
- Error message detailing the fact an invalid index is provided is displayed to the user.
- Other incorrect edit person commands to try:
edit-person,edit-person n/Bob,edit-person 1 m/Bob
Expected:- No person is edited.
- An error message with relevant details is displayed to the user.
- Prerequisites:
Finding contacts
-
Finding persons while all persons are being shown
- Prerequisites:
- Must be at the home page.
- Multiple persons in Plannit.
- Test case:
find-person Alex
Expected:- Person list is updated with persons whose names start with
Alex(case-insensitive). - Number of persons listed shown in the status message.
- Person list is updated with persons whose names start with
- Test case:
find-person Dummy
Assumption: There are no persons whose names start withDummyin Plannit.
Expected:- Person list is updated with an empty list
- Number of persons listed shown in the status message.
- Test case:
find-person
Expected:- Person list remains the same.
- Command box remains the same.
- Error details shown in the status message.
- Prerequisites:
-
Finding persons while not all persons are being shown
- Prerequisites:
- Must be at the home page.
- Multiple persons in Plannit.
- Test case:
find-person Bernice
Assumption: PersonBerniceis not in the current person list
Expected:- Person list is updated with persons whose names start with
Bernice(case-insensitive). - Number of persons listed shown in the status message.
- Person list is updated with persons whose names start with
- Prerequisites:
-
Finding persons while not at home page
- Prerequisites:
- Must not be at the home page.
- Test case:
find-person Bernice
Expected:- Person list remains the same.
- Command box remains the same.
- Error details shown in the status message.
- Prerequisites:
Listing all contacts
-
Listing persons while not all persons are shown
- Prerequisites:
- Must be at the home page.
- Multiple persons in Plannit.
- Test case:
list-person
Expected:- Person list is updated to show all persons.
- Success message is shown in the status message.
- Test case:
list-person 12345
Expected:- Same as the previous.
- Prerequisites:
-
Listing all persons while not at home page
- Prerequisites:
- Must not be at the home page.
- Test case:
list-person
Expected:- Person list remains the same.
- Command box remains the same.
- Error details shown in the status message.
- Prerequisites:
Navigating between modules
-
Navigating to a module
- Test case:
goto CS2103T
Expected:- Module list is updated with the module
CS2103T. - Person list is updated with persons associated with
CS2103T. - Task list is expanded to show tasks associated with the module.
- Success message is shown in the status message.
- Module list is updated with the module
-
Test case:
goto CS1234Assumption: Module
CS1234is not in PlannitExpected:
- Module list remains the same.
- Person list remains the same.
- Command box remains the same.
- Error details shown in the status message.
- Test case:
Navigating back home
-
Navigating back to home page
- Test case:
home
Expected:- Module list is updated with all modules.
- Person list is updated with all persons.
- Success message is shown in the status message.
- Test case:
home 1234
Expected:- Same as previous.
- Test case:
Clear data
- Test case:
clear
Expected:- Module list becomes empty and remains empty after restart.
- Person list becomes empty and remains empty after restart.
- Result display shows all data successfully cleared.
Viewing help
- Test case:
help
Expected:- A help screen is shown.
Exiting the program
- Test case:
exit
Expected:- The program closes.
Appendix: Effort
Initial design
Although we described Plannit as a morph of the original AB3, there were substantial unique design decisions to be made. Problems of our target audience were analysed and a comprehensive list of user stories were generated to guide us in deciding the necessary features to include in our application. Fields such as tasks and links were deemed as “must-have” features of modules that we wanted to include in our application. Association between modules and persons was also decided as an important feature to be included, since it would vastly improve the usefulness of the persons list within Plannit.
Implementation
While AB3 only deals with persons, Plannit deals with both modules and persons at the same time. Modules and persons are not exactly independent entities because Plannit allows creating/deleting associations between person and module via the add-person-to-module and delete-person-from-module commands. This association proved highly challenging to implement, as the additional coupling meant that commands involving modules may unintentionally affect the persons. Deletion of persons now also involved the modification of modules. Our team eventually overcame this after extensive modifications to AB3 code, as well as rigorous testing to weed out any potential unintended behaviours.
We also added the concept of having a home page, where detailed information of modules are hidden. This was introduced with the aim to reduce clutter by only displaying the relevant information required by the user. This functionality introduced a whole host of obstacles for us, including, but not limited to:
- Behavioural decisions regarding whether a command can be executed away from the home page.
- Behavioural decisions regarding whether a command redirects the user back to the home page.
- Creating an observable
Booleanvariable inModelfor theUicomponents to listen to. - Relevant
Uimodifications. - Manual testing to ensure the navigation to and from the home page is as expected.
Although the general colour scheme of the GUI was not modified, changes were still necessary to allow the application’s window to now display all the additional features to users (e.g. modules, tasks, links, etc.).
Project Achievements
As a team, we have successfully morphed Plannit from AB3. Plannit is an all-in-one application that streamlines the execution of module deliverables by empowering NUS students with the ability to manage tasks, links and module-mates (i.e. students in the same module) to increase their productivity.
Some statistics of Plannit project include (as of 5th November 2022, 21:31:50 UTC+8):
- 12th in most lines of code written (including but not limited to documentation code, functional code and test code)
- 5000+ lines of functional code (on top of AB3)
- 7000+ lines of test code (on top of AB3)
- One of the teams with the most review comments (>450)
- Code coverage exceeding 78%